 Qtractor An Audio/MIDI multi-track sequencer
Copyright © 2012 Seth Kenlon
Permission is granted to copy, distribute and/or modify this document under the terms of the GNU Free Documentation License, Version 1.3 or any later version published by the Free Software Foundation; with no Invariant Sections, no Front-Cover Texts, and no Back-Cover Texts. A copy of the license is included in the section entitled Appendix A, GNU Free Documentation License.
A Guide for audio producers both new and experienced.
Qtractor is a full-featured Digital Audio Workstation (DAW); a multi-track audio and MIDI recorder, editor, and mixer. Qtractor is free open-source software, licensed under the GPL, being developed by renowned programmer Rui Nuno Capela.
The functionality of Qtractor is contained within a graphical desktop environment that will be familiar to users of other popular multi-track recording / editing applications on any computer operating system, and follows the same design principles with many of the same or similar elements. In addition to recording digital audio and MIDI, Qtractor provides an environment for multi-track cliporiented composing techniques common in modern music-making and aims to be intuitive and easy to use, yet powerful enough for the serious recording enthusiast.
Qtractor is not what is known as a “tracker” type of audio/MIDI application, although it has the potential to function in that way if needed.
When used merely as an audio and / or MIDI recorder (a MIDI recorder was historically called a “sequencer”) or arranger, Qtractor is non-destructive, which means that the underlying files that contain the audio or MIDI data are not altered when those files are apparently cut into pieces, duplicated, pulled or pasted into a different order in time, or manipulated in any number of ways within the main Window (GUI interface) of Qtractor.
However, when used as an audio or MIDI recorder, for example, or when editing previously recorded MIDI data in the dedicated MIDI editor, Qtractor’s actions can be destructive in the sense that newly recorded data (or altered MIDI data) replaces previously recorded data on the same track.
Qtractor’s target platform is Linux, using the ALSA (Advanced Linux Sound Architecture) and JACK (the Jack Audio Connection Kit) as the supporting infrastructure for recognizing sources of digital audio and MIDI (Musical Instrument Digital Interface) data, communicating with those sources and routing the data to and from various locations and programs (applications, including Qtractor) both inside and outside the computer and involving both software and hardware interfaces. Suggestions of technical requirements for Qtractor are:
PC running a distribution of the GNU+Linux operating system with a Kernel of 2.6.38.4 or higher for best Real-Time performance (older kernels require realtime patches from your distribution or from kernel.org) - CPU capable of running reasonably modern software (the better your CPU, the better performance you will see in real time audio effects and synthesis)
A reasonable amount of RAM (an open Qtractor project requires RAM ; the more you have, the more complex your projects can be and the faster they will respond)
A sound card; the basic sound card that shipped with your computer is perfectly acceptable, although if you require simultaneous recording of multiple tracks, a card or audio interface with distinct inputs will be required
Ample harddrive space for samples and audio files used in your projects.
Attitude. Not required, but if you plan on being a rock star, then you should try to develop an rebellious attitude, and resolutely reject mainstream software
GNU/Linux users often cite the “community” as one of the greatest appeals of using their OS. There must be a lot of truth to that, because this book would not exist without the collaboration, hours of troubleshooting, and tech support from everyone in the freenode channels #opensourcemusicians and #oggcastplanet and obviously without Qtractor this manual would not exist, so the greatest thanks goes to Rui Nuno Capela, for the application that has enabled and inspired me and many other musicians all over the world to get those pesky tunes that pop into our heads down into actual sound waves that other people can hear, too.
The Qtractor project welcomes all collaboration and review from the Linux audio developer and user community in particular, and the public in general.
See qtractor.sourceforge.net for contact information.
The docbook sources for this user manual are available via git from gitorious.org/slackermedia.
Installing Qtractor can be done in two ways : from your distribution’s software repository, or by building from source code. For most users, installing from your distribution’s repositories is the right choice, as it offers the easiest install and ensures timely and reliable updates.
To install software from your distribution’s repository, open the software installer for your distribution (often called Add/Remove Software or sometimes a Software Store). Search for Qtractor, and mark it for installation and proceed; there is no need to intall additional packages since the installer will automatically install any software required for Qtractor to run.
If you absolutely require the latest features in a just-released or not-yet released version of Qtractor, or you simply prefer to build your programs manually, you may build Qtractor from source code. In order to build from source, you must have a build environment, and the essential dependencies that Qtractor requires. Depending on your distribution, the names of the installable build tools will vary, but the software components themselves are:
g++ - the GNU C++ Compiler
gcc - the GNU C Compiler; not strictly required in this case, but good to have in a build environment, and in some distributions this may bring in other useful dependencies
Autoconf - Automake - the GNU Makefile generator
Qt4 (core,gui,xml) - C++ class library and tools for cross-platform development and internationalization, available from your distribution’s software repository (be sure to install all “development” components) or directly from digia.com
libsndfile - C library for reading and writing files containing sampled sound, available from your distribution (be sure to install all “development” components) or directly from mega-nerd.com/libsndfile
LADSPA - Linux Audio Developer’s Simple Plugin API; available from you distribution’s repository (be sure to install all “development” components) or from ladspa.org Additional support libraries may be installed to enhance the abilities of Qtractor:
libvorbis - the Ogg Vorbis encoder and decoder by Xiph
libmad - high-quality MPEG audio decoder, available from your repository or from underbit.com/products/mad
libsameplerate - the secret rabbit code, a C library for audio sample rate conversion, available from your distribution’s repository or from mega-nerd.com/libsndfile
librubberband - the Rubber Band Audio Time Stretcher, an audio time-stretching and pitch-shifting library, available from your repository or breakfastquay.com/rubberband
liblo - Lightweight OSC implementation (needed for DSSI GUI support), available from your repository or liblo.sourceforge.net
DSSI - an API for soft synth plugins with custom user interfaces dssi.sourceforge.net
VST-SDK - Steinberg’s Virtual Studio Technology; this SDK permits the use of Linux-native plugins with Qtractor. To install VST-SDK:
Establish a developer account at Steinberg ; confirm the registration, and log in
Download VST 2.4
Unzip the source directory and copy the files to the appropriate
directory; usually /usr/local/include
su -c ’cp vstsdk2.4/pluginterfaces/vst2.x/aeffect*/usr/local/include/’
Stable releases of Qtractor can be downloaded directly from qtractor.sourceforge.net.
If you intend to develop Qtractor then you will want to run “bleeding edge” code. This is not recommended for a production system and should be used only for development purposes ; check out the source code from its CVS repository via anonymous pserver access:
At the command line, checkout the code via SVN :
svn co https://qtractor.svn.sourceforge.net/svnroot/qtractor/trunk qtractor-svnPrepare the configure script in the newly created
qtractor-svn source tree directory :
cd qtractor-svn
make -f Makefile.svn
Build and install.
After downloading Qtractor, decompress and extract the archive :
tar -xf qtractor-0.x.x.tar.gzChange directory into the resulting qtractor directory. Once inside the qtractor directory, the usual building commands apply :
./configure && makeTo see all configuration options before entering the command sequence above, type
./configure --helpAfter typing the configure and make commands and waiting until the program has finished being compiled, become an administrator of your system (using either the sudo or su command to become, temporarily, the root user) and finish the installation by entering:
make installThe executable binary code (in other words, the Qtractor application itself) and associated desktop and icon files are copied to common, standard system locations.
There are some considerations after you have installed Qtractor which may help you optimize your system for its best possible audio performance.
Previous to the Linux Kernel 2.6.38.4, a Real-Time kernel was a must-have component in audio production. Since 2.6.38, new options have developed to provide a seamless audio production experience, depending largely on what your needs are from your system.
If you are not sure whether you’ll need Real-Time, it is safe to assume that you will need either:
A 2.6.38.4 or greater kernel regardless of your expected workload
A realtime (or “low-latency”) kernel if a 2.6.38.4 or better kernel is not conveniently available from your distribution
An optimized realtime kernel if you anticipate live recording and multitracking
To discover what kernel your computer is currently running, look in KInfoCenter (in KDE4) or System Information (in Gnome3).
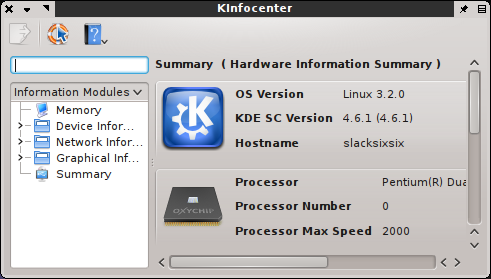
Or simply open a terminal :
uname -rIf your computer is running a kernel previous to 2.6.38.4, then you should either update your kernel, or install a realtime version of your kernel.
To upgrade the Linux kernel, use your distribution’s repository, searching for the terms realtime or rt. If your distribution does not have repositories, or realtime kernels, then you can of course download the source code and compile the kernel yourself. The same guiding principles apply; as long as you are building 2.6.38.4 or above, then a simple make oldconfig will render a modestly pre-emptive kernel suitable for near-realtime use. For extreme low-latency, apply realtime patches, available from kernel.org/pub/linux/kernel/projects/rt.
In order for Qtractor to run, JACK must be running in the background. JACK is a kind of patchbay for Linux (technically a “sound server”), enabling you to route sound in and out of Qtractor and other sound applications.
Some distributions may configure Qtractor such that JACK starts automatically when Qtractor is launched; others may not. If you launch Qtractor from your application menu and receive JACK errors in the message log at the bottom of the Qtractor window, then quit Qtractor and start JACK manually.
The easiest way to start JACK is with QJackCtl (“Q JACK Control”), a control panel and global, synchronized timecode display. If this is not installed, install it from your distribution’s repository or from qjackctl.sourceforge.net If necessary, launch QJackCtl and click the Start button.
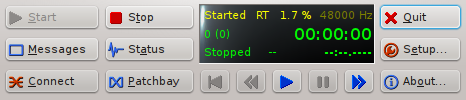
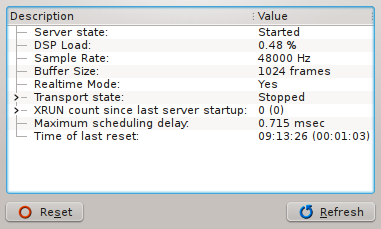
This should instate realtime privileges and begin a global, synchronized timecode clock that will allow Qtractor to use all available inputs and outputs just like a mixing board would in the studio. To view the status of JACK, click the Status button and review the resulting report. JACK should be reported as running, in realtime mode.
If you are experiencing unexpected results with QJackCtl, then here are some things to check:
Click the Setup button to open preferences. Activate Realtime in the left column, and then quit QJackCtl while you configure your system further.
Make sure you have a realtime-capable (ie, 2.6.38.4 or greater,
or an RT-optimized kernel of any variety) kernel installed and that
applications have permission to utilize the realtime mode. On
distributions using PAM, look in /etc/security/limits.conf
and ensure that there is a user group being granted
realtime (or rtprio in PAM terminology)
privileges. If rtprio is being granted to a group, then you
should make sure that you are in that group. For
instance, if the group audio is being granted realtime
privileges then execute
cat /etc/group | grep audio
And look to see that your userinput is listed as a member of the
audio group. If not, execute
usermod -a -G audio youruserinput
as root to add your user to the audio group.
If limits.conf does not exist… Then your system does not use PAM.
If no group is given real time priority, create a group and add yourself to the group. This must be done with root privileges:
groupadd realtime
usermod -a -G realtime yourUserName
Then add realtime priority permissions to the group (and
accordingly any user in that group):
@realtime
@realtime

hard
soft

rtprio
rtprio

20
10Click the Setup button to open preferences. Activate Realtime in the left column, and then restart QJackCtl while you configure your system further.
To enable realtime priority for your user applications, install
set_rlimits from your repository or directly from physics.adelaide.edu.au/~jwoithe
As root, open /etc/set_rlimits.conf.new in your
favourite text editor. Add two lines:
@audio /usr/local/bin/jackd nice=-1 rtprio=80 memlock=100000 @audio /usr/local/bin/qtractor nice=-1 rtprio=80 memlock=100000
Save the file as /etc/set_rlimits.conf
Create a custom launcher so that when you start your realtime
applications, they are started in the syntax
set_rlimits qtractor. In KDE, do this by right-clicking on
the K Menu and edit the launch commands for QJackCtl and Qtractor. In
Gnome, edit as root the .desktop file for the applications
(ie, /usr/share/ applications/qtractor.desktop) such that
the Exec= line executes
set_rlimits qtractor.
Your distribution may not have configured JACK to automatically start upon Qtractor’s launch.
The easiest workaround for this is to launch QJackCtl manually first, and then launch Qtractor.
Diving into Qtractor ; a quick start guide for the basic workflow.
Getting started with basic music production in Qtractor is simple as long as all of the requirements are installed. Review the Installation chapters to ensure you’ve installed all the necessary components before beginning.
As long as you’ve done that, you’ll find Qtractor a robust digital production environment with plenty of knobs and dials to tweak.
Start the QJackCtl application (recommended), or start
jackd from a shell. Once launched, press the Start
button to start JACK.
Launch Qtractor from your applications menu, dock, or launcher.
It’s good practise to start every session by saving. It might seem strange to save an as yet empty session, but it’s better to save an empty session that to start creating your masterpiece and have data files and MIDI files scattered all throughout your hard drive. Saving first is a good way to instantiate an environment in which you can keep all of your files and sounds organized and consolodated.
To save, click the File menu and select Save As.
In the Name field, name your session. For the Directory field, click the directory icon to create a new, empty directory for your session files and click OK.
Save your session by clicking the OK button; a Save Session
dialogue will open so that you can now navigate to the directory you’ve
created and name your session file, which will appear as a
.qtr file. Click the Save button to confirm.
In the Track dialogue, name your track in the Name field. For Type, choose between Audio or MIDI, depending on what kind of data you wish to use in the track. If you have a specific set of inputs and outputs that you wish to use for the track, you can set that here, or you can leave it on the default and manipulate it later as needed.
Likewise, if you know the MIDI bank or patch selections, you can set it here, or leave it as default values and configure it later. Click OK to create the track.
Now that you have an empty track, you should put some sound into it. You can do this in three ways:
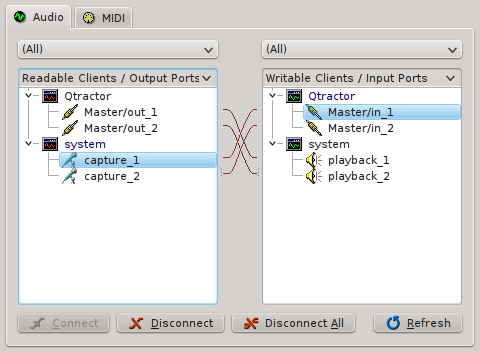
In the left column, choose the source of sound (a device that, from Qtractor’s perspective, is outputting sound, hence the “output” label). Your microphone exists as part of your computer system, so choose the System category, and click a capture device there.
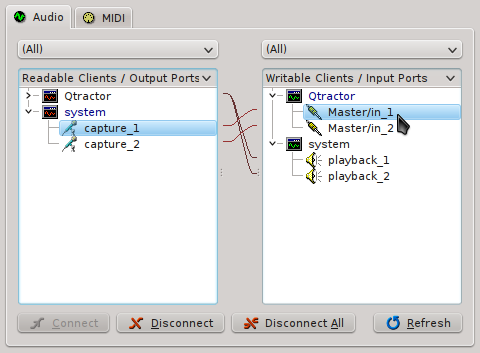
Now choose the sound source’s destination in the right column. You are routing the sound from the microphone into Qtractor, so choose the Qtractor category and select the corresponding input port, such as *Master/in\_1*.
Click the Connect button if they are not already connected. Repeat this process for the right channel, and then close the window.
In the track label on the left of the Qtractor window, click the R button to arm the track for recording.
Click the Record button in the top menu bar to activate recording mode.
Click the Play button in the top menu bar to begin.
Insert an existing audio file into the track - if you’re using pre-recorded material from a live performance, a sound booth session, or a sample or loop collection, then there is no need to set up a recording source such as a microphone or line-in. You’ll simply add files to your Qtractor session and drag them into your workspace.
To add sounds files to your session, go to the Clip menu and select Import.
Choose the file you wish to import, and it will be added into your empty track. Notice that it is also added in the Files panel on the right of the Qtractor window; so to add files without adding them to a track, you can right-click in the Files panel and choose Add Files.
Assuming you are using a USB-based MIDI controller such as the Oxygen or Axiom series, or AKAI LPK series, and so on, then you must first define the source of your MIDI signal. Click the View menu > Windows > Connections to see your central patchbay (ie, QJackCtl).
In the left column, choose the source of your MIDI signal (a device that, from Qtractor’s perspective, is outputting the signal, hence the “output” label). Your USB controller should be listed as a source, so open its listing and click the MIDI channel listed there.
Now choose the MIDI signal’s destination in the right column. You are routing the sound from your hardware controller to Qtractor, so choose the Qtractor category and select the corresponding input port, such as 0:Master.
Click the Connect button if they are not already connected. Close the window.
If you start playing now, you’ll be sending MIDI data without hearing any feedback whatsoever, because you have not yet configured the MIDI signal to trigger sound. So that you can hear what you’re playing, you must insert a plugin synthesizer into the track.
With your destination track selected, click on the Track menu and select Track Properties.
In the Track dialogue, click the Plugins tab. In the Plugins tab, click the Add button on the right to see a list of available sotware plugins. In the Plugins dialogue, select the type of plugin you wish to use with the top right button.
Software synths on Linux are usually of the DSSI variety; from the list of DSSI synths, select the one you want to play and click the Activate checkbox in the lower left corner.
Click the OK button in the bottom right corner of the window to proceed.
If you don’t have any plugins installed, you can install them from your distribution or directly from their project websites.
One of the best soft synths for immediate gratification is whySynth, which bundles some nice, ready-to-use patches. You will need to restart Qtractor in order for your new soft synths to be available.
Back in the Track dialogue, select the Track tab again. In the MIDI/Instrument panel, choose an instrument from the top dropdown menu; using WhySynth as an example, you would select **WhySynth\_20100922 DSSI plugin**.
Choose a Bank and Program. If you’re not familiar with WhySynth, you can select any of its three Banks and any of the Programs contained in them. You should be able to instantly audition the sounds on your USB controller.
When you’ve selected the sound you’d like to use, click the OK button.
In the track label on the left of the Qtractor window, click the R button to arm the track for recording.
Click the Record button in the top menu bar to activate Recording mode.
Click the Play button in the top menu bar to begin.
Insert existing MIDI data into the track - if you want to use pre-made MIDI files then simply add the files to your Qtractor session.
To add MIDI files to files to your session, go to the Track menu and select Import Tracks > MIDI.
Choose the file you wish to import, and it will be added into a new track. Notice that it is also added in the Files panel on the right of the Qtractor window; so to add files without immediately adding them to your workspace, right-click in the MIDI tab of the Files panel and choose Add Files.
The MIDI file you import may or may not have generic MIDI instrument assignments. Either way, you can always adjust the MIDI instrument assigned to that track via the Track Properties dialogue, as you would for a track into which you’re recording MIDI.
You know how to create tracks and insert sound either in the form of audio files or MIDI data. In addition to putting sound into tracks, Qtractor can pipe tracks through filters and effects. The most popular format for sound filters and effect units in Linux is LADSPA, providing the free equivalent to VST, RTAS, or AU. The two ubiquitous Linux plugin packs are the Steve Harris LADSPA Plugins and the CALF Plugins, which should be availble from your repository or from their respective websites.
If you have not installed them yet, install them now and then re-launch Qtractor so that it will detect them as available filters. Effects occur upon the sound itself, so they can be applied to Audio tracks as well as MIDI tracks. To place an effect on a track:
Select the track you want to pipe through an effect and select it by clicking the track label on the left of the Qtractor workspace.
Click on the Track menu and select Track Properties.
In the Track dialogue, click on the Plugins tab.
Click the Add button on the right of the window.
In the Plugins dialogue, choose the type of plugin you want to use with the filter button in the top right corner; more than likely, you will be using a LADSPA plugin.
A very common effect, of course, is reverb. Filter the choices from all the LADSPA plugins by typing “verb” into the search bar along the top. You may see one or two results, such as GVerb and Plate Reverb, so choose one of these. Place a tick in the checkbox in the lower left corner of the screen, labeled Activate and click OK.
Should you need to modify the reverb filter, right click on the plugin in the Track window and choose Properties. This will open the control panel for the effect, where you can change the attributes of the effect.
Nearly every aspect of any track can be automated in Qtractor, from the basics like volume and panning, to the very minute like the LFO frequency of a soft synth, or the levels of an effect.
To work on the automation of your tracks:
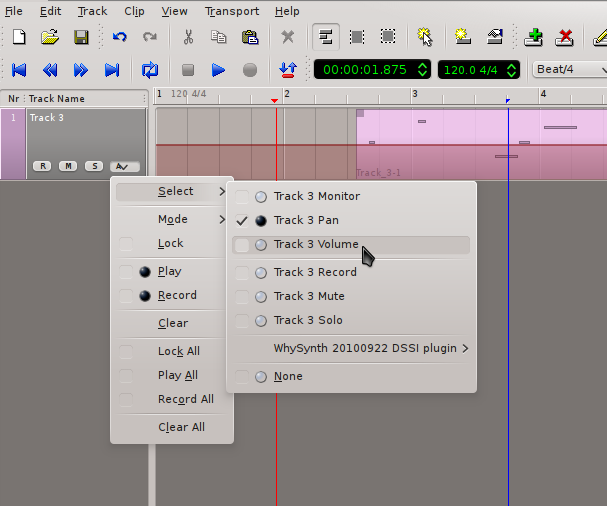
Choose from the popup menu the attribute you wish to automate.
Notice that an overlay appears over your track, representing the normal level of that attribute. To enter automation mode, click the Edit menu > Select Mode > Automation. In this mode, click the automation overlay to adjust levels.
To differentiate different attributes that you’re automating, it can be helpful to modify the colour of the automation overlay. To do this, click the automation button in the track list and choose Mode > Colour and pick a new shade for that automation overlay. To add automation for another attribute, click the automation button again, and navigate to Select to choose the next attribute. The new automation overlay appears in the default colour, and you can now modify its levels.
Leave automation mode by toggling off Edit menu > Select Mode > Automation.
Once you’ve finished your song, you obviously want to export the piece so that people can listen to it without having to have your Qtractor source files. This process is sometimes called “bouncing” a track, or exporting a “mixdown” or simply “exporting” the song.
Since it’s possible to have multiple sources contributing to your final product (external hardware synths feeding sound into Qtrator while soft synths play over pre-recorded audio files to the beat of a Hydrogen drum machine on another virtual desktop, for example) it would make no since to treat the exporting process in the same way as a wave form editor (such as Audacity) would.
Qtractor’s bounce process is literally to play all the sound sources in sync whilst recording what is playing back into Qtractor itself.
Different people deal with bouncing and exporting in different ways, depending on their preference, their creative needs, and the capabilities of their computers. For instance, you could bounce each MIDI track individually to an audio track and then export all audio tracks into one self-contained track.
Or you can simply set Qtractor to record and then play everything back into one audio track, which you then export.
There is no right or wrong way to do it. Either do it all in one go at the end or do it step by step.
Usually the raw power of your computer will be the deciding factor.
To perform the final export of your completed work:
Create a new Audio track: Track > Add Track
Label the track, ie, “Bounce”
Open the Connections window: View > Windows > Connections
In the Connections window, connect the Master/Out of Qtractor to the Master/In of Qtractor, such that the output of all sound managed by Qtractor is being directed to the input of Qtractor for recording.
Be sure to disable any capture device such as microphones or unused line-ins. You’ll be recording all the live sound going into Qtractor, so you don’t want accidental line noise, hums, or room tone.
Click the Punch In/Out button in the top menu bar to limit playback between your markers.
If you do not set in and out points, you will need to stop the recording manually.
Arm your Bounce track for recording. Click the Record button in the top menu bar.
Make sure that your transport (playhead) is at the beginning of your track! When ready, press the Play button in the top menu bar.
Bouncing a track is a realtime process ; do not use your computer while you’re bouncing a track!
When you’ve bounced your song to its own track, save the project! /Solo. the bounce track and listen to the recording for quality assurance, and then you are ready to export that track as a self-contained, distributable file.
To export a single track to disk:
Select the track or tracks you wish to export. If you bounced everything into one track, then it will just be that track, which you can solo using the Solo button on the track controls. If you are exporting a project consisting of only in-project audio, then leave them all activated and continue.
Choose Track > Export Tracks > Audio
In the Export Audio dialogue, choose a location and filename for your file. Choose the range of what will be exported; you can export the entire session, or manually set a Punch In/Out range, or specify the range in timecode, frames, or bars/beats/ticks. If you have multiple output sources, choose the appropriate source (probably your Master Output).
Click the OK button to begin the export.
How to navigate and use the many features of Qtractor for audio production.
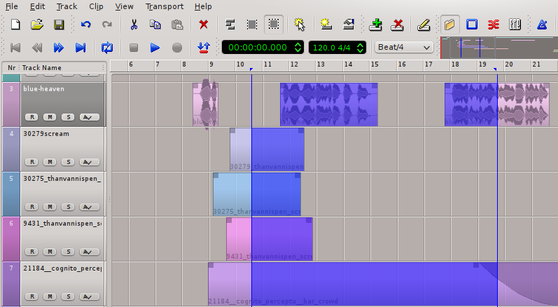
Qtractor’s interface will be familiar to anyone familiar with Digital Audio Workstation software.
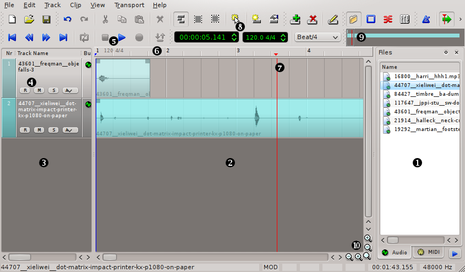
Files - a list of audio and midi files you’ve imported into your Qtractor project
Workspace - a view of the audio or MIDI data contained in each track in your project
Tracks - a list of tracks and some track-specific controls and information
Track controls - titles, bus information, recording and playback toggles, and automation controls for each track in the workspace
Transport controls - rewind, forward, play, pause, record
Timeline - your music workspace’s timeline in bars, measures, and timecode
Transport - the playhead
Timecode and BPM - counter for SMPTE timecode, and the tempo or beats-per-minute setting
Overview - the entire project in one thumbnail view
Zoom - zoom in and zoom out (horizontally and vertically) buttons
The first step in so many pro applications is one that is most overlooked by new users: create and save a new session. Saving a session before actually doing any work in it seems counter-intuitive, but it’s important to save first so that any and all files created or required for your work can be contained in a pre-determined location.
To create a new session in Qtractor:
Launch Qtractor for a fresh new session, otherwise go to the
File menu and select New or use Ctrl+N to
start a fresh session.
Go to the File menu again and select Save As
(or Save if you’ve already been working in the opened session),
or just hit Ctrl+S
In the Session dialogue box, name the session and provide a description as needed. Click the directory button on the right to enter a file chooser dialogue.
In the Session Directory dialogue, create a new folder
in the directory of your choice; for example, you might make a
myGreatSong folder for your session in your
~/music directory.
Click the OK button once you’ve created a directory for your session files.
Click the OK button in the Session dialogue box to proceed
A Save Session window will appear, which is a prompt for
you to save the session file itself into the destination you’ve just
created for it. Navigate to your new folder (in this example,
myGreatSong in the ~/music directory)
Name your session file; by default it will already be named the
same as the name of your session itself, but if you are versioning the
file or have different notation you’d like to use, you can give it a
customized name as well. The extension for Qtractor session files is
.qtr
Click the Save button, and now your Qtractor session is saved in a self-contained, dedicated folder. This helps your project maintain its integrity and increases its portability.
There are four typical scenarios for dealing with sound in Qtractor and, indeed, for most digital audio workstations:
Import existing audio files from your harddrive, a recording device, or a loop collection
Record audio into Qtractor via your computer’s built-in microphone or an external microphone
Import MIDI data
Create MIDI data
All three of these methods of acquiring sound for your work can be, and very often are, combined to produce a richer audio production.
The easiest way to get sound into Qtractor is to import an audio file from your harddrive. Whether you are using sampled loops to construct a new musical piece, or importing a performance transferred from a recording device, importing audio in this way does not involve recording sound directly into Qtractor.
To bring audio into your project file, right-click in the
Files pane and select Add Files or use
Ctrl+F. Choose what file or files you wish to import from
the file chooser window that appears. To place an audio file in a track,
drag and drop it from the Files panel into the workspace. You can add it
to an existing track, or drop it directly into empty workspace and a new
track will be created automatically.
Recording audio into Qtractor requires a microphone and at least one audio input channel. Many laptops and webcams have built-in microphones, so in theory you could use this as an input source, but for best quality, purchase an external microphone and use it as your audio capture device.
For simultaneous multitrack recording, rarely will the soundcard that was bundled with your computer be sufficient. Almost all soundcards embedded on motherboards are set to mixdown the input signals to a stereo mix. If you wish to record three separate musicians at the same time, each to a separate track in Qtractor, you will require a soundcard with separate dedicated inputs.
The way that Linux displays available sound inputs and outputs can be
dauting at first, until you understand the logic behind it. A Linux
system displays sounds devices the same way it displays hard drives and
available network interfaces: the first device (regardless of actual
inputs or outputs available via that device) is labeled
hw0, the next hw1, the next hw2,
and so on.
It is safe to assume that hw0 would be the built-in
sound card on the system; being embedded in the motherboard would
certainly qualify it as the first available sound device.
So, hw0 represents, in almost every case, your built-in
sound card. Hw1 might represent, for instance, a webcam
that you keep plugged into your desktop, and Hw2 could
represent, perhaps, a USB microphone or a USB interface that you’ve
plugged in.
You can usually determine which device is which by looking at the
vendor name associated with the Hw labels; if I have two devices plugged
into my system and one is labeled Blue and the other
H4, then I would know from these terms that one is my Blue
USB microphone and the other my Zoom Studio H4n.
With regards to outputs, these can sometimes be confusing due to the many possible ways you may wish to output your sound. Typically the stereo mix of you system sound is available as the first two output devices.
If you have more than just two speakers and you wish to split your sound to each, then utilize the outputs labeled appropriately (Front, Center, and so on). If the sound input and output labels confuse you, take a few minutes to learn them by playing sound on your computer and plugging speakers into each output on your computer.
For the inputs, plug a microphone into your different inputs and see where they are received and how they are labeled. It won’t take long before you understand the logic behind the labels, and you’ll be able to use Qtractor all the more fluidly.
There are many kinds of microphones, each intended for certain kinds of sounds and situations, but on a purely technical level, without the question of aesthetics and microphone design, there are only about three scenarios you will encounter:
Microphones with an 8th- inch (also called a mini) jack
Microphones with a quarter-inch or XLR jack
Microphones with USB connectors
The recording process is different, depending on your input type.
If your microphone has an 8th-inch jack, then you can plug it directly into the line-in of your computer. No external sound interface is required. Your built-in sound card is JACK’s default input, so no changes are necessary.
If your microphone can easily and cleanly adapted to the standard 8th-inch input with a cable or a simple plug adapter, then you can use this method of recording, as well.
To record from the line-in of your computer into Qtractor:

Go to the Track menu and choose Add Track or use Ctrl+Shift+N. In the Track dialogue box, give the track a name, set the Type to Audio, and set the Input/Output to Master. Click the OK button to proceed.
Arm the new track for recording by clicking the R button in the track listing on the left of the Qtractor window. This sets the destination for the recorded sound.
Click the Record button in the top toolbar
Click the Play button in the top toolbar
If your microphone has a quarter-inch or XLR jack and you choose not to use a plug adapter, then you will need an external sound interface. External interfaces are available from M-Audio, Fostex, Zoom Studio, and others; they serve as an intermediate converter from your input device and the USB port of your computer.
Similarly, a USB microphone plugs directly into the USB port of your computer.
If you input sound through USB, then (obviously) you are utilizing a different interface than your computer’s built-in sound card. This must be set via QJackCtl for appropriate sound routing to occur:
In QJackCtl, stop the sound server by clicking the Stop button
If you have not already plugged in your USB audio interface or USB microphone, then do so. Make sure it’s on.
Click the Setup button. In the Settings tab, locate the Input Device setting and click the > button to see your choices.
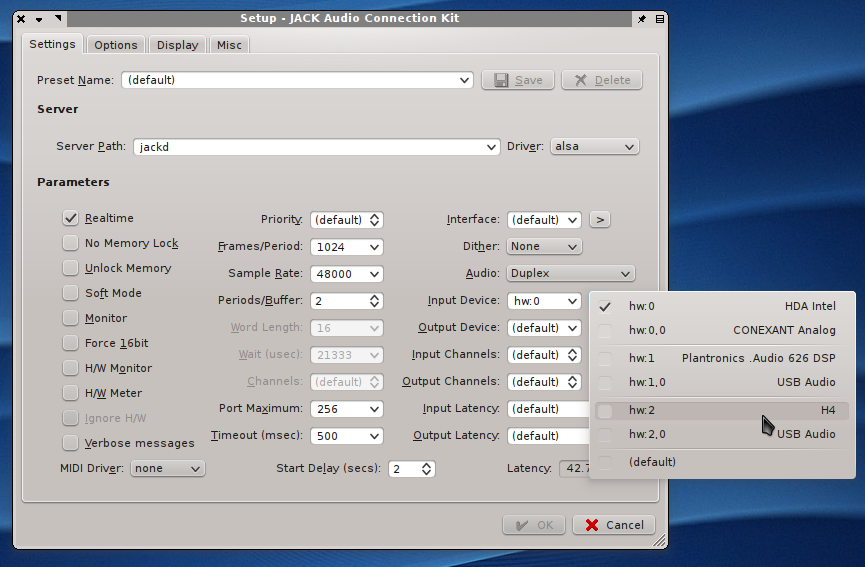
Now your USB interface, whether it is a single USB microphone or a 4-channel Audio-to-USB conversion box, is managing your input sources. Plug your XLR microphone into your USB interface, set the interface’s input source as your XLR jack, and then create a new track in Qtractor and begin the recording:
Go to the Track menu and choose Add Track or use Ctrl+Shift+N. In the Track dialogue box, give the track a name, set the Type to Audio, and set the Input/Output to Master. Click the OK button to proceed.
Arm the new track for recording by clicking the R button in the track listing on the left of the Qtractor window. This sets the destination for the recorded sound.
Click the Record button in the top toolbar
Click the Play button in the top toolbar
MIDI is a versatile format for triggering sounds; it can be used to trigger hardware synths external of your computer, software synths that are applications on your computer, samples, loops, automation functions, and more. There are basically three ways to get MIDI data into your Qtractor session:
Import MIDI data from an existing file
Enter MIDI data into a matrix editor (sometimes called a “piano roll” or “grid view”)
Play in MIDI data via a USB MIDI keyboard controller
Before beginning with MIDI, you should make sure that you have some software synthesizers installed on your system. A popular format for soft synths on Linux is DSSI, which is akin to VST or AU on other platforms. LV2 is also quite popular, although in practice the bulk of LV2 plugins you’ll find are audio effects units (reverbs, tape delays, EQ, and so on).
One of the easiest soft synths is WhySynth; it features enough presets to provide instant gratification, and enough control over the raw sound to become a permanent fixture in your studio. You can install WhySynth from your distribution’s repository or directly from If you’ve just installed soft synths now, then you should relaunch Qtractor so that it will detect the newly available plugins.
Since MIDI data consists of nothing more than digital signals to activate and deactivate sounds at certain times, MIDI files are small and easily distributed online. A simple internet search for MIDI files will result in thousands of MIDI files for nearly any song you can name. Taken alone, the MIDI file is useless. Imported into Qtractor and assigned instruments, the files come to life like a player piano. The MIDI file you import into Qtractor could be from the internet, or it could be a MIDI files you yourself created on any given MIDI input application, or even from data dump from a MIDI-capable hardware synth. In this example, we will use one from the internet:
Download a MIDI file, such as JS Bach ” Invention in c minor, BWV 773 (Canon)” and save it to your hard drive. Preferably, in your Qtractor’s session directory, to keep your project self-contained.
In Qtractor, go to the Track menu and select Import Tracks > MIDI. Alternately, you may click on the MIDI tab of the Files panel on the right of the Qtractor window and right-click or use Ctrl+F to import the MIDI file to your files panel and not automatically add its tracks to your session. If you do this, then you’ll need to manually drag the MIDI file into the workspace in order for the data to appear as tracks.
The MIDI tracks will appear in your Qtractor session, in this example’s case it is even preprogrammed for General MIDI instrumentation. Imported tracks will often have embedded General MIDI instrument assignments. General MIDI was an effort to standardize a set of 128 instruments to provide similar results in playback across all systems.
If you have a soft synth bank compliant with General MIDI, then you can press the Play button in the top toolbar of Qtractor and you will get a good approximation of how the original author of the file wanted the tracks heard.
You can also use the list of Generic MIDI instruments found in the appendices of this book to guide you in the instrumentation of an imported file, making the sound of the tracks truly your own.
To assign instruments to a track:
right-click on the track title and select Track Properties from the contextual menu.
In the Track dialogue box, click on the Plugins tab.
In the Plugins tab, click the Add button on the right to see a list of available sotware plugins.
In the Plugins dialogue, select the type of plugin you wish to use with the top right button. Software synths on Linux are usually of the DSSI variety; from the list of DSSI synths, select the one you want to play and click the Activate checkbox in the lower left corner.
Click the OK button in the bottom right corner of the window to proceed.
Back in the Track dialogue, select the Track tab again. In the MIDI/Instrument panel, choose an instrument from the top dropdown menu; using WhySynth as an example, you would select WhySynth\_20100922 DSSI plugin.
Choose a Bank and Program. If you’re not familiar with WhySynth, you can select any of its three Banks and any of the Programs contained in them. You should be able to instantly audition the sounds on a USB controller.
When you’ve selected the sound you’d like to use, click the OK button. Repeat these steps for each track to wish you want to assign an instrument, incrementing the MIDI channel you use for each new instrument you assign. Press the play button in the top menu bar to hear the MIDI file play.
Note that you must increment the MIDI channel used, or keypresses on your MIDI controller will be using the same MIDI channel to trigger different sounds. In otherwords, if Track 1 and Track 2 are both using MIDI Channel 1, then a note played on Track 2 will also trigger the instrument assigned to Track 1.
A MIDI controller is a piece of hardware to help you play the software-based synthesizers in your computer. Typically, a MIDI controller is a piano keyboard with a few octaves and no built-in sounds of its own. It usually plugs into the USB port of your computer and, once configured, will pass on any key press to Qtractor, allowing you to play a software synth in realtime as well as record the keypresses themselves.
MIDI and USB are two technologies that, fortunately, have been kept universal enough that you almost don’t need to question whether any given USB MIDI controller will work with your system. There are perfectly capable USB MIDI controllers being offered from vendors like Akai, Roland/Edirol, gidesign/M-Audio, and many others. If you require realistic, weighted keys with high resolution touch-sensitivity then look at the upper price-range of controllers and go to a music store to audition them.
If all your require are a few octaves of piano keys so that you can get a tune into the computer quickly and easily, then the basic controllers will be enough.
To use your USB controller to input MIDI data:
Plug in the USB MIDI controller to your computer
Launch QJackCtl and start it
Launch Qtractor and click on the View menu, and select Connections from the Windows category
In the Connections window, click on the MIDI tab. Listed on the Readable Clients / Output Ports column, find your USB controller device. Open its category to see the available outputs.
If you do not see your USB controller listed in the left column, check to ensure that your controller is powered on (some require external power, others are powered by the USB port), and check the cable connection. If you still cannot see the device in the left column, make sure your computer sees the controller by checking dmesg | tail. If your computer registers the device but you are not seeing it in Connections, try restarting both QJackCtl and Qtractor.
To assign instruments to a track
Right-click on the track title and select Track Properties from the contextual menu.
In the Track dialogue box, click on the Plugins tab.
In the Plugins tab, click the Add button on the right to see a list of available sotware plugins.
In the Plugins dialogue, select the type of plugin you wish to use with the top right button.
Software synths on Linux are usually of the DSSI variety; from the list of DSSI synths, select the one you want to play and click the Activate checkbox in the lower left corner.
Click the OK button in the bottom right corner of the window to proceed.
Back in the Track dialogue, select the Track tab again. In the MIDI/Instrument panel, choose an instrument from the top dropdown menu; using WhySynth as an example, you would select WhySynth\_20100922 DSSI plugin.
Choose a Bank and Program. If you’re not familiar with WhySynth, you can select any of its three Banks and any of the Programs contained in them. You should be able to instantly audition the sounds on a USB controller.
When you’ve selected the sound you’d like to use, click the OK button. Now that you’ve create an empty track and assigned it a soft synth, you can record MIDI data:
Create an empty clip in your destination track by choosing New from the Clip menu, or by clicking the New Clip button in the top toolbar
In the Session window, type in a name for your MIDI clip, choose the Directory into which you want to save the clip, and provide a description for yourself as needed. Click the OK button when finished.
Unlike pre-recorded loops or sounds, which already exist on your harddrive, a new MIDI clip doesn’t yet have a home. Some music programs bundle your MIDI data into your project file, which can make it difficult to share one MIDI loop between projects. But Qtractor saves all MIDI tracks as independent files, meaning you can easily re-use them.
Arm your track for recording by clicking the R button in the track control
Click the Record button in the top menu bar to prepare the track for recording. Click the Play button to start the transport recording
Every key press you make on your USB controller will be recorded in realtime. Depending on the feature set of your controller, velocity, pitch, and other data may also be recorded
If you have no USB MIDI controller, you can still create MIDI data using Qtractor’s MIDI Editor (sometimes called a “matrix editor” or “piano roll” in other music programs). This enables you to mark on a grid when a note should be triggered, how long it should be sustained, and at what velocity it should be played.
Broadly speaking, the steps are:
Create a destination Track
Create a MIDI Clip
Enter the data in the MIDI editor
To create a new track select Add Track from the Track menu, or click the New Track button in the top toolbar.
To assign instruments to a track
Right-click on the track title and select Track Properties from the contextual menu.
In the Track dialogue box, click on the Plugins tab.
In the Plugins tab, click the Add button on the right to see a list of available sotware plugins.
In the Plugins dialogue, select the type of plugin you wish to use with the top right button. Software synths on Linux are usually of the DSSI variety; from the list of DSSI synths, select the one you want to play and click the Activate checkbox in the lower left corner.
Click the OK button in the bottom right corner of the window to proceed.
Back in the Track dialogue, select the Track tab again. In the MIDI/Instrument panel, choose an instrument from the top dropdown menu; using WhySynth as an example, you would select WhySynth\_20100922 DSSI plugin.
Choose a Bank and Program. If you’re not familiar with WhySynth, you can select any of its three Banks and any of the Programs contained in them. You should be able to instantly audition the sounds on a USB controller.
When you’ve selected the sound you’d like to use, click the OK button. Now that you’ve create an empty track and assigned it a soft synth, you can input MIDI data:
Create an empty clip in your destination track by choosing New from the Clip menu, or by clicking the New Clip button in the top toolbar
In the Session window, type in a name for your MIDI clip, choose the Directory into which you want to save the clip, and provide a description for yourself as needed. Click the OK button when finished.
Unlike pre-recorded loops or sounds, which already exist on your harddrive, a new MIDI clip doesn’t yet have a home. Some music programs bundle your MIDI data into your project file, which can make it difficult to share one MIDI loop between projects. But Qtractor saves all MIDI tracks as independent files, meaning you can easily re-use them.
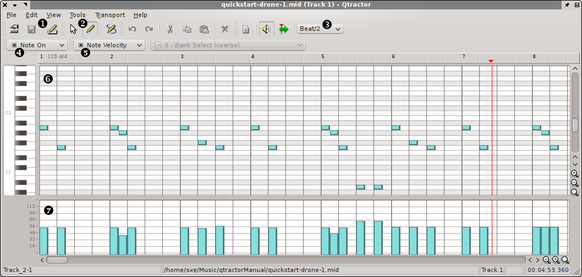
Properties of the MIDI Editor workspace, Save, and Track Properties
Arrow - to move notes, increase and decrease note length, and selecting Pen (Edit On) - to draw note into the grid Edit Draw - dynamically draw multiple notes with a click-and-drag of the mouse
Snap/Beat menu - determines the resolution of drawing and editing notes. In a 4/4 project, for instance, a setting of Beat/2 would cause a pen tool click to produce an eighth note, while Beat would produce a quarter note, and so on. Regardless of the default note length, a note block can be extended by clicking and dragging the border of the note to increase (or decrease) its length. The resolution of changes to the length of a note is also determined by the Snap/Beat menu.
Notes Type setting indicates that the notes you draw in the grid represent the length of the note. The Key Press setting indicates that the notes you draw in the grid represents a MIDI event without a defined duration, such as triggering an external MIDI sequence to begin playing.
The Value menu lets you control note velocity, program changes, pitch bending, and other extra MIDI data.
The main editor grid represents the notes being played. Use the pen tool to draw notes into the grid according to the keyboard on the left of the window. Whether you are drawing in notes or only key presses can be controlled by the Notes Type menu.
The value grid controls extra MIDI data, such as velocity, program changes, pitch bends, and so on. The data represented here will change according to the Value menu setting. The MIDI Editor can be invoked either for raw entry or to modify existing MIDI data that you’ve either
imported or played into Qtractor.
In addition to input and editing tools, the MIDI Editor features functions to make it easy to modify your composition, such as Quantization, Transposition, Timeshifting, and more.
To access these features, use the Tools menu in the MIDI Editor window. If no notes are selected, then the Tools will be unavailable; select a note or block of notes with the arrow tool to make them available.
Quantize - allows you to automatically structure notes in stricter uniformity with your time signature. This is especially helpful if you’ve played the notes in and were not perfectly on the beat. You can quantize notes such that the notes occur on the beat (or one 16ths of the beat, or 8ths, or so on), such that the duration of notes are extended to be on the beat (or divisions thereof), such that notes play with some degree of “swing”, and even such that the notes played match a specific scale from Minor to Major to the extremely obscure.
Transpose - moves the block of selected notes up or down some number of steps.
Normalize - adjusts note velocity by either a percentage or an absolute value. A percentage value will adjust the velocity of the notes equally by the percent given in relation to the original velocity, while an absolute value adjusts velociy of each note to that value regardless of original velocity.
Randomize - provides random changes to the Note, Time, Duration, or velocity (Value). Adjust how extreme the changes will be with percent values.
Resize - allows you to control the duration of notes to any number of beats (or divisions thereof), or the Velocity to any value.
Rescale - changes the selected notes by some percentage; you may alter the time that the notes are triggered, the duration for which they sound, and the velocity at which they are played.
Timeshift - alters the timing of the selected notes on a curve, such that the acceleration from the beginning note to the ending note is either increased or decreased.
In order for Qtractor to know how to accelerate the timing of the notes, you must define a range of time for the acceleration to occur. Do this with the head and tail markers (the blue markers in the timeline above the MIDI Editor gride). Mark the out point (tail) of your range by clicking on the timeline, and then set the in point (head) of the time range by clicking somewhere to the left of the original marker. Once the range is defined, select the notes you wish to timeshift with the arrow tool. Open the Tools menu and select Timeshift. Use the slider to either cause an acceleration in your selected notes over the course of the defined time range, or a deceleration, and then click OK to commit the change.
The View menu provides cutomization for how the MIDI Editor is laid and how the notes are presented to you. The default layout is clean and pleasingly minimalist, but take a look at some of the other options to see what works best for you:
Menubar - turns off the top menu bar; use
Control+m to toggle it on or off.
Statusbar - turns off the status bar at the bottom of the window.
Toolbars - defines what icon toolbar is visible at the top of the window; choose from File (file opening and saving icons), Edit (cut, paste, undo), View (preview modes, snapping quantization), Transport (fast forward, rewind), and Scale (key signature and scale information).
Windows - toggles on or off event information, a panel which will provide detailed information on each MIDI event in the MIDI Editor grid
Tool Tips - toggles whether tool tips are visible
Note Duration - defines whether the note’s duration is reflected in the length of the velocity bars at the bottom of the grid
Note Color - assigns differing colours to each note; if this is not active, all notes appear as one colour.
Value Color - assigns the colours of the corresponding notes to the velocity bars; helpful when you have many overlapping notes but want to adjust their velocities.
Zoom - zoom in or out on the grid.
Snap - define what division of the beat your notes snap to, or turn snapping off entirely.
Scale - change the key signature or type of scale being used.
Refresh - for the MIDI Editor to redraw in the event of latent images.
Preview Notes - turn on or off whether you hear the notes of the scale as you input or move notes along the grid.
Follow Playhead - define whether the MIDI Editor grid scrolls with the playhead when you are playing the track.
Qtractor’s preferences can be accessed via the View menu, via the Options selection. The options are divided into tabs:
General - contains options for overall preferences, such as file formats of project files, behaviour of windows and confirmation requests, and the transport
Audio - determines how Qtractor stores newly recorded audio (ie, microphone or line inputs, as well as re-routed sound within its own mixer), and whether an audible metronome is used
MIDI - controls how MIDI data is stored, captured, and what defaults it uses for quantization, playback, and metronome
Display - controls whether your timeline uses timecode, frames, or beats, some default colours and fonts, and where log files are stored
Plugins - the paths to folders containing your plugins. An empty list is OK, since Qtractor defaults to the typical locations such as usr/lib and so on, but if you have customized your system heavily then you may need to specify the locations of your synths, effects, and plugins here.
Strictly speaking, soft synths are not a part of Qtractor. However, it is common to use soft synths within Qtractor. Acquiring free software synthesizers online is a simple matter of locating them online at sourceforge.net, ccrma.stanford.edu, your distribution’s repository, or the project’s homepages directly.
Software synths for GNU Linux come in a few varieties:
Independent synth applications that launch separately from Qtractor but that plug into JACK so that the synths can be used as sound sources within Qtractor. One such example is Qsynth, written by the same programmer as QJackCtl and Qtractor.
DSSI Plugins which are launched and controlled entirely from within Qtractor
LV2 Plugins which are launched and controlled entirely from within Qtractor
VST Plugins; the format from Steinberg does in fact support Linux technically but the number of Linux-native VST synths are few
Installing any soft synth, whether it is a plugin or stand-alone application, is done through your distribution’s package manager (yum, apt, slackbuilds, pacman, emerge, ports, and so on) or from the installers on the project’s website. Once the synth is installed, you may launch it and try it out; if it’s a stand-alone application, then it can be launched like any other application on your system.
If it’s a plugin for Qtractor, then launch Qtractor and create a new MIDI track, choosing your new soft synth as the MIDI Instrument as described in Chapter Managing MIDI Tracks To verify that Qtractor knows where all of your soft synth plugins are located, open the View menu and select Options and choose the Plugins tab in the Options window.
In the Plugins tab, define any non-standard paths to DSSI, LADSPA, LV2, or VST plugins on your system by selecting the type of plugin from the dropdown menu on the left and then adding the path with the Add button on the right. When finished, click the OK button to save your changes.
Using soft synths as DSSI or LV2 plugins is probably the easiest model, as it does not require any additional routing of sounds through JACK. The synth is integrated into Qtractor’s interface, the sound is directed to the appropriate track, and the fact that you are using a separate application is almost entirely abstracted away from you.
From the Chapter Managing MIDI Tracks, you already know how to create a MIDI track and assign a synthesizer plugin to that track. Most soft synths, however, have some level of control over the sounds they produce, which you can access by editing the properties of the synthesizer:
Open the View menu > Windows and select Mixer.
The Mixer window shows all available tracks; on the far left are the Master Inputs and on the far right are the Master Outputs; in the middle are the tracks in your project’s workspace. In the top plugin list of your track, right click on the soft synth currently associated with the track and choose Properties from the contextual menu.
In the window that appears, notice the three buttons in the top right corner:
Params toggles the view of available attributes you can modify (such as oscillators, resonance, envelopes, and so on)
Edit toggles whether the plugin is editable
An active plugin is “on” and will play sounds when receiving MIDI signals. If a plugin is not active, it will not produce (or affect, if it’s an effect unit plugin) sound if you do not see editable parameters in the synthesizer window, click the Params button.
Change the parameters you wish to change using the controls the soft synth provides. If you create a patch that you want to save, type a name into the Preset Name field in the upper left corner and click the Save button and your settings will be added as a Preset in the Preset dropdown menu.
Whether you use DSSI, LV2, or VST plugins, the process for using a soft synth or effect is the same. All parameters provided by the soft synth’s interface can also be automated such that attributes like LFO or resonance can be programmed to change over time during playback. For more information on automation, see the Chapter Automation.
The other kind of software synth you might use in your Qtractor workflow are stand-alone synthesizers such as Qsynth and amSynth. Installing these stand-alone synths from your distribution’s repository or from the projects’ websites. Launch QJackCtl first, and then launch the software synths the same as you would any other application on your system.
Keep in mind that if your distribution requires you to set your own realtime permissions, you will want to add the stand-alone software synths to your RT list.
Once you’ve launched your software synth, it will become a source for sound and a destination for MIDI signals in the Qtractor. Verify that your settings are correct:
Select the View menu in Windows > Connections
In the Audio tab appear all possible sources of sound. If you have launched QSynth or amSynth, for example, they would be listed in the left column. Also listed will be Qtractor itself, since it also produces sound, and your computer’s sound input (labeled as System > capture) In the right column are the sound destinations available. At the very least, you should see Qtractor’s Master In and your computer speakers (labeled as System > playback) By default, the sound from Qtractor Master Out is patched to System playback so that you can hear, from your speakers, everything that Qtractor’s mixer manages.
This is where the logic of audio engineering as well as the workings of your own studio setup should be considered. The sound produced from your stand-alone synth can logically be patched into either:
Qtractor Master In so that the sound produced by the synthesizer can be recorded back into an empty audio track in Qtractor
If you’re not sure what kind of setup you have, then choose this method.
System playback if you have an external mixer or recording device that will be recording the audio being produced by the MIDI-driven synths.
To patch the sound from the synth to its destination, click the left channel of the synth output, and then the left destination channel, and click the Connect button. Repeat this for the right channel if stereo is required.
This takes care of routing the sound; now you must route the MIDI signals controlling the synthesizer. As with the routing of sound, there is no “right” way to route the MIDI signal; you must be somewhat familiar with the equipment and workflow you are implementing and decide for yourself how you want it to all work together.
As with audio routing, there are many ways to design your production process:
If you are not sure about what you want, this is probably the method to use.
This method does not record any MIDI data.
To patch the MIDI signal from the source to its destination
Click the MIDI source in the left column
Then the destination in the right column
Click the Connect button
Repeat this for all MIDI signals that need routing
If you’re not sure what signals need routing, then you probably need to route Qtractor to your synth. If you are using a USB MIDI controller then you also need to route your controller to Qtractor.
All signals have been patched now, so playing MIDI into Qtractor should cause your external synthesizer to sound.
If you have had limited experience with MIDI, it’s important to have a basic understanding of how MIDI talks to the devices it controls.
MIDI was originally developed for hardware, with the only software involved being MIDI sequencers, which were as frequently embedded systems as they were traditional software applications like the modern DAW’s we are used to today.
MIDI signals are divided into channels; each channel is a discreet signal that can be directed to a specific device or a number of devices. If you generate a MIDI signal on MIDI Channel 1 and send that signal to a group of synthesizers, then any synthesizer programmed to play a note on either MIDI Channel 1 or MIDI Channel Omni will play. Any synthesizer programmed to respond to MIDI Channel 2 through 128 will not play.
Most musicians had more than one synthesizer, so the problem became how to get MIDI data from one controlling device (the sequencer; either a dedicated piece of hardware or a software running on a Personal Computer) to more than one synth. The answer was to daisy chain the synthesizers together, so that each synth could receive MIDI data pertinent to it as well as MIDI data for the next synthesizer in the chain.
Therefore, any MIDI-capable synth could have:
MIDI IN used to receive playable MIDI data
MIDI THRU to receive MIDI data to pass along to the next synth in line
MIDI OUT to send MIDI signals from MIDI THRU (or its own internal sequencer) to other devices Modern digital audio workstations don’t necessarily have this problem, since many musicians are making music with no hardware synthesizer whatever.
MIDI is generated by the sequencer (Qtractor in this case) and is passed to each software synthesizer over virtual MIDI ports.
A virtual MIDI THRU port is nevertheless available, so in the event that you do require MIDI data in a passthrough configuration, you can use the MIDI THRU port in QJackCtl, via the Connections window in Qtractor The concept of MIDI channels are also equally relevant even without hardware.
If you set up QSynth to generate a bassline for your piece on MIDI channel 1, and WhySynth to play the melody, then you must not set WhySynth to use Channel 1, or else all notes being triggered on QSynth will also be triggered on WhySynth because they are being triggered by the same MIDI Channel.
With 128 channels to use, you are free to use 128 soft synths, but unless you are seeking unison, each should have a distinct MIDI Channel.
You can set the MIDI Channel in the Track Properties of each of your Qtractor tracks.
If a synthesizer has a built-in sequencer, then the only MIDI signals that need to be sent to that device are START and STOP. This is common in external drum machines, which inherently manage their own sequencing so that you can create drumbeats and loops on them using a fairly familiar interface (familiar as long as you’ve used drum machines, anyway).
On the software side, Hydrogen is a good example. Hydrogen is a self-contained drum machine for Linux which allows the user to create custom patch sets and which does all of its own sequencing.
Therefore, if you were to use Hydrogen as a stand-alone drum machine, you wouldn’t sequence your drum tracks in Qtractor’s MIDI editor, but in Hydrogen’s sequencer. Since Hydrogen is JACK-aware, sending a START signal to Hydrogen to start the sequence playing and a STOP signal when the song is finished, is all that Qtractor will do; the clock and syncronization of the drum beats with the rest of the sequence is handled by JACK just as it would have been on hardware synthesizers via a MIDI clock.
Editing audio in Qtractor is done directly in the workspace, with a small set of powerful tools. There are three types of audio within the Qtractor workspace:
Audio files - the representation of the actual audio file on your harddrive, which is being referenced by Qtractor because you imported it into your project. It may or may not be actually used in the project yet, but it you have linked to it and so it will appear in the Files panel.
Track - the representation of a mixable channel in Qtractor’s workspace. It may or may not have audio in it, but it is a bus which can hold audio, effects (or, technically, MIDI data, but that hardly applies in a chapter on audio editing).
Clip - a piece or the whole of an audio file, as it appears in your Qtractor project. Audio clips are always contained in an audio track. You can edit and effect the latter two; the first (the audio file itself) is merely referenced in Qtractor and cannot be directly manipulated by any of Qtractor’s tools. In fact, it should be noted that Qtractor, like most other digital audio workstations, is not a waveform editor; for cosmetic corrections such as removing pops or blown-out plosives, or removing lip smacks or dampening roomtone, you should use a waveform editor such as Audacity.
Cleaning your source sound is frequently one of the first tasks you’ll do, so ideally your sound will be sanitized before ever reaching Qtractor. However, in the event that you have imported audio and started working and then you decide that something needs some detail work, you can export just the clip that requires cleaning from Qtractor, clean it, and then re-import it. To export a clip of a sound file for cleaning outside of Qtractor:
Right-click on the clip in its track and select Clip > Export from the contextual menu.
Edit the exported clip in a waveform editor such as Audacity and save export your changes.
Import the modified clip back into Qtractor and move it into place over the previous clip.
Outside of cleaning the sound of an audio clip, there are plenty of modifications you can do to the audio clips you record or import into Qtractor, such as splitting, punching-in, looping, and more.
You mouse cursor has four selection modes. Its default mode is Clip select, which allows you to click and drag clips within and between tracks. The precision with which you can move clips back and forward in time is determined by snapping. To deactivate or change snapping, click the View menu and select Snapping to choose the resolution you want to use when moving clips; you can move clips by beats, quarter notes, sixteenth notes, and so on, or none to deactivate snapping.
Also in clip mode, you can split audio clips nondestructively. To split a clip:
Position the playhead in the timecode bar at the top of the Qtractor workspace to the position at which you’d like to split your audio clip
Click the clip you want to split so that it is selected
Click the Clip menu and choose Split
The clip has now been split at the position of the playhead.
Since Qtractor never affects the original audio file it is referencing, any split you make to an audio clip is reversible. The easiest way to undo a clip (aside from using Edit > Undo) is to extend the clip. To extend a clip, click on the edge of the clip with your selection arrow and click and pull the edge to reveal more of the audio file within the track.
Extending or truncating clips by dragging the clip’s edge is also affected by the Snap setting, so if you are having difficulty modifying the end or beginning of a clip, check to make snapping is deactivated.
A second way to split clips is to use the Range or Rectangle selection tools.
The default selection tool is the Clip selection, which allows you to click on clips and select them as a whole so that you can move them within the workspace. The other two modes are Range and Rectangle.
The Range selection tool spans all tracks in your workspace and allows you to arbitrarily select any portion of clips regardless of where the clips begin or end. In otherwords, you can select a range in the very middle of a clip, and all other clips above and below it because you are selecting a block of time, rather than basing your selection on the nature of the clips in your workspace.
To use the Range select mode:
Click the Edit menu > Select Mode > Range
Click within an audio clip and drag your selection
The Rectangle selection mode is similar to Range but is track-specific. Using the Rectangle selection tool permits you to draw the range of selection over one or more tracks, and a selection will be made wherever a clip is present.
To use the Rectangle select mode:
Click the Edit menu > Select Mode > Rectangle
Click within an audio clip and drag your selection. You may select portions, or the whole, of clips on as many tracks as you wish. Or you may confine your selection to one. With both tools, your selected areas can be cut, copied, pasted, deleted, or even lifted out from their clips and moved elsewhere (the splits will be made automatically for you).
To lift a selection from a clip or a set of clips, click and drag the selection.
To copy and paste, click on the Edit menu and select
Copy or Cut or the usual keyboard shortcuts of
Ctrl+C or Ctrl+X. When you are ready to paste,
click the Edit menu again and select Paste (or use
Ctrl+V) and click in the time line where you want to paste
the clips.
If you have multiple clips copied., then they will be pasted relative to how they were copied (so if you paste a clip originally from tracks 1 and 2 into track 3, then the pasted clips will fall into tracks 3 and 4).
An alternate way to select a range in your workspace is with the marker transports, which appear in the timeline above the workspace alongside the play transport.
Click in the timeline above the Qtractor workspace. Both the In- and Out- markers will appear at your cursor’s position.
The position of the markers is the out-point for what will become your selection. Move your cursor left and click again to set the in-point.
The space between the two blue markers is now the active range. Click the Edit menu and use the options in the Select submenu to select areas based on the currently active track, the range spanning all tracks, and so on.
You can also use this range to define a loopable area, or to delete or copy and paste its contents.
In electronic music especially, there’s a common need to record one or two measures and then loop those measures to create standardized basslines or drumbeats. The “right” way to achieve that would be to use a drum machine or a sequencer, which would literally play the same data (either pure MIDI data or audio samples) for as many measures as the composer programs.
However, the effect can be emulated in Qtractor with a Paste Repeat, which allows you to copy an audio or MIDI clip and then paste it back-to-back for as many repetitions as you want.
To perform a Paste Repeat:
Check your snapping settings in the View menu (usually when looping clips, the user wants precision snapping to the first clip’s edge).
Click to select the clip you want to copy (or use a range selection to extract a portion of the clip) and use Edit > Copy to Copy the clip.
Click Edit and choose Paste Repeat.
In the Paste Repeat window, enter the number of iterations you want to paste, or the duration (in timecode, frames, or beats) you need to fill with repetitions. Click the OK button to confirm.
Click in the timeline to complete the paste and anchor the newly pasted clips in their track.
If one or two measures of a track doesn’t quite measure up to your standards, you might want to re-record just those measures without having to record the entire track over. This process is called “punching in”.
Use the Range select tool or the range markers to define a region of your timeline as the active area as described in Section Range and Rectangle Selection and Section Using Range Markers.
Once your range is set, click the Punch In/Out button in the main toolbar, or use the Transport menu and select Punch Set.
Arm the recording destination track by clicking the R button in the track list.
Click the Record button in the main toolbar, and then the Play button. Qtractor will play back your piece, and you can play along but nothing you play will actually be recorded except within the punch range. Recording will automatically stop once the transport leaves the punch range.
To stop playback, click the Stop button in the main toolbar, or use the space bar. Punching in and out is a common task used in both MIDI and Audio recording.
To play a section of your composition in a loop (often done so the musician can practise for a punch-in or improvise), select a range as described in Section Range and Rectangle Selection and Section Using Range Markers.
Once your desired loop range is selected:
Click on the Transport menu and select Set Loop.
Move the transport into the loop range, or start playing immediately; when the transport reaches the end of the loop range, it will return to the in-point of the loop and seamlessly continue playing until stopped.
Fading in or out of an audio clip is common enough that there is a quick shortcut to achieve the effect on any clip. Notice in the top corner of any clip in the workspace there is a semi-transparent square node. Clicking and dragging this node further into the clip will create a fade in (if done at the beginning of a clip) or a fade out (if done at the end of a clip). The fade is given a slight curve to give it a more natural feel.
Most of the time, these simple fades achieve the effect you need but should you desire finer control over your fades, see Chapter Automation.
After a long day of editing, your workspace might start to look fragmented, with pieces of audio clips appearing in their tracks with long stretches of empty space. This is not necessarily a bad thing, but it does sometimes allow for accidental moves of precisely timed sound cues and it also may reflect a number of disparate files on your harddrive even though you consider the track one instance of music.
By merging clips, you can change a number of clips into one consolidated file on your harddrive:
Select the clips within a track that you want to merge into one.
Click the Clip menu and select Merge.
In the Merge/Export window, enter a new name for the merged file and save it to a logical location on your harddrive.
The merged audio clip immediately replaces the old files in your project.
As audio clips contain the sound (and MIDI) files you are using in your Qtractor project, so do Tracks contain the clips themselves. Tracks allow you to mix the audio clips in relation to one another, apply effects to whole groups of clips without ever affecting the waveform files themselves (ie, nondestructively), and even automate everything from volume to panning to the functions of effect units and synths.
A special window is dedicated to managing tracks: the Mixer window ; set up like a traditional mixing desk with a user-friendly interface to allow for Aux Sends, Returns, Sub-mixing, and more. You can also manage many aspects of your tracks through the track list on the left of the Qtractor interface, but since the Mixing desk interface is so ubiquitous and useful, it’s common to have it open on a separate monitor or virtual desktop for quick reference.
To open the Mixer window, click on the View menu, select Windows, and choose Mixer.
Most track functions can be done through both the main Qtractor interface, as well as through the Mixer window.
It’s a good idea to keep related musical parts grouped together. If your drums appear on track 1 and your bass on track 14, it’s difficult to edit the two tracks in unison as one might reasonably attempt to do.
To keep a logical order to your track listing, you can rearrange where each track appears in the Qtractor workspace.
To move a track up or down the track list, either click and drag the number on the far left of the track label, or use the Track menu and select Move to move the currently highlighted track either up, down, or straight to the top or bottom of the list.
In addition to changing track order, you can change the height of tracks with the Height selection in the Track menu. Other track properties, such as track name, the color of the clips, the type (audio or midi) of track data, and more, can be modified through the Track menu, especially the Track Properties selection.
Mixing in Qtractor, like most digital audio workstation software, is modeled after mixing on real-world equipment. With Qtractor, as with hardware mixing equipment, you are able to define inputs, outputs, auxiliary sends and returns, effects, and automation.
Generally, mixing in Qtractor utilizes three different toolsets:
Mixer - used to control the stereo separation and levels of the track, route sound, and configure effects and other outboard “gear”
Effect Units and Filters - plugins used to sweeten, degrade, fix, or control sound
Automation - makes Qtractor your live mixer so that levels, effects, and pans are adjusted during playback Just as with a hardware-based studio, you’ll use a combination of techniques to achieve the mood, sound, and quality you want. The central hub, however, is the Mixer window.
The Mixer window can be accessed by click the View menu and selecting Mixer from the Windows category. The Mixer opens in its own window, making it a prime candidate for occupying a second screen if you have a multiple-head setup.

On the extremities of the Mixer window are the Master In and Master Out controls. These are independent of any one track and control everything coming into or going out of the mixing board. You can adjust the master levels of the input and output, and place any effect processors you want to apply globally (such as a compressor to control peaks on an outboard microphone, or to prevent peaks on outgoing audio).
The middle portion of the Mixer window represents the tracks in your project, both audio and MIDI (distinguished by the Audio or Midi icon next to the name of the track).
These control the individual track, allowing you to set the level of the track with the volume slider and gain control, the stereo position with the pan/pot control, and mute, solo, or arm the track for recording.
When monitoring the levels of your tracks, make sure that your sound does not enter the red zone on the volumeter. In audio production, any sound that goes above 0 dB hits its peak and will cause distortion. It’s not uncommon to flirt with 0 dB to truly maxmize the impact of important sounds, but leaving sounds above 0dB in your final mix is a surefire way to ruin your project. Using the volume level slider, adjust your track volumes into safe settings while listening to your project. Then listen to your project again to refine the levels in relation to one another. If the sound source is too low (or too loud), you can add (or subtract) gain at the input point with the Gain adjustment at the very bottom of the mixer window.
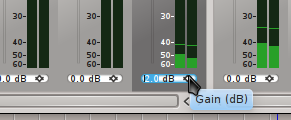
This adds or subtracts gain level at the point of the sound’s entry, meaning that you are changing the amount of sound reaching any effects processors. Generally, gain adjustment is avoided and other tools, like a Compressor or Equalizer, are favoured.
Tracks levels don’t exist in a vacuum; the levels are cumulative…
So if you have two tracks with near-maximum levels that produce very loud sounds at the same time, the Master Out level will peak even if each track was “safe” independently.
There is no authoratative way of achieving a balanced mix ; some professional sound mixers prefer an additive mix, in which they start all levels at a reasonable and safe level and then accentuate important parts by adding volume to tracks.
Others prefer a subtractive method by starting everything at the highest safe (or unsafe) level and then bringing volumes down so that everything falls into place. Predictably, still others prefer a combination of these methods.
By default, tracks are set to play sounds from the center point of the stereo space, meaning that to the listener the sound will feel as if it’s situated directly in front of them, or evenly between their left and right ear.
To diversify the sound, sometimes in order to emulate a live setup or to suggest that a sound is just next to the listener, or to broaden the scope and impact of the piece, you can pan sound between the left and right speakers.
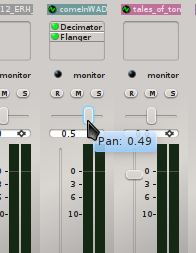
When panning a track, “less” is often “more” and an even spread is usually best. In other words, do not arbitrarily assign tracks in stereo space just to give a spread to your sound; consider where the sound would realistically come from if the listener were watching a live performance.
Avoid moving sounds to the extreme stereo positions, since in real life sounds are rarely only heard in one ear and not the other (the sound of extreme stereo separation was common in early stereo mixes from the 1960s, in which the drums might only be heard in the right ear and a guitar only in the left; the effect was revolutionary at the time but largely considered utterly unnatural now).
A gentle spread of sound is most natural, with sounds at the extreme edges of the stereo space being used for atmosphere, emphasis, or effect.
In the Mixer window, effects processor can be added to any track (the Master In, Out, or individual tracks in the project):
Right-click the plugin window in the track into which you wish to add the effect or synth.
Select Add Plugin from the contextual menu.

The order of processors is important ; applying a reverb effect first and then a distortion filter will render a track with distorted reverb. Applying the distortion filter first and then the reverb will render a track with reverberating distortion.
To move an effect up or down the order of processing (ie, to place a reverb effect before a distortion filter), right-click the effect you want to move and select Move Up or Move Down from the contextual menu.
Once a plugin has been inserted into a track, control its settings in the pop up window that appears for the plugin. After your initial adjustments are made, you can access a plugin’s controls at any time by right-clicking on the name of the effect unit in the track and selecting Properties from the contextual menu.
A green light to the left of the plugin name indicates that the plugin is active. You can temporarily deactivate (bypass) the effect by right-clicking the effect in the track and toggling off the Activate menu item. If you wish to by-pass all effect units in a track, choose Deactivate All If you want to remove an effect or plugin from a track entirely, right-click on the effect in the track and choose Remove or Remove All to remove all plugins from that track.
What we call a “plug-in” in a DAW would be most akin, in a hardware-based studio, to a built-in reverb effect or gain adjustment on some of the more general-purpose mixing desks on the market. Mostly, however, there are no “plug-ins” in a traditional studio setup; everything is outboard and the mixer plugs into the effect unit, the effect unit processes the sound, and then the affected sound is send back into the board to be integrated into the mix.
This model is still useful in the software world, since not all sound applications are available as plugins, or you prefer to run them as separate applications. To be able to utilize Sends and Returns, you should have some external, JACK-aware, sound application installed. In other words, the application should run outside of Qtractor but be programmed to utilize JACK when available. A few examples of such applications would be
Jamin - a sound mastering application
CALF - an audio plugin set that is available as a stand-alone application as well as a plugin
amSynth - a soft synth
QSynth - a fluidsynth frontend
Schismtracker - a MIDI tracker
Hydrogen - a stand-alone drum machine
For this example, launch the CALF JACK Host plugin client. Click the Add plugin button and select Reverb and turn the Wet Amount nearly all the way up so that it will be easy to hear that the sound is being effected in this test. Bring in or generate sound into a track in Qtractor. To create a Send and Return on that track:
Locate the track you wish to affect in the Mixer window in Qtractor.
Right-click the plugin inset and choose Inserts.
In the Insert window, click the Sends button in the lower left corner.
In the Connections window that appears, choose the Insert Out connection in the left column and then then reverb in of calf in the right column. Click the Connect button to route the sound. Repeat this for both left and right channels.
At this point, you are successfully sending the sound from your track to the CALF effect processor, but if you were to play the track in Qtractor you wouldn’t hear anything. Of course, the reason is because there is no Return yet. Back in the Insert window, click the Returns button.
In the Connections window, choose the reverb out connection in the left column and then the insert in of Qtractor in the right column. Click the Connect button to route the sound. Repeat this for both left and right channels.
Now your track is routed out to the CALF effect unit, processed, and sent back into Qtractor. Click the Play button in Qtractor to hear the results.
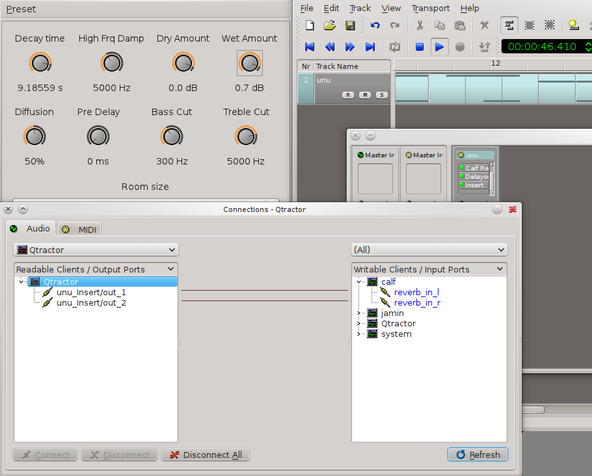

There are many theories, personal styles, and preferences when it comes to mixing a project. One producer might opt for no effects at all while another might use compressors, limiters, levellers, EQ, and more, and those same producers will abandon their style depending on what band they are dealing with.
The best way to know what effects to use is to experiment ; discover what different filters do, find out which ones you like or dislike, and do whatever your ear tells you to do. There are some staples in any audio engineer’s toolkit, and between the Steve Harris LADSPA collection, CALF, and Jamin, you’ll find everything you need to achieve the sound you want:
As a sys admin has ssh and emacs, an audio producer has Dynamic Range Compressors. A compressor’s job is to reduce loud sounds or to increase quiet sounds by reducing (or “compressing”) the signal’s overall dynamic range. It has a number of uses in music production.
A compressor on a track that is inconsistent in dynamics will produce a more consistent track that might be easier to mix into the rest of the piece, and also provide a better listening experience for the audience; it’s difficult to follow the lyrics of a song, for example, when the voice track continually drops behind the other instruments.
Compressors are very common on drums, as well, since when drums are mixed the loudest hits and crashes tend to rise to the surface while all the subtleties, like little touches of ornamentation and the decays of drum and cymbal hits, are lost. A compressor will even out the range between those softer sounds and the harder sounds, so you still get the hard-hitting beats but get to keep the personality.
There are at least three good compressors for GNU Linux:
The Calf plugin suite contains a compressor which you can use either as a plugin from within Qtractor or as a stand-alone app as an Aux Send/Return. Its features are typical of an all-purpose, general-use compressor, and running its full GUI with calfjackhost might help you understand the theory behind compression if you are new to it.
If you are new to compressors, try this experiment:
Open the CALF compressor by launching calfjackhost.
Click on the Add plugin menu and choose
Compressor.
To launch the user interface, click the Compressor button in the lower left. Change the settings to:
Ratio to 1
Makeup gain to 0dB
Threshold to -43.2
Knee to 0dB
Notice that this causes the green line to align perfectly with the gray line that runs diagonally through the compressor screen. This achieves, essentially, a pass-through effect. You have set a limit for every possible level of sound equal to itself, and since no possible level of sound will ever be greater than itself, nothing will be constrained.
Now change the ratio to approximately 2 (a 2:1 ratio). Notice the green line now deviates from the gray normal line; you may think of the green line as a sort of ceiling. Measuring soundwaves by the numbers along the X-axis, you can see that 24dB in the input (ie, the gray line), it will be constrained down to 0dB (along the green line). Accordingly, a soundwave that reaches -12dB will be constrained to -24db.
For one last demonstration, turn the Ratio knob all the way to right so it reads +inf and the Threshold knob all the way to the right so it reads 0dB. This places a hard ceiling at the current threshold setting. This means that any sound louder than the threshold will be constrained to that level, no matter what. Set too severly this can cause a clipped sound, but the concept of leveling is ubiquitous in production, as a safeguard to ensure that the levels do not go over 0dB.
When exactly compression kicks in is controlled by the Threshold value. Try adjusting the threshold knob and notice that the bend (or “knee”) in the green line changes. Turn the Ratio knob back to 2 and set the Threshold to -12dB. Setting the threshold to -12dB means that everything below -12dB will remain unchanged, while anything above -12dB will be constrained to some degree (depending on the ratio setting, of course).
Make the Knee more gradual and natural by adjusting the knee to 18dB; this gives a softer curve to the compression. Sometimes this is intentionally not increased, and a sharper knee is desired (it’s a trick sometimes used in compressing drums, to create hits that “pop”).
The Makeup Gain knob, currently set to 0, allows you to boost the output sound to account for the inherent loss in volume when using a compressor that constrains levels.
The Attack and Release knobs control how quickly the compression effect takes to take full effect, and how quickly the effect is released. In otherwords, at a 0ms attack, a soundwave will be constrained the very moment it pushes toward the threshold setting. The result of this is often a very harsh and noticeable effect, usually undesirable (except, again, for some stylistic choice sometimes made on drum kits or special effects). Setting the attack to 500ms (.5 second), for instance, renders a softer, more gradual effect that better allows a soundwave to retain its natural shape and curve but still suppressing it under the threshold’s level.
Once you’ve designed good compression settings, save it as a preset by clicking on the Preset menu and choosing Store preset selection. You will need the preset saved (perhaps in your Qtractor project folder for better organization) since Qtractor obviously will not save or preserve your settings. The Calf compressor is a capable and user-friendly compressor unit, available either as a stand-alone unit or a plugin from within Qtractor, so use it often!
The Dyson Compressor is included in the Steve Harris set of LADSPA plugins. It is very basic, with few adjustable settings, but if quick and basic compression is all you need then it may just be what you need.
Use the Dyson compressor as you would any other LADSPA plugin in Qtractor. Its interface offers four sliders for customization: the peak limit (ie, threshold), release time (in seconds), the fast compression ratio, and the compression ratio (both ratios are counted from 0 to 1, so some math is required, with 1:1 ratio being equal to 0).
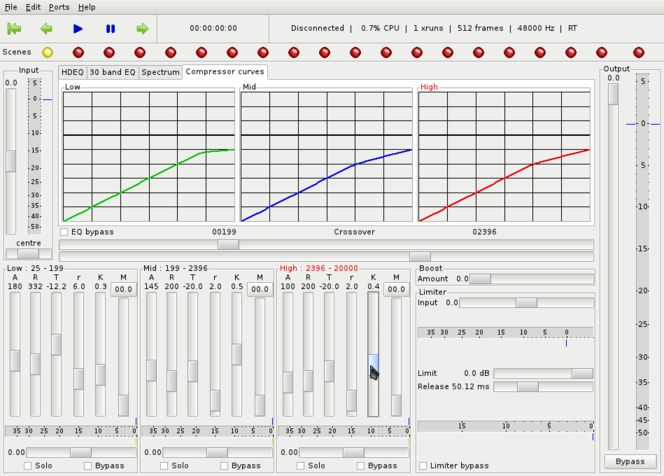
The Jamin mastering application contains one of the most powerful compressors available. Whereas the Calf compressor excels in its simplicity, Jamin provides three separate compressors, essentially, for the Low, Mid, and Hi frequencies of your input.
This obviously allows for a far greater degree of fine-tuning. As for what Jamin defines as a low, mid, or hi frequency: even these are adjustable with the middle horizontal Crossover sliders. Your familiar Attack, Release, Threshold, Ratio, Knee, and Makeup Gain controls are found at the bottom of the window in the form of vertical sliders.
As with the stand-alone version of Calf, Jamin is used as an Aux Send / Return; unlike Calf, it has no plugin option.
Because Jamin also features a full-featured 30-band EQ, it might be best treated as the compressor/ EQ filter for the Qtractor’s Master Out; something that Jamin obviously intends since it is advertised as a mastering application. As with the stand-alone version of Calf compressor, you can and should save your presets in Jamin by clicking on the File menu and selecting Save As.
Directly related to dynamic compressors are limiters, which are basically compressors set to an infinite compression ratio. There are limiters available in the Steve Harris LADSPA set. The Hard Limiter, for example, enforces the threshold by literally clipping off the offending portion of the sound wave. Its upper dB limit is 0dB and the harshness of the clipping can be set with the Wet Level (the more wet, the more clipping) and Residue level, which essentially control the attack and release times of the effect.
Limiters, compared to compressors, are by nature fairly harsh. However, slightly clipping the upper tips of offending soundwaves can create the illusion of loudness without actually crossing over into true distortion levels. It may also be used as a protective filter on the Master Out, just to ensure that levels absolutely do not rise above 0dB.
The idea of normalization basically refers to dynamic range compression, since its job is to take irregular sound and make it more “normal”. However, the term is imprecise and so it can mean many things.
In Qtractor, tracks that are too soft can have gain applied; manually applying gain can be dangerous, since you do not know how much gain you can safely apply without sending peaks over the 0dB mark. To have Qtractor calculate a safe clip-wide gain level:
Select the clip that is too soft
Click the Clip menu and select Normalize
The clip has a safe gain level nondestructively applied.
What this does not do is compress the dynamic range of that clip. If
you want to normalize a clip with dynamic range compression, then use
either a compressor such as Calf or Dyson, or process the clip
externally of Qtractor. A good external normalization application is
normalize (named normalize-audio in Debian), a command line
application for GNU Linux that is available in most repositories and
pre-installed on Slackware. The syntax is simple:
normalize -a -6db -l -3db nameOfFile.wavIn the above command, -a is amplitude
and -l is limiter; so the command sets the
average amplitude of the sound clip to -6dB and ensures that peaks do
not exceed -3dB. Obviously these settings would need adjusting depending
on what the sound file contained, but it’s a marvelously efficient
command for quick normalization.
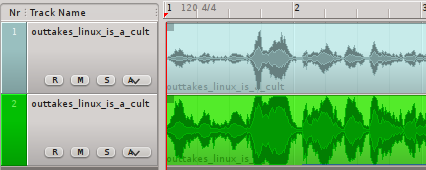
In addition to normalizing a clip to itself, normalize can normalize a group of files in relation to one another, set thresholds, and much more.
Sound waves, being oscillations of pressure, are measured by the cyclic standard of hertz. The human ear generally can hear from 20Hz to 16,000Hz (or 16kHz), with the human voice usually appearing around the 100Hz to 400Hz range.
A good equalizer can increase or decrease the energy of these frequency bands; this is used by audio engineers to boost bass, or possibly cut bass when it is overpowering, or boost the midtones where the human voice dwells, and so on.
There are a few good equalizers that can be used with Qtractor:
The Jamin mastering application, which you can use as an Aux Send/Return, has two views of EQ: the graphical curve-based HDEQ, and a slider-based 30 band EQ. They are literally two different views of the same thing, so it’s typical to use both views depending on what kind of adjustment you need to make and which one makes that adjustment easiest.
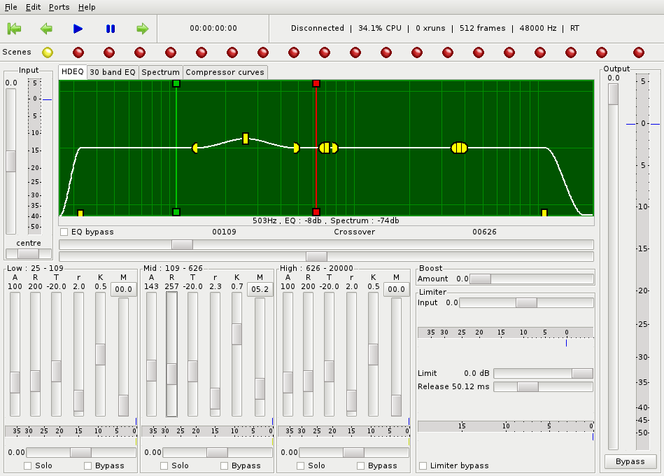
The practical theory behind EQ is simple enough; identify the frequency you wish to emphasize or supress, and then raise or lower its intensity in the equalizer. If you are unfamiliar with equalizers, you may have a difficult time at first being able to identify where in the spectrum of frequencies the sound lies. Put simply, the lower (bass) bands are on the left and the higher (treble) are on the right, with the mids (human voice and similarly pitched instruments) are in the middle.
For more precision, there is an old engineering trick that you can use in Jamin to identify where something you are hearing actually appears in the spectrum:
Send a track to Jamin as an Aux Send/Return
Open the HDEQ view of Jamin and use the yellow curve nodes to create the sharpest curve possible at its maximum value
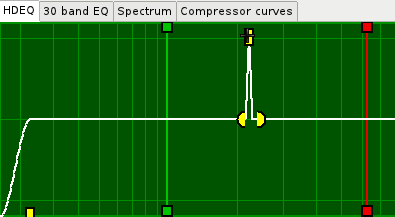
Using the middle node, drag the peak across the spectrum, listening to the sounds it emphasizes. Because of the drastic curve, the change will be obvious.
Once you find the sound you are searching for, lessen the volume of the curve and make it more gradual. Less is more in EQ; rarely is there a time when huge increases or decreases of the existing frequencies are required. If you find yourself wanting to maximize the intensity of a frequency band then quite possibly you need to re-record to achieve the actual sound you were intending to capture.
The other view of the EQ in Jamin is the 30 band EQ tab, which displays the same information as the HDEQ interface, but uses sliders instead of graphical curves and nodes. The same principles apply; the sliders provide a quicker way to boost or cut frequencies when you know exactly what needs to be done and don’t want to have to draw curves and move nodes around to achieve it.
The Calf plugin set provides a set of filters, which perform EQ through customizable presets. It is less precise than a 30 band equalizer but realistically is often all you’ll need. Calf offers four types of presets:
Lowpass - low pass filters allow low frequencies to pass and cuts off high frequencies
Highpass - high pass filters allow high frequencies to pass and cuts off low frequencies
Band Pass - band pass combines low pass and high pass filters configured such that a targeted frequency range is allowed to pass while frequencies above or below that range are rejected
Band Reject - band reject combines low pass and high pass filters with their intersection being a range of frequencies that will be rejected You have control over the characteristics of these presets via the Frequency, Resonance, and Inertia knobs.
Open the CALF filter plugin by launching calfjackhost. Click on the Add plugin menu and choose Filter.
To launch the interface, click the Filter button in the lower left corner. When the interface for filters launches, it may only display a list of the presets, so be sure to expand the window until you can see the knobs and filter graph.
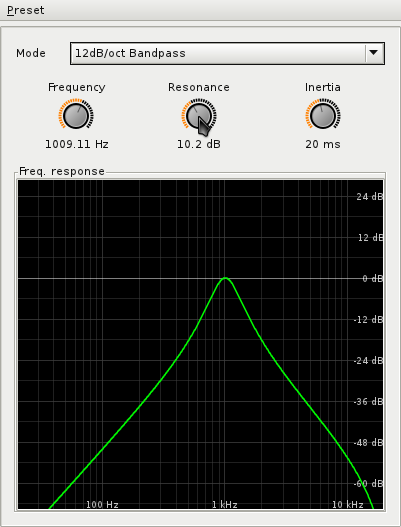
For the clearest example of how the Calf filters work, select the 18dB Bandpass, Set the Frequency knob to approximately 300 Hz. Notice how the filter shape moves horizontally along the graph as you adjust the filter. The green line indicates that sounds at 300 Hz will passthrough the filter, while the frequencies lower and higher than 300 Hz will be filtered down gradually until they are excluded entirely.
To control what frequencies are attenuated by the filter, use the Resonance knob. Setting it to 30dB, for instance, makes for a narrow filter, while setting it to 0dB makes it fairly broad.
Try a lowpass filter on bass parts, and a highpass on other instruments, and make adjustments by ear.
Once you’ve designed good EQ settings for your track, save it as a preset by clicking on the Preset menu and choosing Store preset selection. You will need the preset saved (perhaps in your Qtractor project folder for better organization) since Qtractor obviously will not save or preserve your settings.
The Calf filters are more specialized than the Jamin EQ but just as effective in what it does. Since Calf can be used as either a stand-alone application or as Qtractor plug-ins, they are flexible in how you choose to implement them.
Simpler than Jamin or Calf is the Steve Harris LADSPA plugin Multiband EQ. It features 15 sliders for broad rangers of frequencies.
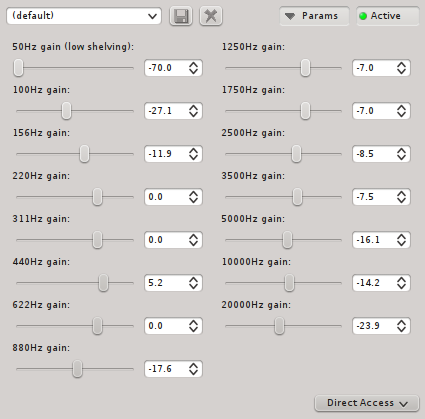
There is less customization available but well-rounded curves can still be achieved by staggering the sliders, a common practise on hardware equalizers.
A basic 3-band equalizer, the Steve Harris JD EQ LADSPA plugin allows you to easily control the three general areas of sound frequency: bass, mids, and treble.
Noise removal is something of a myth borne of automatic filters bundled with recording applications. It is not possible, in spite of what the advertisements say, to isolate noise on a track and eliminate it without also removing that same frequency from what you deem to be signal. The manual elimination of noise is easiest with Jamin HDEQ; first scan your sound for the frequency containing most of the noise as described in Section Jamin, and then invert the resonance curve to eliminate the noise you’ve found.
Automated noise removal filters do the same process; analyze a sample of user-defined “noise” and then EQ the offending frequencies out.
Reverb is an old ever-popular recording effect that simulates the phenomenon of a sound wave bouncing off of surfaces, causing the soundwave to bounce back in a new direction; our ears hear the original sound wave as the source and the reverberated sound wave as an echo.
Common examples are large cathedrals, famous for very saturated and immediate echoes, and canyons, with the stereotypical distant and delayed echo (“Hello….hello……..hello…”). You might also notice less drastic examples in, for instance, small empty closets, or you might try speaking into a coffee tin; the reverberation is immediate and subtle, but it’s still clear that there are soundwaves bouncing back at you.
Reverb effect units simulate this phenomenon and allow the user to control different aspects of how the reverberation is generated.
As with the other Calf plugins, the Calf reverb can be used as a stand-alone application via calfjackhost or as a plugin from within Qtractor. It features a good number of the most important reverb controls:
Decay Time - controls the length that the echo (tail) is heard before
High Freq Damp - the tail of the reverb is dampened to simulate that sound loses energy and fades out over time and distance. The /High Frequency Dampening knob determines the frequency at which the dampening begins
Dry Amount - determines how much of the original sound is heard along with the reverb
Wet Amount - determines how much of the reverb is heard
Diffusion - structures the “spread” of the reverb; a highly diffused reverb effect spreads reverb widely across the stereo space, where as a less diffuse reverb effect is more centrally located
Pre Delay - determines the distance between the source signal and the start of the reverb
Bass Cut - determines the frquency at which bass frequencies are truncated
Treble Cut - determines the frequency at which bass frequencies are truncated
Room Size - sets the emulated space, determining the shape and character of the reverberated sound
If you are using Calf as a stand-alone effect unit, remember that once you’ve designed good reverb settings for your track, you must save it as a preset…
You can save presets by clicking on the Preset menu and choosing Store preset selection. You will need the preset saved (perhaps in your Qtractor project folder for better organization) since Qtractor obviously will not save or preserve your settings.
There are reverb units available in the Steve Harris LADSPA set. The GVerb plugin is particularly powerful.
Roomsize - controls the size of the space being used to simulate reverb
Reverb time - controls decay of the reverb; the longer the reverb time, the longer the “echo” is heard
Damping - the greater the damping, the shorter and weaker the reverb effect will be
Input bandwidth - the strength of the signal that reaches the reverb effect unit for processing
Dry signal level - the volume of the unprocessed source sound
Early reflection level - strength of the initial reverberated wave; a weaker early reflection level has the effect of hearing just the tail of a reverb, while a greater level brings more immediate sound
Tail level - the level of the reverberated sound; increasing this will great a stronger signal, which will therefore continue even past the Reverb time setting, which can then also be controlled by the Damping setting
The range of effect units available for processing sound is nearly endless. With echos, tape delays, distortion filters, amps, decimators, chorus effects, ring modulators, and much more, Linux has no shortage of special effects. Explore Calf and Steve Harris LADSPA plugins to discover a wide variety of new possible sounds.
If you had to mix all of the tracks in a project, at the same time, in realtime, you’d not only need a lot of practice but probably two more arms and another mouse or two. Qtractor features automation of nearly any aspect of any plugin, as well as basic track functions like volume and panning. It is only possible to automate tracks; buses cannot be automated.
In the track you wish to automate, click the Automation button in the track list. From the pop-up menu, select the attribute of that track that you wish to automate first.
From the pop-up menu, select the attribute of that track that you wish to automate first. An overlay is placed on the track.
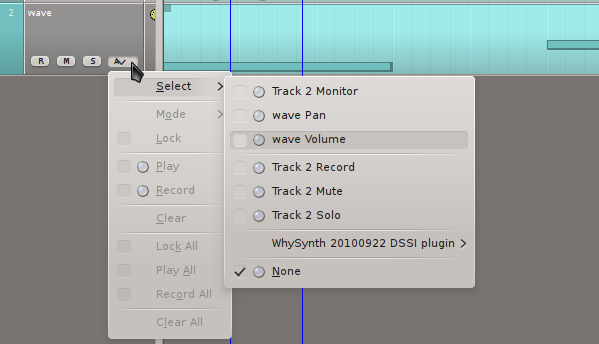
Click the Edit menu to go into the Select Mode category, and choose the Automation selection tool. Alternately, click the Automation Selection Tool icon from the top menu bar.
Armed with your automation selection tool, click on the automation overlay on your track to create a node. Adjust the volume of this node to be the initial volume of your track. You can either drag the node, or double click it and enter a precise value.
Click again on the automation overlay to create a second node, and move it to another volume level. For the space between the two nodes, the volume will climb from the starting node level to the ending node level.
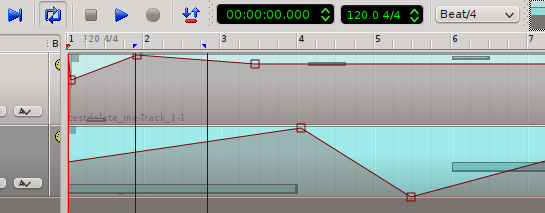
If you need a less gradual change, move the nodes closer together, or use more nodes to shape different movements for the mixer.
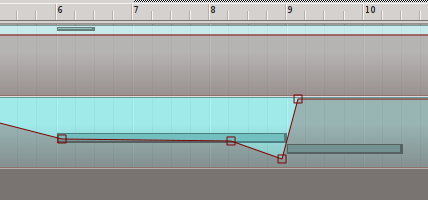
The automation is customizable via the Automation button in the track list, in the Mode category, Hold places the automation nodes into absolute values until otherwise changed.
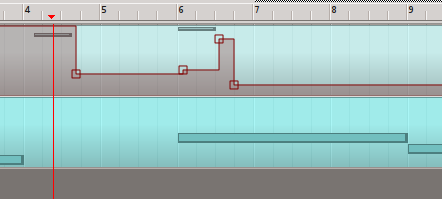
Linear - represents the automation as even linear progression from one node to the next. This is the default automation mode.
Spline - same as linear, except with b-splines instead of completely linear progress between nodes.
Automation node values are stored as plain MIDI controller values, which means a default 7-bit resolution; on save/load, the values are quantized to this resolution. Because of this, you may find that the values you originally entered change very slightly upon reloading a session. Despite this, Qtractor should still handle the automation correctly. If you want a higher resolution, you can enable High resolution plugin automation from View > Options… > Plugins > Experimental, which will give a 14-bit resolution.
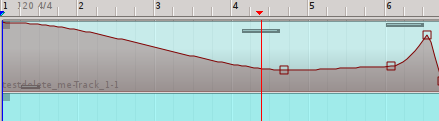
If you are a skilled live mixer and want to record your performance in realtime, you can override existing automation decisions, or record new ones, in two different styles, each available in the Automation menu:
Play - with this enabled, you may make realtime changes to existing automation, and upon release of the slider or knob that you are automating, the value returns to the pre-existing value. This may be combined with the Record option.
Record - with this enabled, you may make realtime decisions for automation and every move will be recorded, in realtime, as a node in your track. They can be manually changed later, if needed.
If you have the Play option enabled, when you release the slider or knob that you are automating, the values will return to their existing level…
Without Play enabled, any change you make will persist until you change it again.
At the end of the song-writing process, there is the final export. This of course combines all of the sounds being generated from all of the different sources you may be using, filtered through all of the effects and processors you have in place, and places them all into a self-contained file that your audience can play in their media player of choice.
Since everything in Qtractor is routed through its mixer, to combine the sounds into one audio file is as simple as creating a new track and using it to record the Master Out:
Go to the View menu and select Options to open Qtractor’s preferences.
In the Options window, click on the Audio tab. Select the kind of audio you’d like to use for your recording. It is generally prefered to export to a lossless format and use that file as the “gold master” from which compressed (ogg vorbis, mp4, mp3, and so on) versions can be produced. A high quality, lossless, free codec is FLAC.
Click the OK button to accept your changes.
Create a new track in your Qtractor project by clicking the Track menu and selecting Add Track.
In the Mixer window, right click the plugin window and click the Inserts category, choosing Add Insert. In the Insert window, click the Return button. This opens a Connections window.
Click the first (left) Master In jack in the left column to the first insert of your new track in the right column, and click the Connect button. Repeat this for the second (right) jacks. Close the window when finished.
You have now routed all of your mixer’s outbound sound to the input of your new track. Arm your new track for recording by clicking the R button either in the track list or the mixer window.
Position the transport (playhead) at the beginning of the project (or the beginning of the portion of your song you intend to export).
You may wish to set an in and out point so that the recording stops automatically, or you may prefer to stop the recording manually.
Before recording, double check your connections!
If you have left a microphone plugged in and actively sending input to your Master in, for example, you might find later that you’ve recorded a layer of room tone behind all of your tracks!
Press the Play button to begin playback and recording.
When recording is finished, select the track by clicking on the new audio clip in the Qtractor project. Click the Clip menu and select Export to send the clip out as an independent file. Your project is now complete. Create a new project file, and start over with your next song, and enjoy your time with Qtractor.
Version 1.3, 3 November 2008 Copyright © 2000, 2001, 2002, 2007, 2008 Free Software Foundation, Inc.
Everyone is permitted to copy and distribute verbatim copies of this license document, but changing it is not allowed.
The purpose of this License is to make a manual, textbook, or other functional and useful document “free” in the sense of freedom: to assure everyone the effective freedom to copy and redistribute it, with or without modifying it, either commercially or noncommercially. Secondarily, this License preserves for the author and publisher a way to get credit for their work, while not being considered responsible for modifications made by others.
This License is a kind of “copyleft”, which means that derivative works of the document must themselves be free in the same sense. It complements the GNU General Public License, which is a copyleft license designed for free software.
We have designed this License in order to use it for manuals for free software, because free software needs free documentation: a free program should come with manuals providing the same freedoms that the software does. But this License is not limited to software manuals; it can be used for any textual work, regardless of subject matter or whether it is published as a printed book. We recommend this License principally for works whose purpose is instruction or reference.
This License applies to any manual or other work, in any medium, that contains a notice placed by the copyright holder saying it can be distributed under the terms of this License. Such a notice grants a world-wide, royalty-free license, unlimited in duration, to use that work under the conditions stated herein. The “Document”, below, refers to any such manual or work. Any member of the public is a licensee, and is addressed as “you”. You accept the license if you copy, modify or distribute the work in a way requiring permission under copyright law.
A “Modified Version” of the Document means any work containing the Document or a portion of it, either copied verbatim, or with modifications and/or translated into another language. A “Secondary Section” is a named appendix or a front-matter section of the Document that deals exclusively with the relationship of the publishers or authors of the Document to the Document’s overall subject (or to related matters) and contains nothing that could fall directly within that overall subject. (Thus, if the Document is in part a textbook of mathematics, a Secondary Section may not explain any mathematics.) The relationship could be a matter of historical connection with the subject or with related matters, or of legal, commercial, philosophical, ethical or political position regarding them.
The “Invariant Sections” are certain Secondary Sections whose titles are designated, as being those of Invariant Sections, in the notice that says that the Document is released under this License.
If a section does not fit the above definition of Secondary then it is not allowed to be designated as Invariant. The Document may contain zero Invariant Sections.
If the Document does not identify any Invariant Sections then there are none.
The “Cover Texts” are certain short passages of text that are listed, as Front-Cover Texts or BackCover Texts, in the notice that says that the Document is released under this License. A Front-Cover Text may be at most 5 words, and a Back-Cover Text may be at most 25 words.
A “Transparent” copy of the Document means a machine-readable copy, represented in a format whose specification is available to the general public, that is suitable for revising the document straightforwardly with generic text editors or (for images composed of pixels) generic paint programs or (for drawings) some widely available drawing editor, and that is suitable for input to text formatters or for automatic translation to a variety of formats suitable for input to text formatters.
A copy made in an otherwise Transparent file format whose markup, or absence of markup, has been arranged to thwart or discourage subsequent modification by readers is not Transparent.
An image format is not Transparent if used for any substantial amount of text. A copy that is not “Transparent” is called “Opaque”. Examples of suitable formats for Transparent copies include plain ASCII without markup, Texinfo input format, LaTeX input format, SGML or XML using a publicly available DTD, and standard-conforming simple HTML, PostScript or PDF designed for human modification.
Examples of transparent image formats include PNG, XCF and JPG. Opaque formats include proprietary formats that can be read and edited only by proprietary word processors, SGML or XML for which the DTD and/or processing tools are not generally available, and the machine-generated HTML, PostScript or PDF produced by some word processors for output purposes only.
The “Title Page” means, for a printed book, the title page itself, plus such following pages as are needed to hold, legibly, the material this License requires to appear in the title page. For works in formats which do not have any title page as such, “Title Page” means the text near the most prominent appearance of the work’s title, preceding the beginning of the body of the text. The “publisher” means any person or entity that distributes copies of the Document to the public.
A section “Entitled XYZ” means a named subunit of the Document whose title either is precisely XYZ or contains XYZ in parentheses following text that translates XYZ in another language. (Here XYZ stands for a specific section name mentioned below, such as “Acknowledgements”, “Dedications”, “Endorsements”, or “History”.) To “Preserve the Title” of such a section when you modify the Document means that it remains a section “Entitled XYZ” according to this definition.
The Document may include Warranty Disclaimers next to the notice which states that this License applies to the Document. These Warranty Disclaimers are considered to be included by reference in this License, but only as regards disclaiming warranties: any other implication that these Warranty Disclaimers may have is void and has no effect on the meaning of this License.
You may copy and distribute the Document in any medium, either commercially or noncommercially, provided that this License, the copyright notices, and the license notice saying this License applies to the Document are reproduced in all copies, and that you add no other conditions whatsoever to those of this License.
You may not use technical measures to obstruct or control the reading or further copying of the copies you make or distribute. However, you may accept compensation in exchange for copies. If you distribute a large enough number of copies you must also follow the conditions in section 3. You may also lend copies, under the same conditions stated above, and you may publicly display copies.
If you publish printed copies (or copies in media that commonly have printed covers) of the Document, numbering more than 100, and the Document’s license notice requires Cover Texts, you must enclose the copies in covers that carry, clearly and legibly, all these Cover Texts: Front-Cover Texts on the front cover, and Back-Cover Texts on the back cover.
Both covers must also clearly and legibly identify you as the publisher of these copies. The front cover must present the full title with all words of the title equally prominent and visible. You may add other material on the covers in addition.
Copying with changes limited to the covers, as long as they preserve the title of the Document and satisfy these conditions, can be treated as verbatim copying in other respects.
If the required texts for either cover are too voluminous to fit legibly, you should put the first ones listed (as many as fit reasonably) on the actual cover, and continue the rest onto adjacent pages.
If you publish or distribute Opaque copies of the Document numbering more than 100, you must either include a machine-readable Transparent copy along with each Opaque copy, or state in or with each Opaque copy a computer-network location from which the general network-using public has access to download using public-standard network protocols a complete Transparent copy of the Document, free of added material.
If you use the latter option, you must take reasonably prudent steps, when you begin distribution of Opaque copies in quantity, to ensure that this Transparent copy will remain thus accessible at the stated location until at least one year after the last time you distribute an Opaque copy (directly or through your agents or retailers) of that edition to the public.
It is requested, but not required, that you contact the authors of the Document well before redistributing any large number of copies, to give them a chance to provide you with an updated version of the Document.
You may copy and distribute a Modified Version of the Document under the conditions of sections 2 and 3 above, provided that you release the Modified Version under precisely this License, with the Modified Version filling the role of the Document, thus licensing distribution and modification of the Modified Version to whoever possesses a copy of it.
In addition, you must do these things in the Modified Version:
Use in the Title Page (and on the covers, if any) a title distinct from that of the Document, and from those of previous versions (which should, if there were any, be listed in the History section of the Document). You may use the same title as a previous version if the original publisher of that version gives permission.
List on the Title Page, as authors, one or more persons or entities responsible for authorship of the modifications in the Modified Version, together with at least five of the principal authors of the Document (all of its principal authors, if it has fewer than five), unless they release you from this requirement.
State on the Title page the name of the publisher of the Modified Version, as the publisher.
Preserve all the copyright notices of the Document.
Add an appropriate copyright notice for your modifications adjacent to the other copyright notices.
Include, immediately after the copyright notices, a license notice giving the public permission to use the Modified Version under the terms of this License, in the form shown in the Addendum below.
Preserve in that license notice the full lists of Invariant Sections and required Cover Texts given in the Document’s license notice.
Include an unaltered copy of this License.
Preserve the section Entitled “History”, Preserve its Title, and add to it an item stating at least the title, year, new authors, and publisher of the Modified Version as given on the Title Page. If there is no section Entitled “History” in the Document, create one stating the title, year, authors, and publisher of the Document as given on its Title Page, then add an item describing the Modified Version as stated in the previous sentence.
Preserve the network location, if any, given in the Document for public access to a Transparent copy of the Document, and likewise the network locations given in the Document for previous versions it was based on. These may be placed in the “History” section. You may omit a network location for a work that was published at least four years before the Document itself, or if the original publisher of the version it refers to gives permission.
For any section Entitled “Acknowledgements” or “Dedications”, Preserve the Title of the section, and preserve in the section all the substance and tone of each of the contributor acknowledgements and/or dedications given therein.
Preserve all the Invariant Sections of the Document, unaltered in their text and in their titles. Section numbers or the equivalent are not considered part of the section titles.
Delete any section Entitled “Endorsements”. Such a section may not be included in the Modified Version.
Do not retitle any existing section to be Entitled “Endorsements” or to conflict in title with any Invariant Section.
Preserve any Warranty Disclaimers.
If the Modified Version includes new front-matter sections or appendices that qualify as Secondary Sections and contain no material copied from the Document, you may at your option designate some or all of these sections as invariant. To do this, add their titles to the list of Invariant Sections in the Modified Version’s license notice.
These titles must be distinct from any other section titles. You may add a section Entitled “Endorsements”, provided it contains nothing but endorsements of your Modified Version by various parties — for example, statements of peer review or that the text has been approved by an organization as the authoritative definition of a standard.
You may add a passage of up to five words as a Front-Cover Text, and a passage of up to 25 words as a Back-Cover Text, to the end of the list of Cover Texts in the Modified Version.
Only one passage of Front-Cover Text and one of Back-Cover Text may be added by (or through arrangements made by) any one entity.
If the Document already includes a cover text for the same cover, previously added by you or by arrangement made by the same entity you are acting on behalf of, you may not add another; but you may replace the old one, on explicit permission from the previous publisher that added the old one.
The author(s) and publisher(s) of the Document do not by this License give permission to use their names for publicity for or to assert or imply endorsement of any Modified Version.
You may combine the Document with other documents released under this License, under the terms defined in section 4 above for modified versions, provided that you include in the combination all of the Invariant Sections of all of the original documents, unmodified, and list them all as Invariant Sections of your combined work in its license notice, and that you preserve all their Warranty Disclaimers. 88
The combined work need only contain one copy of this License, and multiple identical Invariant Sections may be replaced with a single copy. If there are multiple Invariant Sections with the same name but different contents, make the title of each such section unique by adding at the end of it, in parentheses, the name of the original author or publisher of that section if known, or else a unique number.
Make the same adjustment to the section titles in the list of Invariant Sections in the license notice of the combined work.
In the combination, you must combine any sections Entitled “History” in the various original documents, forming one section Entitled “History”; likewise combine any sections Entitled “Acknowledgements”, and any sections Entitled “Dedications”.
You must delete all sections Entitled “Endorsements”.
You may make a collection consisting of the Document and other documents released under this License, and replace the individual copies of this License in the various documents with a single copy that is included in the collection, provided that you follow the rules of this License for verbatim copying of each of the documents in all other respects.
You may extract a single document from such a collection, and distribute it individually under this License, provided you insert a copy of this License into the extracted document, and follow this License in all other respects regarding verbatim copying of that document.
A compilation of the Document or its derivatives with other separate and independent documents or works, in or on a volume of a storage or distribution medium, is called an “aggregate” if the copyright resulting from the compilation is not used to limit the legal rights of the compilation’s users beyond what the individual works permit.
When the Document is included in an aggregate, this License does not apply to the other works in the aggregate which are not themselves derivative works of the Document.
If the Cover Text requirement of section 3 is applicable to these copies of the Document, then if the Document is less than one half of the entire aggregate, the Document’s Cover Texts may be placed on covers that bracket the Document within the aggregate, or the electronic equivalent of covers if the Document is in electronic form. Otherwise they must appear on printed covers that bracket the whole aggregate.
Translation is considered a kind of modification, so you may distribute translations of the Document under the terms of section 4. Replacing Invariant Sections with translations requires special permission from their copyright holders, but you may include translations of some or all Invariant Sections in addition to the original versions of these Invariant Sections.
You may include a translation of this License, and all the license notices in the Document, and any Warranty Disclaimers, provided that you also include the original English version of this License and the original versions of those notices and disclaimers.
In case of a disagreement between the translation and the original version of this License or a notice or disclaimer, the original version will prevail. If a section in the Document is Entitled “Acknowledgements”, “Dedications”, or “History”, the requirement (section 4) to Preserve its Title (section 1) will typically require changing the actual title.
You may not copy, modify, sublicense, or distribute the Document except as expressly provided under this License. Any attempt otherwise to copy, modify, sublicense, or distribute it is void, and will automatically terminate your rights under this License.
However, if you cease all violation of this License, then your license from a particular copyright holder is reinstated (a) provisionally, unless and until the copyright holder explicitly and finally terminates your license, and (b) permanently, if the copyright holder fails to notify you of the violation by some reasonable means prior to 60 days after the cessation.
Moreover, your license from a particular copyright holder is reinstated permanently if the copyright holder notifies you of the violation by some reasonable means, this is the first time you have received notice of violation of this License (for any work) from that copyright holder, and you cure the violation prior to 30 days after your receipt of the notice.
Termination of your rights under this section does not terminate the licenses of parties who have received copies or rights from you under this License. If your rights have been terminated and not permanently reinstated, receipt of a copy of some or all of the same material does not give you any rights to use it.
The Free Software Foundation may publish new, revised versions of the GNU Free Documentation License from time to time. Such new versions will be similar in spirit to the present version, but may differ in detail to address new problems or concerns. See Copyleft.
Each version of the License is given a distinguishing version number. If the Document specifies that a particular numbered version of this License “or any later version” applies to it, you have the option of following the terms and conditions either of that specified version or of any later version that has been published (not as a draft) by the Free Software Foundation.
If the Document does not specify a version number of this License, you may choose any version ever published (not as a draft) by the Free Software Foundation. If the Document specifies that a proxy can decide which future versions of this License can be used, that proxy’s public statement of acceptance of a version permanently authorizes you to choose that version for the Document.
“Massive Multiauthor Collaboration Site” (or “MMC Site”) means any World Wide Web server that publishes copyrightable works and also provides prominent facilities for anybody to edit those works. A public wiki that anybody can edit is an example of such a server. A “Massive Multiauthor Collaboration” (or “MMC”) contained in the site means any set of copyrightable works thus published on the MMC site. “CC-BY-SA” means the Creative Commons Attribution-Share Alike 3.0 license published by Creative Commons Corporation, a not-for-profit corporation with a principal place of business in San Francisco, California, as well as future copyleft versions of that license published by that same organization.
“Incorporate” means to publish or republish a Document, in whole or in part, as part of another Document. An MMC is “eligible for relicensing” if it is licensed under this License, and if all works that were first published under this License somewhere other than this MMC, and subsequently incorporated
in whole or in part into the MMC, (1) had no cover texts or invariant sections, and (2) were thus incorporated prior to November 1, 2008. The operator of an MMC Site may republish an MMC contained in the site under CC-BY-SA on the same site at any time before August 1, 2009, provided the MMC is eligible for relicensing.
To use this License in a document you have written, include a copy of the License in the document and put the following copyright and license notices just after the title page: Copyright © YEAR YOUR NAME Permission is granted to copy, distribute and/or modify this document under the terms of the GNU Free Documentation License, Version 1.3 or any later version published by the Free Software Foundation; with no Invariant Sections, no Front-Cover Texts, and no Back-Cover Texts. A copy of the license is included in the section entitled “GNU Free Documentation License”.
If you have Invariant Sections, Front-Cover Texts and Back-Cover Texts, replace the “with… Texts.” line with this: with the Invariant Sections being LIST THEIR TITLES, with the Front-Cover Texts being LIST, and with the Back-Cover Texts being LIST.
If you have Invariant Sections without Cover Texts, or some other combination of the three, merge those two alternatives to suit the situation. If your document contains nontrivial examples of program code, we recommend releasing these examples in parallel under your choice of free software license, such as the GNU General Public License, to permit their use in free software.
Some software is not required for Qtractor to run, but are useful to have and can be run along with Qtractor. Optional installs include:
QJackCtl - a user-friendly control panel for JACK, which can help you fine tune latency settings, and wire your virtual instruments to your virtual mixer. The JACK subsystem will be installed automatically by your distribution; check to ensure that QJackCtl is installed. Being written by the same programmer, many control panels available in QJackCtl are also available from within QJackCtl, but unless you very familiar with jackd, you will probably find JACK easier to use with QJackCtl
Qsynth - a user-friendly controller for the Fluidsynth soft synth and a good example (for its familiarity) of how soft synths can be used external of the Qtractor interface and yet still send sound to Qtractor
Fluidsynth-DSSI - the Fluidsynth soft synth in plugin-form so that soundfonts can be used from within the Qtractor interface
WhySynth - a DSSI plugin that ships with a number of high-quality pre-sets, providing quick satisfaction as well as plenty of oscillators and dials to allow you to create your own patches
Steve Harris LADSPA Plugins - the famous must-have set of audio plugins. The LADSPA versions have been around for years, the newer LV2 versions are also available and LV2 support is starting to become standard, so feel free to try the newer ones instead.
CALF audio plugin pack - provides a compressor, chorus, reverb, flanger, delay, and lots more, as either DSSI, LADSPA, or LV2 plugins. They are easy to use and feature attractive interfaces.
This is the standardized list of General MIDI channels and the corresponding instrumentation. If you are composing using MIDI and want your piece to call a standard set of instruments so that it will sound the same across all systems, this is the list to use.
Distributing MIDI files of renditions of popular songs was fairly common in the early days of the Internet, when it was considered technologically advanced to have a MIDI song autoatically play in the background when someone visited one’s homepage. With General MIDI, it could be ensured that the song sounded more or less the same no matter whose system it was.
Of course, this is rather rarely done now. It is far more common to use MIDI to trigger sounds and instruments in any format that works best for you, then to record the music and re-distribute the ogg or mp3 version.
Even so, this is a good reference list since General MIDI was widely used at one point.
Acoustic Grand Piano
Bright Acoustic Piano
Electric Grand Piano
Honky-tonk Piano
Electric Piano 1
Electric Piano 2
Harpsichord
Clavinet
Celesta
Glockenspiel
Music Box
Vibraphone
Marimba
Xylophone
Tubular Bells
Dulcimer
Drawbar Organ
Percussive Organ
Rock Organ
Church Organ
Reed Organ
Accordion
Harmonica
Tango Accordion
Acoustic Guitar (nylon)
Acoustic Guitar (steel)
Electric Guitar (jazz)
Electric Guitar (clean)
Electric Guitar (muted)
Overdriven Guitar
Distortion Guitar
Guitar harmonics
Acoustic Bass
Electric Bass (finger)
Electric Bass (pick)
Fretless Bass
Slap Bass 1
Slap Bass 2
Synth Bass 1
Synth Bass 2
Violin
Viola
Cello
Contrabass
Tremolo Strings
Pizzicato Strings
Orchestral Harp
Timpani
String Ensemble 1
String Ensemble 2
Synth Strings 1
Synth Strings 2
Choir Aahs
Voice Oohs
Synth Voice
Orchestra Hit
Trumpet
Trombone
Tuba
Muted Trumpet
French Horn
Brass Section
Synth Brass 1
Synth Brass 2
Soprano Sax
Alto Sax
Tenor Sax
Baritone Sax
Oboe
English Horn
Bassoon
Clarinet
Piccolo
Flute
Recorder
Pan Flute
Blown Bottle
Shakuhachi
Whistle
Ocarina
Lead 1 (square)
Lead 2 (sawtooth)
Lead 3 (calliope)
Lead 4 (chiff)
Lead 5 (charang)
Lead 6 (vox)
Lead 7 (fifths)
Lead 8 (lead bass)
Pad 1 (new age)
Pad 2 (warm)
Pad 3 (polysynth)
Pad 4 (choir)
Pad 5 (bowed)
Pad 6 (metal)
Pad 7 (halo)
Pad 8 (sweep)
FX 1 (rain)
FX 2 (soundtrack)
FX 3 (crystal)
100.FX 4 (atmosphere)
101.FX 5 (brightness)
102.FX 6 (goblins)
103.FX 7 (echoes)
104.FX 8 (sci fi)
105.Sitar
106.Banjo
107.Shamisen
108.Koto
109.Kalimba
110.Bag pipe
111.Fiddle
112.Shanai
113.Tinkle Bell
114.Agogo
115.Steel Drums
116.Woodblock
117.Taiko Drum
118.Melodic Tom
119.Synth Drum
120.Reverse Cymbal
121.Guitar Fret Noise
122.Breath Noise
123.Seashore
124.Bird Tweet
125.Telephone Ring
126.Helicopter
127.Applause
128.Gunshot
Amsynth
Automation
Calf
Clips
Compressors
Editing
Editor
Equalizers
Effects
Exporting
Importing audio
Importing data
Installation from source
Limiter
Loops
Merging
Modes
Moving
MIDI
Mixdown
Mixer
Noise removal
Normalization
Preferences
Punch-in
Playback
Plugins
Quick start
Qsynth
Reverb
Range markers
Range, rectangle
Realtime kernel
Recording
Recording a live mix
Synths
set\_rlimits
Splitting
Stereo
Selection tool
Sends / returns
Sequencers
System requirements
Track order
Troubleshooting
Tools