 Qtractor An Audio/MIDI multi-track sequencer
Diving into Qtractor; a quick start guide for the basic workflow.
Chapter 4, Getting Sound Into Qtractor
Chapter 5, Effects and Filters
Chapter 6, Automation in Qtractor
Chapter 7, Bouncing the Project
Getting started with basic music production in Qtractor is simple as long as all of the requirements are installed. Review the Installation chapters to ensure you’ve installed all the necessary components before beginning. As long as you’ve done that, you’ll find Qtractor a robust digital production environment with plenty of knobs and dials to tweak.
Start the QJackCtl application (recommended), or start jackd from a shell. Once launched, press the Start button to start JACK.
Launch Qtractor from your applications menu, dock, or launcher.
It’s good practise to start every session by saving. It might
seem strange to save an as yet empty session, but it’s better to save an
empty session that to start creating your masterpiece and have data
files and MIDI files scattered all throughout your hard drive. Saving
first is a good way to instantiate an environment in which you can keep
all of your files and sounds organized and consolodated. To save, click
the File menu and select Save As. In
the Name field, name your session. For the
Directory field, click the Directory
icon to create a new, empty directory for your session files and click
OK. Save your session by clicking the
OK button; a Save Session dialogue
will open so that you can now navigate to the directory you’ve created
and name your session file, which will appear as a .qtr
file. Click the Save button to confirm.
Now you’re ready to start producing! Obviously there are different means to creating music in Qtractor, but nearly each one would create with creating a new track. To create an empty track in your Qtractor workspace, click on the Track menu and select Add Track. In the Track dialogue, name your track in the Name field. For Type, choose between Audio or MIDI, depending on what kind of data you wish to use in the track. If you have a specific set of inputs and outputs that you wish to use for the track, you can set that here, or you can leave it on the default and manipulate it later as needed. Likewise, if you know the MIDI bank or patch selections, you can set it here, or leave it as default values and configure it later. Click OK to create the track.
Now that you have an empty track, you should put some sound into it. You can do this in four ways:
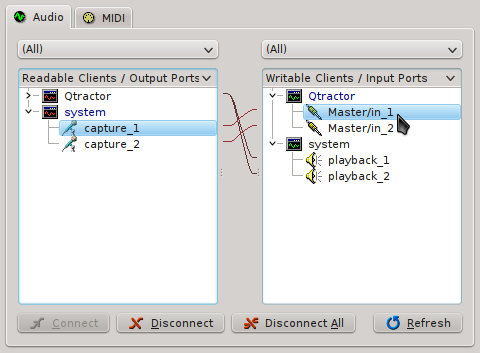
Now choose the sound source’s destination in the right column. You are routing the sound from the microphone into Qtractor, so choose the Qtractor category and select the corresponding input port, such as Master/in_1. Click the Connect button if they are not already connected. Repeat this process for the right channel, and then close the window. In the track label on the left of the Qtractor window, click the R button to arm the track for recording. Click the Record button in the top menu bar to activate Recording mode. Click the Play button in the top menu bar to begin.
* ***Insert an existing audio file into the track*** - if you're using pre-recorded material from a live performance, a sound booth session, or a sample or loop collection, then there is no need to set up a recording source such as a microphone or line-in. You'll simply add files to your **Qtractor** session and drag them into your workspace. To add sounds files to your session, go to the Clip menu and select Import. Choose the file you wish to import, and it will be added into your empty track. Notice that it is also added in the Files panel on the right of the Qtractor window; so to add files without adding them to a track, you can right-click in the Files panel and choose Add Files.
* ***Play MIDI into the track*** - similar to recording audio directly into **Qtractor**, you can connect a MIDI controller to your computer and record MIDI data into a track. The MIDI data will be used to trigger a sound source; the simplest and most direct method is to use the MIDI to trigger a software synthesizer, but of course the MIDI signal could also be routed back out of the computer into a hardware synth as well. Assuming you are using a USB-based MIDI controller such as the Oxygen or Axiom series, or AKAI LPK series, and so on, then you must first define the source of your MIDI signal. Click the View menu > Windows > Connections to see your central patchbay (ie, QJackCtl). In the left column, choose the source of your MIDI signal (a device that, from Qtractor’s perspective, is outputting the signal, hence the “output” label). Your USB controller should be listed as a source, so open its listing and click the MIDI channel listed there. Now choose the MIDI signal’s destination in the right column. You are routing the sound from your hardware controller to Qtractor, so choose the Qtractor category and select the corresponding input port, such as 0:Master Click the Connect button if they are not already connected. Close the window. If you start playing now, you’ll be sending MIDI data without hearing any feedback whatsoever, because you have not yet configured the MIDI signal to trigger sound. So that you can hear what you’re playing, you must insert a plugin synthesizer into the track. With your destination track selected, click on the Track menu and select Track Properties. In the Track dialogue, click the Plugins tab. In the Plugins tab, click the Add button on the right to see a list of available sotware plugins. In the Plugins dialogue, select the type of plugin you wish to use with the top right button. Software synths on Linux are usually of the DSSI variety; from the list of DSSI synths, select the one you want to play and click the Activate checkbox in the lower left corner. Click the OK button in the bottom right corner of the window to proceed. Note If you don’t have any plugins installed, you can install them from your distribution or directly from their project websites. One of the best soft synths for immediate gratification is whySynth, which bundles some nice, ready-to-use patches. You will need to restart Qtractor in order for your new soft synths to be available. Back in the Track dialogue, select the Track tab again. In the MIDI/Instrument panel, choose an instrument from the top dropdown menu; using WhySynth as an example, you would select WhySynth_20100922 DSSI plugin. Choose a Bank and Program. If you’re not familiar with WhySynth, you can select any of its three Banks and any of the Programs contained in them. You should be able to instantly audition the sounds on your USB controller. When you’ve selected the sound you’d like to use, click the OK button. In the track label on the left of the Qtractor window, click the R button to arm the track for recording. Click the Record button in the top menu bar to activate Recording mode. Click the Play button in the top menu bar to begin.
* ***Insert existing MIDI data into the track*** - if you want to use pre-made MIDI files then simply add the files to your **Qtractor** session. To add MIDI files to your session, go to the Track menu and select Import Tracks > MIDI Choose the file you wish to import, and it will be added into a new track. Notice that it is also added in the Files panel on the right of the Qtractor window; so to add files without immediately adding them to your workspace, right-click in the MIDI tab of the Files panel and choose Add Files. Note The MIDI file you import may or may not have generic MIDI instrument assignments. Either way, you can always adjust the MIDI instrument assigned to that track via the Track Properties dialogue, as you would for a track into which you’re recording MIDI.
You know how to create tracks and insert sound either in the form of audio files or MIDI data. In addition to putting sound into tracks, Qtractor can pipe tracks through filters and effects.
The most popular format for sound filters and effect units in Linux is LADSPA, providing the free equivalent to VST, RTAS, or AU. The two ubiquitous Linux plugin packs are the Steve Harris LADSPA Plugins and the CALF Plugins, which should be availble from your repository or from their respective websites.
If you have not installed them yet, install them now and then re-launch Qtractor so that it will detect them as available filters.
Effects occur upon the sound itself, so they can be applied to Audio tracks as well as MIDI tracks. To place an effect on a track:
Select the track you want to pipe through an effect and select it by clicking the track label on the left of the Qtractor workspace.
Click on the Track menu and select Track Properties.
In the Track dialogue, click on the Plugins tab.
Click the Add button on the right of the window.
In the Plugins dialogue, choose the type of plugin you want to use with the filter button in the top right corner; more than likely, you will be using a LADSPA plugin.
A very common effect, of course, is reverb. Filter the choices from all the LADSPA plugins by typing “verb” into the search bar along the top. You may see one or two results, such as GVerb and Plate Reverb, so choose one of these. Place a tick in the checkbox in the lower left corner of the screen, labeled Activate and click OK.
Should you need to modify the reverb filter, right click on the plugin in the Track window and choose Properties. This will open the control panel for the effect, where you can change the attributes of the effect.
Nearly every aspect of any track can be automated in Qtractor, from the basics like volume and panning, to the very minute like the LFO frequency of a soft synth, or the levels of an effect.
To work on the automation of your tracks:
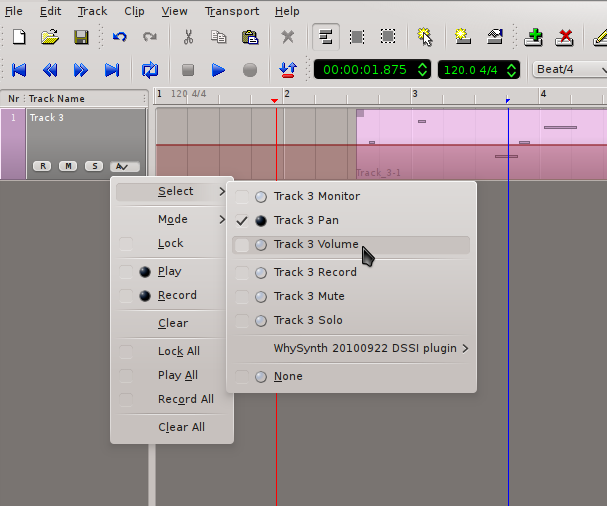
Choose from the popup menu the attribute you wish to automate.
Notice that an overlay appears over your track, representing the normal level of that attribute. To enter automation mode, click the Edit menu > Select Mode > Automation. In this mode, click the automation overlay to adjust levels.
To differentiate different attributes that you’re automating, it can be helpful to modify the colour of the automation overlay. To do this, click the automation button in the track list and choose Mode > Colour and pick a new shade for that automation overlay. To add automation for another attribute, click the automation button again, and navigate to Select to choose the next attribute. The new automation overlay appears in the default colour, and you can now modify its levels.
Leave automation mode by toggling off Edit menu > Select Mode > Automation
Once you’ve finished your song, you obviously want to export the piece so that people can listen to it without having to have your Qtractor source files. This process is sometimes called “bouncing” a track, or exporting a “mixdown” or simply “exporting” the song.
Since it’s possible to have multiple sources contributing to your final product (external hardware synths feeding sound into Qtrator while soft synths play over pre-recorded audio files to the beat of a Hydrogen drum machine on another virtual desktop, for example) it would make no since to treat the exporting process in the same way as a wave form editor (such as Audacity) would. Qtractor’s bounce process is literally to play all the sound sources in sync whilst recording what is playing back into Qtractor itself.
Note
Different people deal with bouncing and exporting in different ways, depending on their preference, their creative needs, and the capabilities of their computers. For instance, you could bounce each MIDI track individually to an audio track and then export all audio tracks into one self-contained track. Or you can simply set Qtractor to record and then play everything back into one audio track, which you then export.
There is no right or wrong way to do it. Either do it all in one go at the end or do it step by step. Usually the raw power of your computer will be the deciding factor.
To perform the final export of your completed work:
Create a new Audio track: Track > Add Track
Label the track, ie, “Bounce”
Open the Connections window: View > Windows > Connections
In the Connections window, connect the Master/Out of Qtractor to the Master/In of Qtractor, such that the output of all sound managed by Qtractor is being directed to the input of Qtractor for recording. Warning Be sure to disable any capture device such as microphones or unused line-ins. You’ll be recording all the live sound going into Qtractor, so you don’t want accidental line noise, hums, or room tone.
Set the in and out points for your recording by clicking once on the top timeline at the point you want the recording to stop; a blue transport line will be anchored where you click. Scroll back to the beginning of your project and click again in the top timeline to mark the in point with an opening blue transport bar.
Click the Punch In/Out button in the top menu bar to limit playback between your markers. Note If you do not set in and out points, you will need to stop the recording manually.
Arm your Bounce track for recording. Click the Record button in the top menu bar. Make sure that your transport (playhead) is at the beginning of your track! When ready, press the Play button in the top menu bar. Warning Bouncing a track is a realtime process. Do not use your computer while you’re bouncing a track!
When you’ve bounced your song to its own track, save the project! Solo the bounce track and listen to the recording for quality assurance, and then you are ready to export that track as a self-contained, distributable file.
To export a single track to disk:
Select the track or tracks you wish to export. If you bounced everything into one track, then it will just be that track, which you can solo using the Solo button on the track controls. If you are exporting a project consisting of only in-project audio, then leave them all activated and continue.
Choose Track > Export Tracks > Audio
In the Export Audio dialogue, choose a location and filename for your file. Choose the range of what will be exported; you can export the entire session, or manually set a Punch In/Out range, or specify the range in timecode, frames, or bars/beats/ticks. If you have multiple output sources, choose the appropriate source (probably your Master Output).
Click the OK button to begin the export.