 Qtractor An Audio/MIDI multi-track sequencer
Author: Miguel Lacha.
Difficulty level: Advanced.
It is assumed that you already know:
You will learn to:
Have sufficient knowledge to be able to apply different workflows with sendings to sidechains in Qtractor. The workflows proposed here are only a partial reference of infinite possibilities. Related content: How To - 6 Alternative Sidechain Workflow with Aux Sends
Qtractor does not have pre-built workflows. In exchange, it offers you total freedom to create your own workflows.
Example project
We will work with an example project subdivided into 4 Qtractor sessions (.qtr), where we will implement the different techniques.
I recommend before starting the tutorial, open the last session “4.HowSidechain.qtr”, to get an idea of the final result sought.
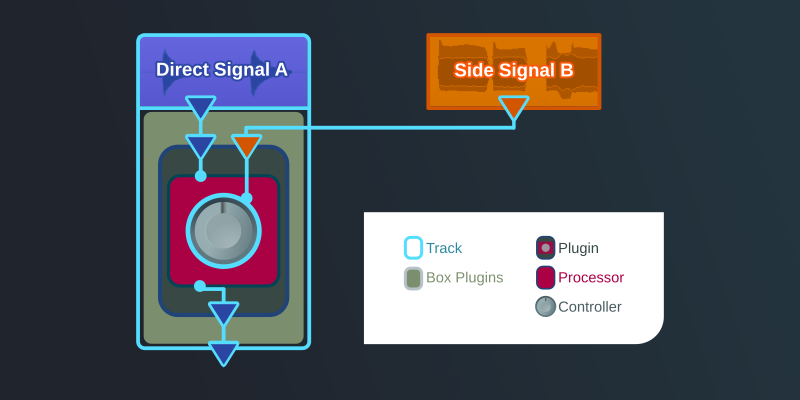
Sidechain is a signal sending technique that allows modifying or controlling an audio signal “direct A”, with another audio signal “external B”.
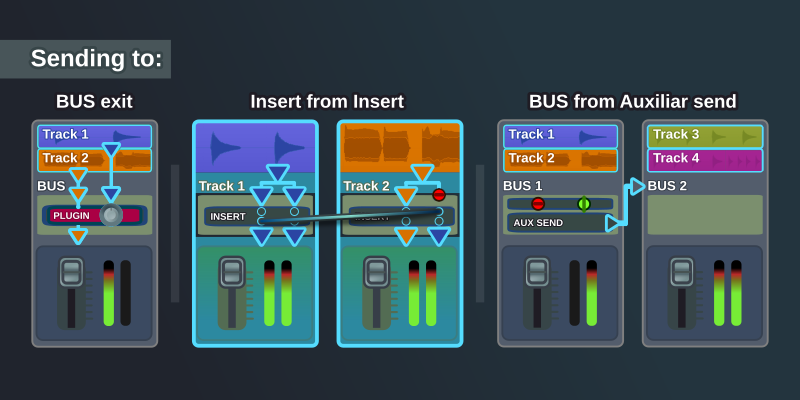
Types of sendings in Qtractor
Plugins with sidechain They are characterized by having more inputs than outputs: Every sidechain plugin must have extra input/s for the sidechain “external B” signal in addition to “direct A” input/s.
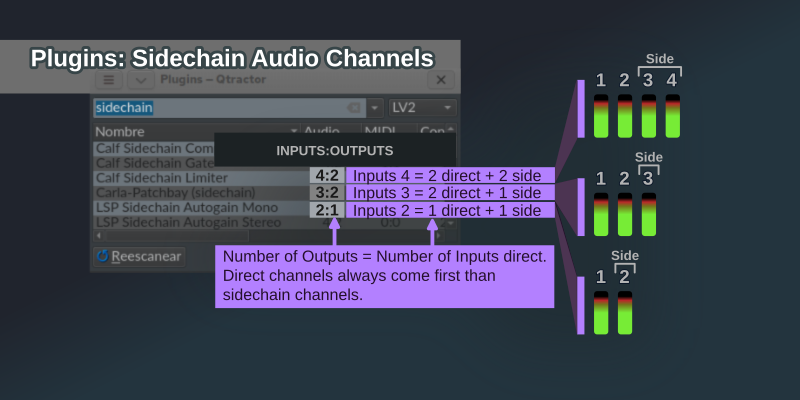
“Direct inputs” are the first ones that correspond in number to the outputs. The remaining ones are “entries for sidechain (or external)”. The workflow is conditioned by the demands of each specific plugin (mono, stereo, purpose of the plugin, etc.).
Two very widespread uses:
However, there are no limits, all types of plugins can be developed with a sidechain, where an “external B” signal “automates” a certain parameter or parameters of a plugin in order to control or modify the “direct A” signal. Not all plugins support sidechains, they must have been designed and programmed expressly for this purpose.
1. Undefined channels. A bus is not mono, stereo… A bus simply has channels. It is you who, through the interconnections, define the configuration (mono, stereo, soundround… with or without sidechain). The number of channels on a Bus can be modified at any time, although it is advisable to design the project connections and workflow in advance.
3. The buses determine the number of channels in the tracks. Sidechain plugins have extra inputs. So we need extra channels that allow the signal to be directed towards them. Qtractor buses allow you to create these new channels.
4. Although buses (and therefore tracks) with different numbers of channels can coexist, it is not recommended. If you plan to work with sidechain, buses with the same number of channels are the best option. Otherwise, “Auxiliary Sends” will not work and “Inserts” may create conflicts.
5. An audio track will attempt to inject audio to all available channels before entering the plugin chain. This allows you to combine mono and stereo audio files into a single track in an intuitive and simple way. In general it is desirable behavior. It is not in the specific case of side chains. However, it is easily solved with plugins that mute or interrupt channels.
Thanks to the “switch plugin”, we now have the 2nd channel free to be able to carry out sidechain workflows. What at first seemed like a configuration of stereo track, it turned out to be a mono + sidechain channel configuration. I want to emphasize this idea, although the tracks start from a stereo configuration for panning control, a Qtractor Bus gives you undefined channels, so that you define them. And this feature is what we are going to take advantage of to apply sidechain.
6. The “midi instruments” generate an audio signal within the plugin rack. They do not behave like an audio track. They only occupy the bus channels that correspond to their outputs. That is why with them it is not necessary to use switches. channels.
7. Standard sidechain channel configurations:
Compatible with “Jack (genuine)” and “PipeWire”
It’s the simplest way. There is no need to create new sendings. We take advantage of the signal send from a track to its default bus.
It could be summarized as, whenever we need a sidechain, creating a specific bus for all the tracks involved.
Create a folder where you can follow the tutorial and unzip how_sidechain.zip inside.
You will find different sessions arranged numerically. Open the session “1.HowSidechain.qtr”.
You will see several tracks already recorded ready to begin our connections.

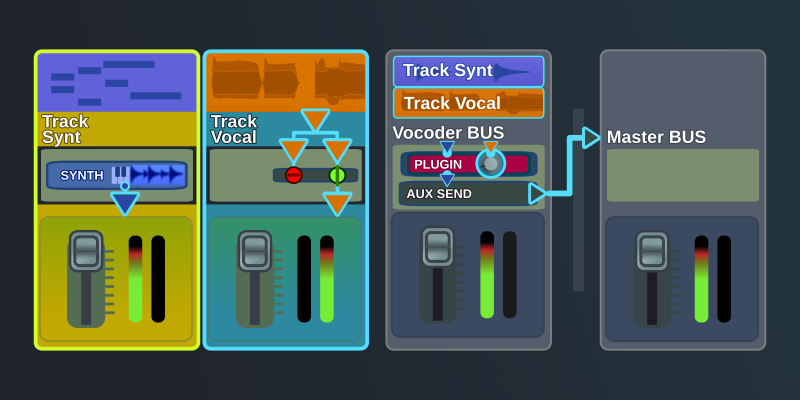
We find two tracks for the vocoder (“vocoderSynt” and “VocoderVocal”), and two other tracks with midi instruments.
CONFIGURE BUSES
The first thing we will do is create an exclusive bus for the “vocoder” tracks, where we will host the “Calf Vocoder” plugin.
In the mixer:
Now we will need a new Master channel.
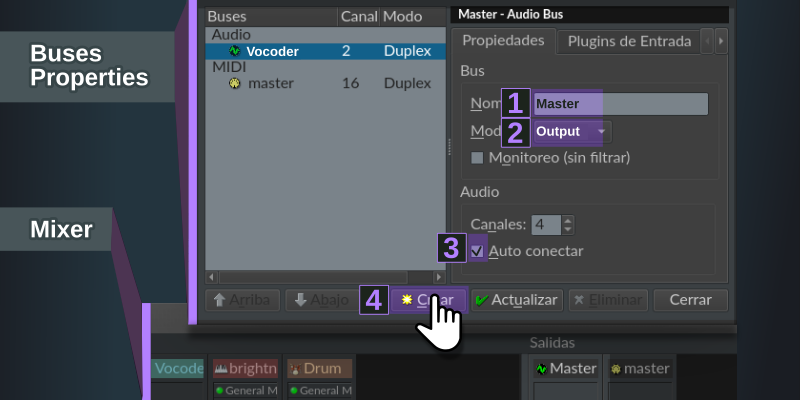
It’s Qtractor’s own and unique 2-step (Configure > Save) way of managing “buses”. Therefore feels strange at first. However, once you see the logic, it is more productive than the traditional system (New > Configure > Save).
Adds the “Calf Vocoder” plugin to the “Vocoder” bus.
“Calf Vocoder” has a stereo sound concept, and arranges the channels as follows:
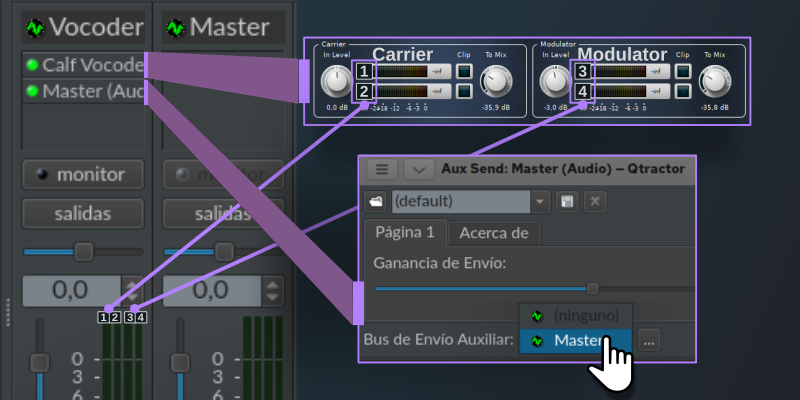
Adds an “Aux Send” to the “Master” bus.
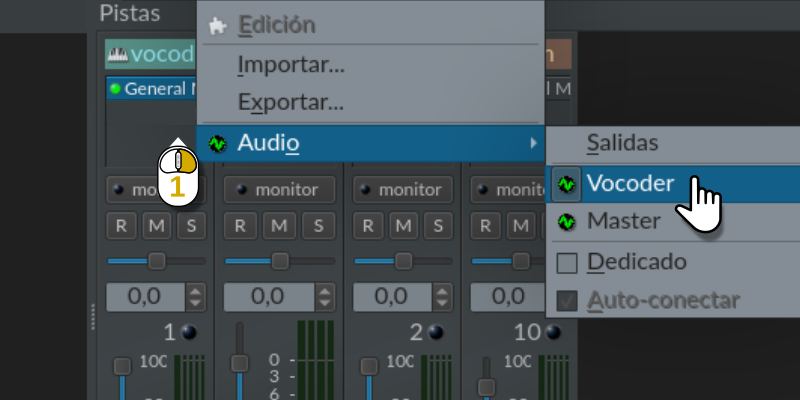
SET TRACKS
Track vocoderSynt:
Right click on the plugins box of the midi track “vocoderSynt”.
Assign as audio output bus: audio > Vocoder.
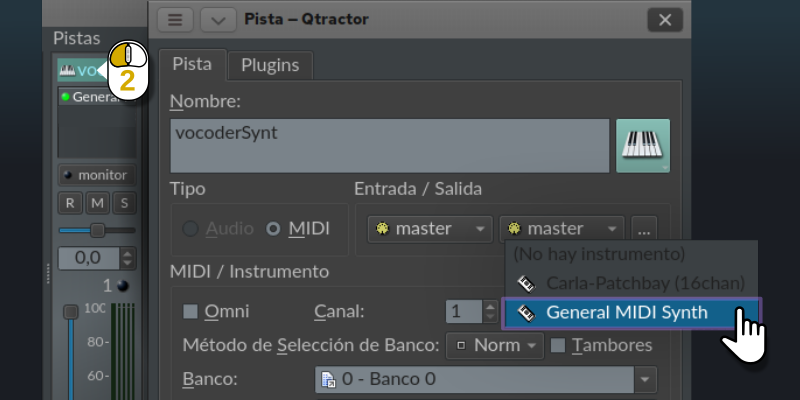
“General Midi Synth” can be deconfigured by playing “Piano default” instead of the program assigned by you. If this happens, reassign the bank and program. It is not very common, but it can happen.
Track VocoderVocal:
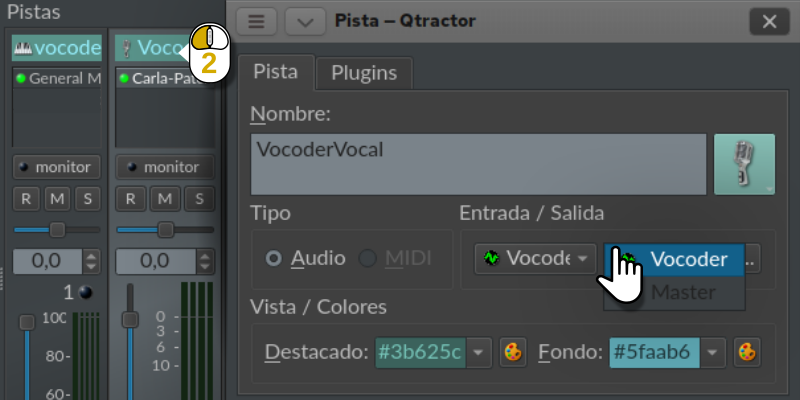

We already have all our connections!!!
Try and experiment with different settings on the Calf Vocodorer and with different timbres on the carrier.
You can find my configuration proposal in the session: 2.HowSidechain.qtr
“PipeWire” Compatible: Tested in version 0.3.84.
“Jack (genuine)” Personally I haven’t had any problems. However, some users comment on the following incidents: * Inserts may not send audio. * Inserts may stop working when you reopen the session.
This time we will add the plugins from the sequencer instead of the mixer. The reason is simply educational, to see the many options that the Qtractor UI offers.
We will add a Sidechain Compressor to the track “brightness” (intended for accompaniment). The intention is to lose presence (volume) when the Vocoder (lead voice) plays. This way we will achieve a cleaner mixture.
We added the plugin “Calf Sidechain Compressor” in the track “brightness”.
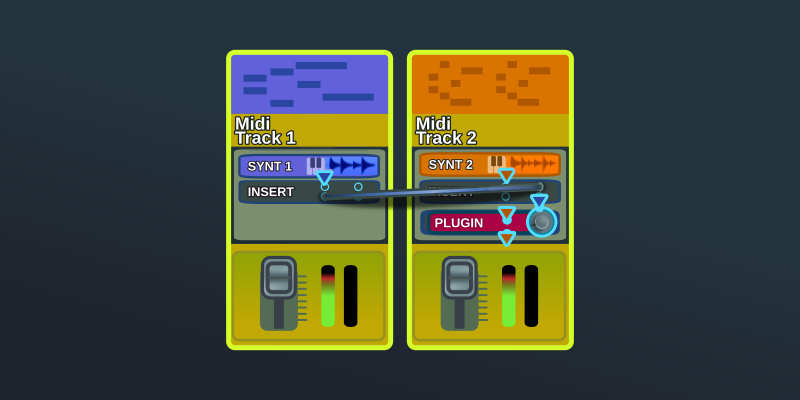
We added an “Insert” audio on the midi track “vocoderSynth”.
We added an “Insert” audio on the midi track “brightness” before “Calf Sidechain Compressor”.
We thus have an “Insert 1” for sending and an “Insert 2” for signal reception.
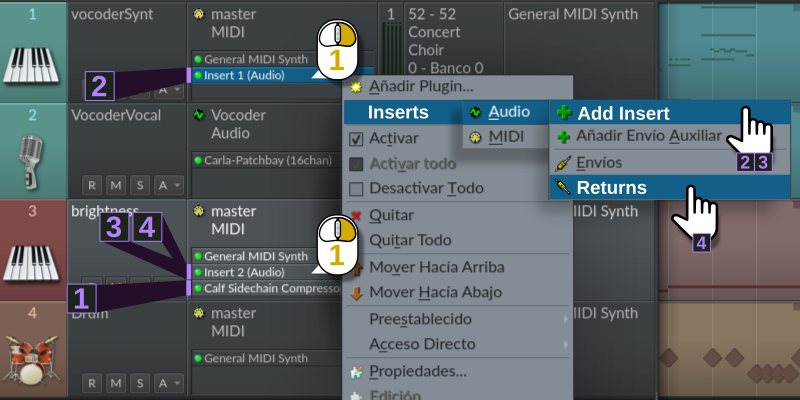
IMPORTANT!!! In Qtractor, inserts with a sending function must always have a lower number than those for receiving.
We right click on “Insert 2” and select: Inserts > Audio > Returns.
We connect outputs 1 and 2 of “Insert 1”, to inputs 3 and 4 of “Insert 2”.
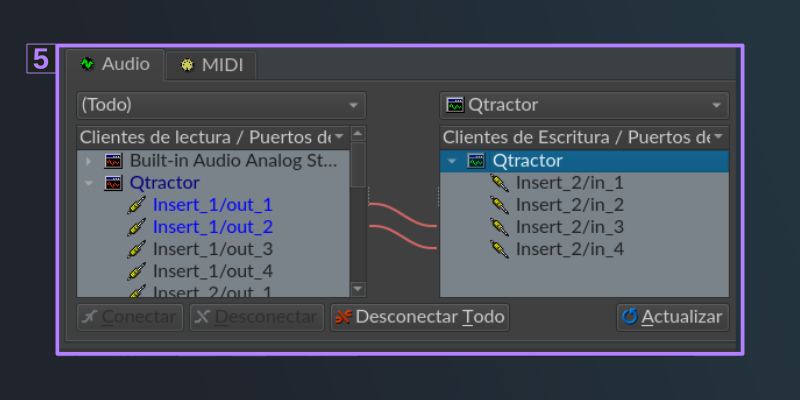
We already have all our connections!!!
Try and experiment with different configurations in “Calf Sidechain Compressor”.
You can find my configuration proposal in the session: 3.HowSidechain.qtr
How to add a reverb with side compression?
Reverbs are essential for spatial and aesthetic reasons, but they have a bad habit of muddying the mix.
That is why it is usually advisable to have them controlled with a compressor.
If the compressor responds to the solo audio we will achieve a more balanced mix.
You will find a new audio bus (“Reverb”) with a lateral compression. A mastering chain has also been added to the “Master” audio bus.
In this exercise there is no explanation, with what has already been discussed you should know what is happening.
Session proposal to experiment and enjoy: 4.HowSidechain.qtr