 Qtractor An Audio/MIDI multi-track sequencer
This chapter is written for those who may not be very familiar with digital audio recording or MIDI “sequencing” applications, or who wish to gain a quick overview of how Qtractor works. It can be used before exploring the program in greater depth and learning its features in detail. It describes an example Qtractor session and serves as a basic walk-through of the program.
You’ll use Qtractor to import a pre-recorded audio file and record a MIDI track. A MIDI-triggered tone generator (in this case, a hardware tone generator outside the computer, although it could just as easily be a “soft synth” inside the computer) will produce the sound for the MIDI track as Qtractor plays it back.
To begin:
Start the QJackCtl application
Set the input and output audio hardware with QJackCtl if you
need. This is the place and not Qtractor. You will find the options to
do this at: QJackCtl Setup > Configurations > Advanced
> Input Device and Output Device 
Press the Start button to start JACK and launch Qtractor from your applications menu, dock, or launcher
It’s good practise to start every session by saving. It might seem strange to save an as-yet empty session, but it’s better to save an empty session than to start creating your masterpiece and have data files and MIDI files scattered all throughout your hard drive. Saving first is a good way to instantiate an environment in which you can keep all of your files and sounds organized and consolidated
To save, click the File menu and select Save As. This opens the Session Properties window.
In the Name field, name your session. For the
Directory field, click the directory icon to create a
new, empty directory for your session files and click
OK. Save your session by clicking the
OK button; a Save Session dialogue
will open so that you can navigate to the directory you’ve created and
name your session file, which will appear as a .qtr file.
Click the Save button to confirm.
Now that the session has been saved, open the Session Properties window again using the menu item File / Properties. This time, click the Properties tab and set both the time signature and the tempo so that you can use the metronome to help you keep MIDI parts synchronized as you record them.
The first thing you may like to do is import a pre-recorded audio file of drums and other percussion, to form the basis of the recording session. To bring audio into your project file, right-click in the Files pane on the right hand side of the main workspace and select Add Files, then choose the file or files you wish to import from the Open Audio Files window that appears. If the Files pane isn’t visible, you can enable it by clicking on the yellow file icon, the one without an arrow above it. To place an audio file in a track, drag and drop it from the Files pane into the workspace. You can add it to an existing track, or drop it directly into an empty area and a new track will be created automatically.
Your MIDI piano-like keyboard normally routes its MIDI data (created when you strike the keys, for example) to its own internal tone generator, which then sounds like you’re playing a real piano, or electric piano, harpsichord, bass guitar, etc. However, for this project in Qtractor you want to route the external keyboard’s MIDI data to Qtractor. So, using a standard MIDI cable (or perhaps a MIDI to USB converter, depending on your set-up), connect the keyboard’s output to the input of your sound card. Inside the computer, you will route the MIDI data from the sound card to a Qtractor MIDI input bus.
Next, open Qtractor’s Connections window by clicking on the red icon near the top of the main workspace.

Connections icon
In the Connections window’s MIDI tab, connect the MIDI output of the sound card (in the left pane, marked Readable Clients / Output Ports) to Qtractor’s listing in the right pane (marked Writable Clients / Input Ports). If your sound card doesn’t appear in the list, click the Refresh button in the bottom right to update the list of connections.
You can connect an output port (the source of the data, MIDI or audio) to an input port (the port that will receive the data) in several ways. One method is to left-click a port in the left pane, left-click a port in the right pane, then either left-click the Connect button or right-click elsewhere in the window and select Connect from the pop-up menu. Another method is to click a port in the left pane and, with the mouse button held down, drag the cursor to a port in the right pane until the port is highlighted, then release the mouse button. Regardless of the method you use, a line representing a “virtual cable” will appear between the two ports in the middle section of the window.
After connecting your sound card to Qtractor, you’ll then need to connect Qtractor’s output to your destination source, so that it can send the MIDI information back out again. Again in the Connections window, connect Qtractor’s Master/Out listing in the left pane to your sound card in the right pane.
Once you’ve made your connections, close the Connections window by clicking its icon once more.
Now that Qtractor can receive and send MIDI data, it’s time to create the first track in order to record that data. Right-click in the blank pane on the left of Qtractor’s main window and, from the pop-up menu, choose Add track…. You can also do this via the menu item Track / Add Track….

Adding a track
Qtractor’s Track Properties window will then open.
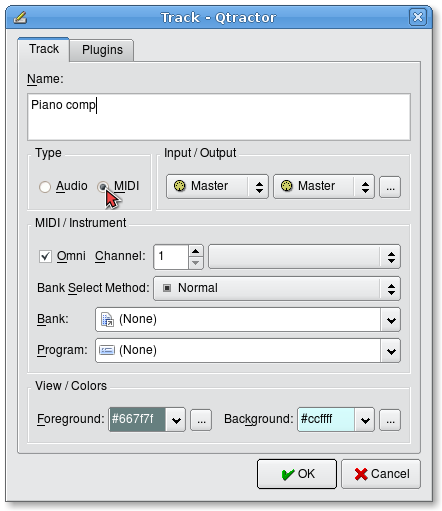
Track Properties window
In the Track Properties window, click the MIDI radio button: you want this track to be used for MIDI, rather than audio, data. As soon as you click the MIDI button, the track is automatically connected to Qtractor’s Master MIDI input and output buses. These can be changed by using the drop-down lists and the ellipsis button in the Input / Output area of the Track Properties window, but there is no reason to do so right now. You can replace the default name “Track 1” with, for instance, “Piano comp.”
You can leave the MIDI Channel at the default “1” for now, as this channel designation is mainly for output. That is to say, when the track is played back and its MIDI data is sent to somewhere outside Qtractor (in this case, a hardware tone generator) that data will be sent on the MIDI channel specified here (there are 16 possible channels). However, you’re going to record now, so the eventual output MIDI channel doesn’t matter at the moment - it can easily be changed later before you play your MIDI tracks back.
What does matter however is the Omni checkbox. If enabled, Qtractor will record MIDI information received on any MIDI channel (omni means all). If disabled, it will record only information it receives on the channel number specified in the Channel setting, to the right of the Omni checkbox. Your MIDI keyboard might be set to transmit MIDI data on only one channel (e.g., MIDI channel 1), so you need to make sure that each of the MIDI tracks you plan to record on will receive data either from the correct channel, or from all channels. Click the OK button and a new empty track appears in Qtractor’s main window.
In order to record, you must arm the track by clicking on the “Record” button for that track. This is the “R” button that is present on every track strip, besides the other “M” and “S” buttons (respectively for “Mute” and “Solo” track state settings). You can also do this via the menu item Track / State / Record. Either way, the “R” button will turn red (or become highlighted, depending on your GUI settings) and the track is then set armed and ready for recording.
Next, turn on session recording mode by clicking on the Record button in the main transport toolbar (big red circle). You can also do this via the menu item Transport / Record.
Now you’re ready to record your first MIDI track. Take a little breath and… press “Play” (blue triangle next to the transport’s Record button), the space bar or choose the Transport / Play menu item: you’re rolling. Hit the MIDI keyboard and see a brand new MIDI clip taking shape while you’re performing. When done, press “Play” again to stop.
As previously mentioned, when playing back a MIDI track its data is sent on the channel number specified in the Channel setting of the Track Properties window. In order for your hardware tone generator to play back the MIDI data from Qtractor as actual sound, you’ll need to make sure that this channel tallies with your hardware set-up.
This chapter has been merely an introduction to what is a fairly far-reaching subject. More detailed information on the above topics, plus many other aspects of Qtractor, can be found in the next chapter. Specifically, see here for more information on working with MIDI and here for audio. A sample MIDI workflow tutorial using a soft synth can be found in this How To.