 Qtractor An Audio/MIDI multi-track sequencer
Qtractor can record and play digital data, specifically audio and MIDI data. To record, Qtractor must get the data from somewhere; to play the data, Qtractor must send it to somewhere that can understand the data stream and produce sound. The process of directing such data to and from – and through – software and hardware is called routing. In Qtractor, not much routing is done automatically. Most of it is left to the user, because it is the user’s preferences, desires and goals in any specific project that determine how the audio and MIDI data should be routed.
In order to route data, one must have an understanding of the various connections and pathways that are available. A bus is like a pipeline through which one or more streams of data can travel. A port is like a valve at one or both ends of a bus. A port is normally closed, not allowing any data to flow through, but once a connection is made to it, it opens to allow data to pass through it from one bus to another. However, simply because a connection is made and the port is open doesn’t mean that data is flowing through it: the data flow is initiated by the software or hardware at one or both of the ends of the bus.
A track can be thought of as a place where digital audio or MIDI data is deposited, rather than a pathway through which such data moves. Data can be deposited in various ways, such as recording, pasting or importing. Tracks are, however, still part of the signal or data flow, as they can “pluck” a copy of their data and send it to one or more buses (and, through those buses, to other destinations). In concrete terms:
Below is a representation of the connections (ports), buses and routes in Qtractor through which audio or MIDI data can flow.
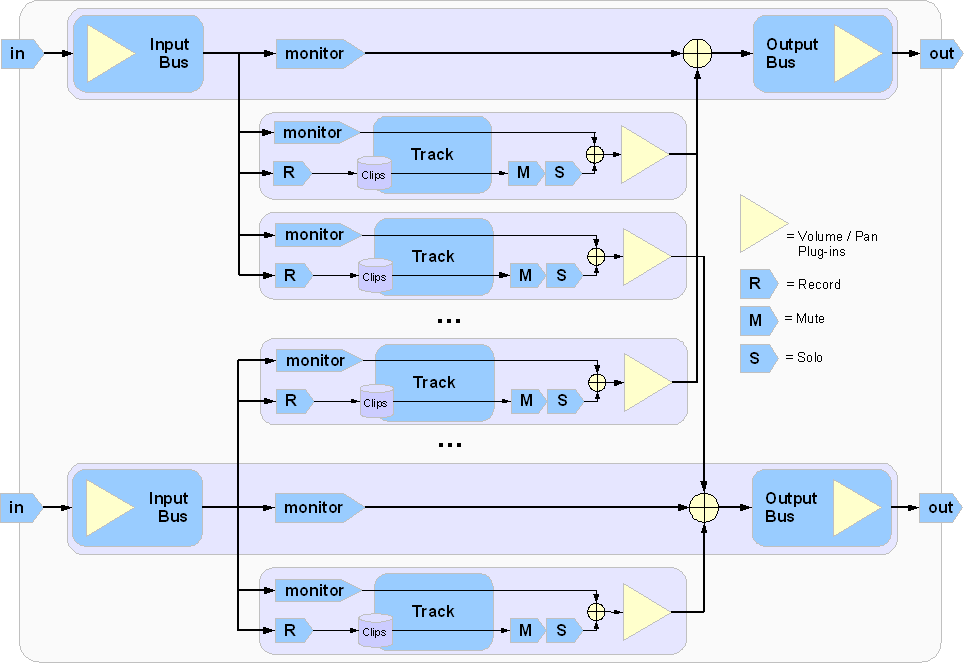
Audio & MIDI data flow, in, through and out of Qtractor
Routing in Qtractor is very flexible and therefore signal/data flow can become very complex. Data streams can merge and flow through the same bus, or split and go through separate buses to different destinations. They can likewise flow through different buses to the same destination, whilst passing through other intermediate software or hardware in which the data is possibly manipulated in some way. Because of this complexity it is beneficial to develop a solid understanding of the issues related to routing, the many possible routes that data can take and the many possible connections that can be made.
Routing can be accomplished in several ways, including:
Using the Connections window to connect Qtractor’s input and output buses to outside sources (for “reading” and, possibly, recording data) and destinations (for “writing” data to, for example, a sound card)
Using the Track Properties window to assign a track’s input and output buses
Setting the state of a track, from among Record, Mute, Solo and Monitor (some of which are mutually exclusive)
Adding Plugins, Aux Sends or Inserts to tracks or buses. Aux Sends are used to route audio to internal destinations, i.e. Qtractor buses; Inserts are used for external destinations, i.e. applications outside of Qtractor
Qtractor is a fairly massive multi-threaded application. For instance, each audio clip has a dedicated disk I/O executive thread, which synchronizes with the master engine, and to the central JACK real-time audio processing cycle, through a lock-free ring-buffer. These audio file ring-buffers are recycled (filled/emptied) at a one second threshold and have a maximum streaming capacity of 4-5 seconds of audio sample data. Smaller clips are permanently cached in a RAM buffer.
Audio thread scheduling is mastered and mandated through the JACK callback API model. MIDI clip events are queued in anticipation through one MIDI output thread, which feeds an ALSA sequencer queue, synchronized on one second periods to the JACK process cycle. A single thread is responsible for listening (polling) for MIDI input, and multiplexes all incoming events through record-armed MIDI tracks. Time stamping is done through the ALSA sequencer facility.
Looping is made possible through the audio file buffering layer, right at the disk I/O thread context. The same consideration is adopted for MIDI output queuing. Audio frame relocation is accounted from successive JACK client process cycles (i.e. buffer-period resolution).
In this particular design, JACK and ALSA sequencer ports are logically aggregated as buses with respect to the audio and MIDI signal routing paths, functioning as fundamental device interfaces. Input buses, through exposing their respective input ports, are the inlets responsible for capture and recording. Output buses are the main signal outlets and are responsible for providing playback and, more importantly, mix-down connections.
Buses are independently assigned to tracks. Each track is assigned to one input bus for recording, and to one output bus for playback and mix-down. The assigned bus determines the number of channels the track supports. Clips bound to disparate multi-channel audio files, for which the number of channels does not match the track’s, are automatically resolved on mix-down. The illustration in the above section shows one typical signal flow block diagram.
Qtractor’s graphical user interface follows a standard design of most modern digital audio and MIDI workstations. The interface is easy and intuitive enough to easily interact with in order to discover the potential of the underlying inner core of the application where its functionality is implemented.
The following illustration shows an overall view of the GUI with an example session loaded into the workspace.
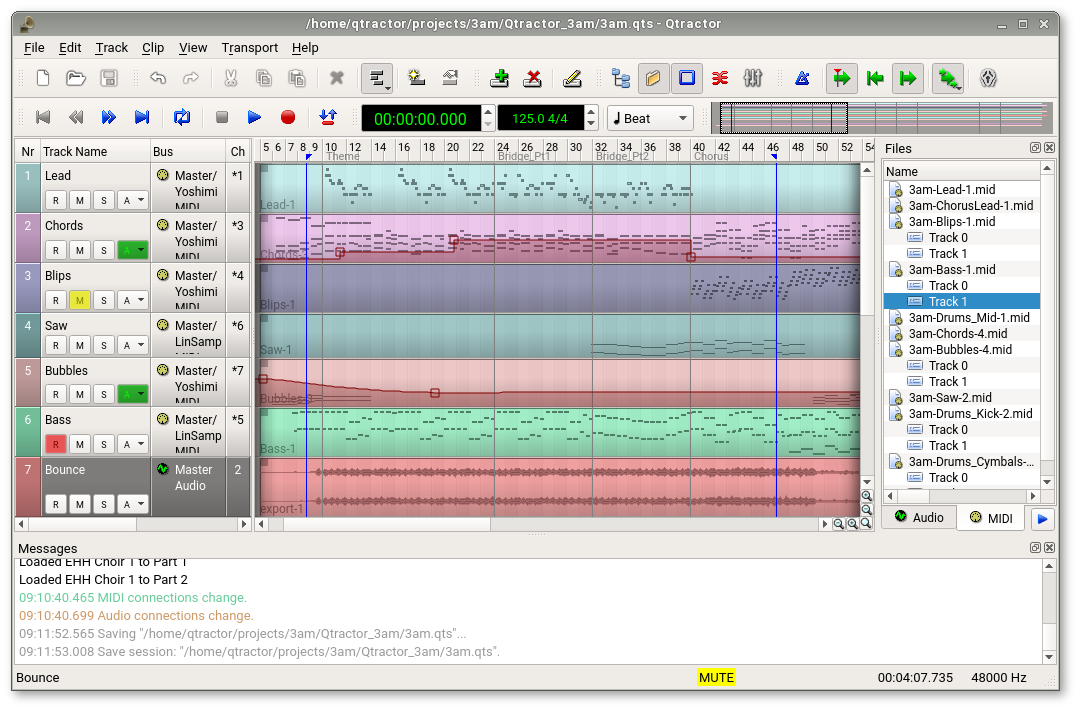
Qtractor’s main window and work area
The main Qtractor window is initially laid out in this fashion:
To move around the work area use the horizontal/vertical scroll bars
at the bottom/right of the windows, or the mouse wheel to move up/down
and Shift+mouse wheel to move left/right. You can also
click on the navigation window (above the timeline) to jump to specific
areas of the session.
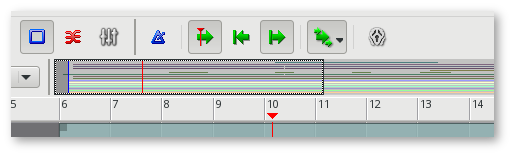
The navigation window, situated between the main toolbar icons and timeline
To zoom in/out horizontally and vertically use the magnifying glass
buttons in the bottom-right of the main view.
Shift-clicking these allows you to zoom in greater
increments and Ctrl-clicking will zoom to the
maximum/minimum. You can also zoom in/out horizontally using
Ctrl+mouse wheel.
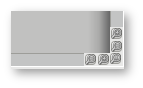
“Magnifying glass” zoom buttons, situated in the bottom-right of the main view
The clips area in the middle is where most of the action takes place. It contains visual displays and representations of audio waveforms or MIDI data. This section is used for editing Clip objects (portions or all of any particular audio or MIDI file, recorded or imported) and for navigation within the project or “session.”
The very bottom-right of the screen shows the Session total time and Session sample rate. To the left of these is a panel which provides information on the session’s current state. From left to right, the indicators and their meanings are:

Session state, total time and sample rate information
Qtractor also has other useful windows, such as the Mixer window and
the Connections (patch-bay) window. These can be opened via the
View / Windows menu, or by pressing
F8 for Connections or F9 for the Mixer. Three
utility windows are additionally featured: the Messages window,
for general information and debugging purposes; the Files pane,
where audio and MIDI files are organised and selected; and the File
System browser, which provides access to your file system in a
manner similar to a file manager (such as Dolphin, GNOME Files, Thunar
and so on).
Dialog windows for editing session, track and clip properties are also accessible in their proper context, which will be discussed in their respective sections.
Finally, session and application configuration options are assisted through respective customizing dialogs: Buses, Instruments and Options…, available from the View menu in the main menu bar.
A Qtractor session project contains all the information about your Clips and their placement, Mixer set-up, plugins, tempo, time signature and Connections patch-bay. When creating or saving a project, all this and any related settings are saved on your hard disk within this session project file.
To create a new session, simply start Qtractor and begin working. If you already have a session loaded and want to start a new one, choose File / New or click the New session icon (blank piece of paper) in the upper-left of the screen. To open a session, either use the File / Open… menu command or drag your session file (.qtr or .qts, which are essentially the same) into the left or middle pane.
It is important to note that Qtractor sessions are locked to a session project sample rate. This is dependent on the sample rate of the JACK server running at the time the session is created.
Any attempt to convert non-matching sample-rate sessions will result in a recommendation warning message.
However, individual audio clip files are automatically converted on playback in real-time to the host sample-rate (via libsamplerate). This method, while it works very well, is not the recommended method due to possible errors in the real-time sample rate conversion. Real-time sample rate conversion is also going to use quite a bit more valuable CPU resources.
Rui Nuno Capela is working toward eliminating this shortcoming by taking control of JACK from within Qtractor, and restarting it using the session’s project parameters. This will ultimately reconnect any plugins, set the proper sample rate, etc. Until this feature is available, please follow the recommendations listed above.
To access the session properties, choose the File / Properties menu item. Here, you can name your Qtractor session, set the tempo, time signature (how many beats per bar) and decide how many “ticks” (the smallest time unit in a session) will be within the time span of each beat. If you choose to rename your session, Qtractor will update any midi and audio clip file names to match this.
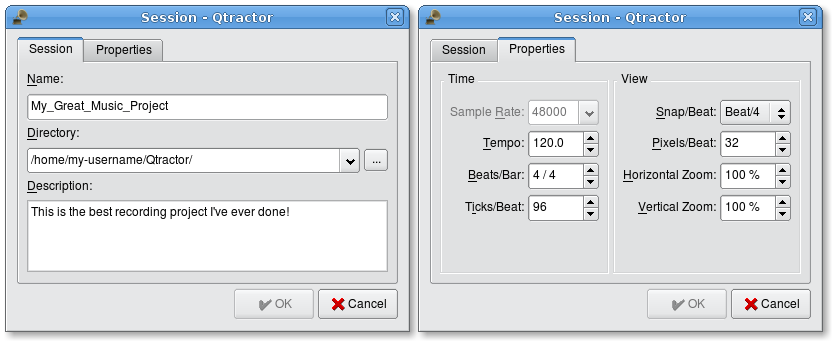
Session properties window showing both Session and Properties tabs
Tempo and time signature can be changed during the course of your composition using the Tempo Map / Markers window. This is accessed via the View menu or by double-clicking the region directly above the tracks which displays the bar numbers. Determine where you wish your tempo/time signature change to occur in Location, input the details of the change in Node, then click either Add to add a new node, or Update to make changes to a previously created one. If desired, you can also add descriptive text in Marker, plus a colour, by clicking the palette icon next to the text field. Markers may be assigned to tempo/time signature changes, or independent of them. Once you’re happy with the content of your Marker, click Add to add it to the map. The other option in this window is Tempo scale factor, which allows you to scale the entire Tempo Map (speeding up/slowing down the whole composition) by an arbitrary factor.
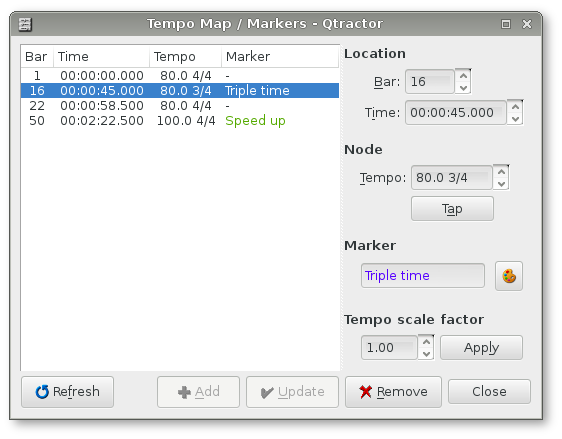
Tempo Map / Markers window showing tempo/time signature changes and markers
There are two limitations to be aware of with regard to tempo and time signature changes. Firstly, changes must occur at the start of a bar - there is no facility to add changes within one. If you, for example, need to insert a change into the middle of a 4/4 bar, create two 2/4 bars and add the change to the start of the second of these. Secondly, there is no facility to “ramp” between two different tempos (gradually increase/decrease tempo over a defined period). Hopefully, such a feature will be added in the future, though whether this will happen or not is currently unclear.
Access the Options windows via the View / Options… menu item. This window allows you to control the global parameters of Qtractor. These are global settings which are not saved within your session file.
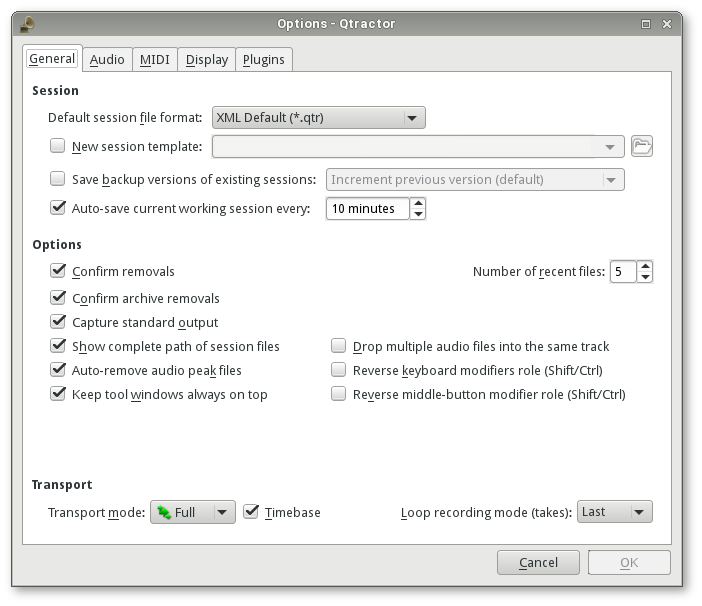
Options window, showing General tab
The window is divided into five tabs: General,
Audio, MIDI, Display
and Plugins. Most of the settings are self-explanatory,
and there are tool tips to guide you, but some which require more
explanation are covered elsewhere in this chapter. The default options
should largely be fine to begin with, but if you’re having trouble
seeing parts of the GUI you may wish to adjust the options in the
Display tab. Qtractor takes its look-and-feel from your
system settings by default, but on this tab you can disable Use
desktop environment native dialogs (which should be off by default)
and choose your preferred Color theme and Style theme.
You may also wish to run qtconfig to perform configuration
for all Qt applications (of which Qtractor is one).
If you need to make detailed colour-related changes, click the … button to the right of Color theme to open the Color Themes window. Here, you can fine-tune a variety of settings, plus import them from/export them to external files via the Import and Export buttons at the bottom of the window.
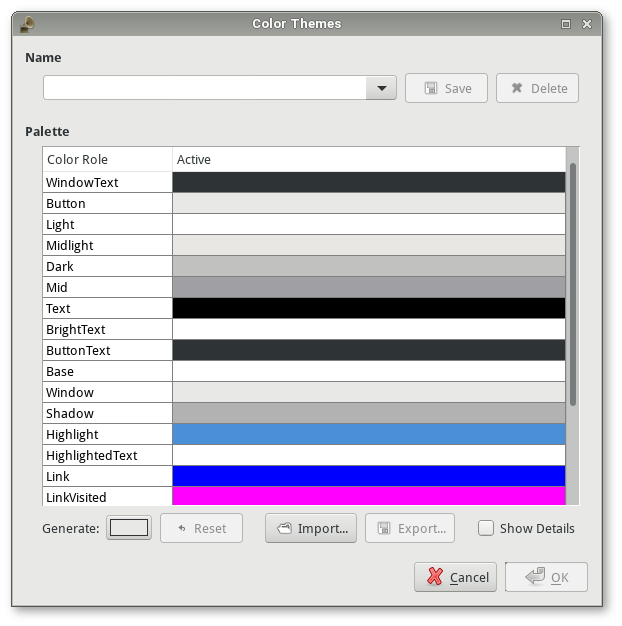
Color Themes window, with the Show Details option enabled
Finally, if you experience problems with Qtractor when using a desktop environment based on GTK+ (GNOME, Xfce etc.), try a Qt-based theme for Style theme and make sure that Use desktop environment native dialogs is disabled.
Sound file selection is made available through a tabbed mini-organizer, known as the Files pane, which lists all the files contained in the current session. Audio and MIDI file lists are kept separate on their respective tabs. Audio file format support is provided by libsndfile, enabling the use of wav, aiff, flac, au, etc. The optional libraries libvorbis and libmad provide support for ogg and mp3 formats respectively. MIDI file support covers the usual SMF formats 0 and 1, through a native, home-brew implementation.
Files can be imported using the menu command Track / Import Tracks / Audio… or MIDI…, or by right-clicking in the relevant tab of the Files pane and choosing Add Files…. If the Files pane is not visible, you can enable it via View / Windows / Files. The default position for the Files pane is to the right of the clips area, but it can be detached and docked elsewhere (such as to the left of the Tracks pane) if needed. You can preview files by double-clicking them, or by selecting them and either clicking the play button on the lower right hand side of the pane or choosing Play from the right-click menu.
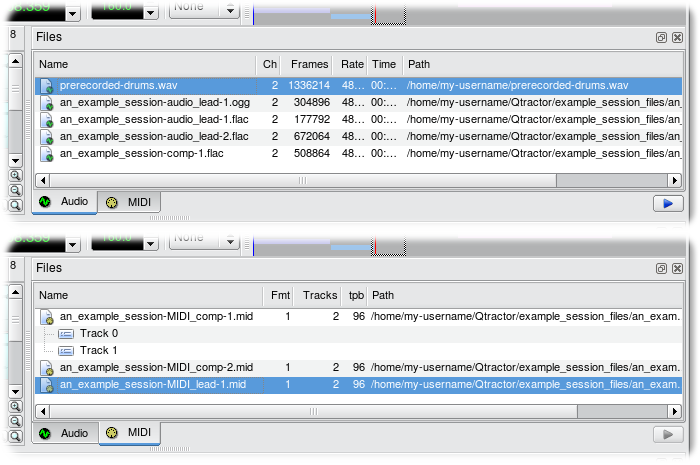
The Files pane of Qtractor’s main workspace. Both Audio and MIDI tabs are shown
When importing a MIDI file, note that the file’s tempo map will be reproduced in Qtractor only if it is the first MIDI content to be loaded into the current session. If the current session already has one or more MIDI tracks (even if the tracks contain no actual clips), the tempo map from the imported MIDI file will be discarded. This also means that if a New session template containing tracks has been enabled via the View / Options… / General menu, the tempo map of any imported MIDI file will be automatically discarded.
Individual and multiple files can be drag-and-dropped from the desktop environment and within the file list. Dropping a file into a blank region of the tracks area will create a new track and add the clip (which represents the file) to it. Dropping a file into an existing track will create a new clip within it. When dropping an audio file into an existing track you can drag the file itself, but with a MIDI clip you must drag your desired Track/Channel (displayed when clicking the file name in the Files pane), rather than the file itself. Finally, dragging a session file (.qtr or .qts, which are essentially the same) into the left or middle pane will load that session.
After working on a project for a while you’ll probably find that the Files pane contains files which you no longer need. To remove anything not currently referenced in the tracks area, right-click the Files pane and choose Cleanup. Note that this merely cleans up the list of files - it does not delete the files themselves from your hard drive. If you wish also to remove non-needed files from your session directory, save the session as a .qtz archive and use this in place of your previous session. See here for details on archives.
For convenience, a File System browser with tree-view is also available. This can be enabled via View / Windows / File System. Its default position is to the left of the Tracks pane, but like the Files pane it can be detached and docked elsewhere. For instance, you may choose to have both windows on one side of the screen, with one above the other.

File System browser, docked to the left of the Tracks pane
Clip objects are the elemental items of a session arrangement, and can contain either audio or MIDI data. A clip represents either a region of, or the entirety of, an actual audio or MIDI file. MIDI clip objects are representations of a sequence of events of one single MIDI channel, as extracted from an SMF format 0 file, or of one single track from an SMF format 1 file. Clips can be copied, truncated, lengthened/shortened (by dragging their edges) and time-stretched as if they were actual audio/MIDI data; editing a clip object in these ways is a non-destructive process.
Clips are placed on tracks either by importing audio or MIDI files as new tracks or by dragging and dropping files into the main track window. Empty clips may also be created by right-clicking on a track and choosing Edit / Clip / New….
To copy or cut a clip, select the clip, then right-click and choose Copy or Cut from the menu. Next, choose Paste from the right-click menu, position the box outline where you want to paste the clip and left-click. Note that when copying a MIDI clip within the same track, the two clips become linked, meaning that any change to one of them will automatically affect the other. If you select a clip which is currently linked to another, any such linked clips will be highlighted with a dashed outline, enabling you to see which other clips will be affected by changes made to the selected one. To unlink a clip, thus disabling automatic changes, select it and choose Clip / Unlink from the right-click menu.
A linked clip highlighted with a dashed outline
To split a clip, select the clip, then position the playhead (red vertical line) where you want to split it and choose Clip / Edit / Split from the right-click menu. If you use this operation often, it is far more convenient to assign a keyboard shortcut for it. Since Qtractor never affects the original file it is referencing, any split you make to a clip is reversible. You can undo a split via the Edit / Undo menu, or by clicking and dragging the edge of the clip then extending it to its original length. Note that when dragging audio files to hide/reveal portions of them, the waveform may appear to “move” slightly. This is just a visual artefact - the position of the actual audio in the track is not affected.
To merge clips and so consolidate a number of them into one file on your hard drive:
Select the clips within a track that you want to merge into one
Choose Clip / Merge, either via the main toolbar or the right-click menu
In the Merge/Export window, enter a new name for the merged file and save it to a logical location on your hard drive (preferably within your session folder)
The merged clip immediately replaces the old clips in your project
Fading a clip in or out is a common enough operation that there is a quick shortcut to achieve the effect. Notice that in the top corner of any audio or MIDI clip there is a semi-transparent square node. Clicking and dragging this node further into the clip will create a fade-in (if done at the beginning of the clip) or a fade-out (if done at the end).
The actual method of audio volume (gain) and MIDI velocity change can be one of linear, quadratic or cubic types. You can set your desired type via the clip’s Properties window (see next section).
An audio clip, with left and right upper corner fade handles drawn inward to create a fade-in and fade-out
When two clips overlap you may wish to cross-fade them, simultaneously fading-out the first and fading-in the second. You can do this manually, by dragging the fade handles to the desired lengths (they can still be manipulated even if clips overlap). Alternatively, you can select either clip and choose Clip / Cross Fade - Qtractor will then add a cross-fade, determined by the length of the overlap. Once you have your cross-fade you can fine-tune its length and type if needed, as per the information above. If you have trouble clicking on a particular clip because it’s obscured by another, try selecting it from the Files pane.

Two audio clips cross-faded together
A clip’s properties can be accessed by double-clicking the clip (for audio clips), or by opening the clip and choosing File / Properties (for MIDI).
Audio clip properties include its Name (the label the clip is known by within the session); File path; Start time (location), Offset and Length; Gain; Panning; Format (Frames, Time or BBT); Fade-in/out length and type; Time Stretch percentage (can be set within a range of 10%-1000%) and options; and Pitch Shift amount (can be set within a range of -/+40 semitones). Time-stretching is applied in real-time at the buffering level, as a custom WSOLA algorithm based on and derived from the SoundTouch library.
MIDI clip properties include its Name; File path; Track/Channel; Start time, Offset and Length; Volume; Format (Frames, Time or BBT); and Fade-in/out length and type.
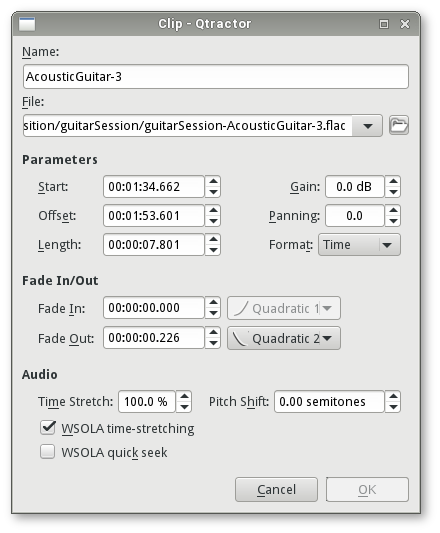
Audio clip properties window
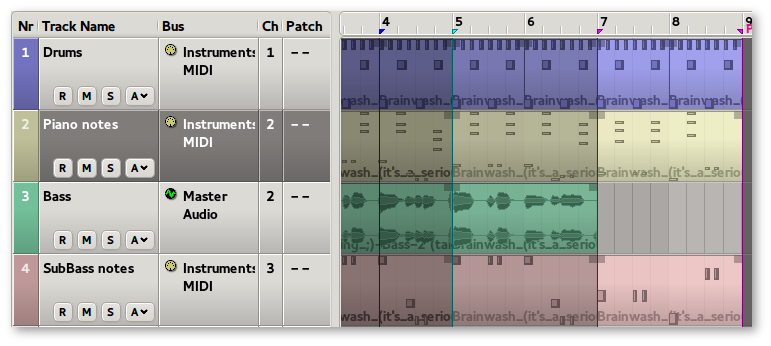
MIDI and audio tracks in the main workspace of Qtractor
Tracks are arranged as a sequence of one or more clips of the same file type, either audio or MIDI. The tracks window is the main application workspace, serving as a virtual canvas of a multi-track composition arranger. Most of the editing operations are performed here.
The tracks area has two panes: the left one displays the list of tracks with their respective properties and the middle pane is the audio and MIDI clips area, where multi-track composition and arranging is performed. Column widths in the left pane can be adjusted to allow for long track names etc. by dragging their edges; double-clicking resets them to their defaults. Track height can be adjusted by dragging up/down in the Nr column of the left pane, or by right-clicking and using the Height menu.
Audio and MIDI tracks with meters enabled
Note that information regarding global UI settings, such as column
widths and Mixer set-up, is stored in
~/.config/rncbc.org/Qtractor.conf (and so restored upon
re-loading Qtractor), while track height is stored in the session file
(and so restored upon re-loading a session).
To create a new track either right-click in the left pane and choose Add Track, or right-click in the right pane and choose Track / Add Track. In the Track window which appears, choose a name in the Name: box, choose a Type (Audio or MIDI), adjust any other options desired, such as the track’s colour and icon, and whether it is for drums (which will show MIDI Note On events as diamonds instead of rectangles) or not, then click OK.
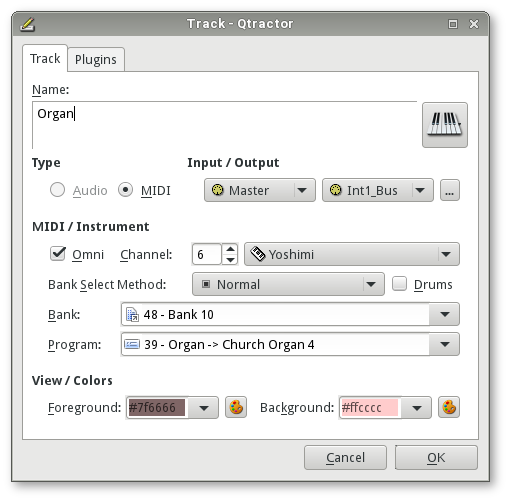
Track window for a MIDI track
You can also duplicate an already-existing track by right-clicking the track in the left pane and choosing Duplicate Track.
As is usual, tracks are stacked on horizontal strips and clips are layered on a bi-dimensional grid, in time sequence for each track strip. Time is modeled on the horizontal axis and pictured by a bar-beat scale ruler at the top of the track view. Clips may be conveniently aligned to discrete time positions, depending on the current Snap mode setting, which is set via either its icon on the toolbar or the View / Snap menu. When set to “None”, snapping is carried out to MIDI resolution, quantized to ticks per quarter note granularity.
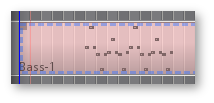
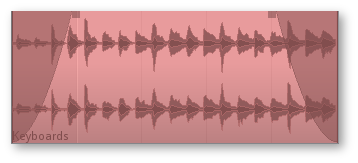
Each track has its own user assignable colors for better visual identification. Audio clips are displayed with approximate waveform graphic, with peak and RMS signal envelopes as read from the respective audio file segment. MIDI clips are shown as a piano roll-like graphic, with note events shown as small rectangles, depicting pitch, time and duration.
All session, track and clip editing operations are undo/redo-able. Discrete view zooming is also available.
The red vertical line in the tracks area is the playhead.
This shows the point at which playback/recording will begin when you
start the transport rolling and its time corresponds to the clock
towards the top-left of the screen. You can control the position of the
playhead via the transport controls (to the left of the clock), by
dragging the top of the playhead, or by
Ctrl/Shift-clicking in the horizontal bar
above the tracks which houses the bar numbers or in an area of the
Tracks pane which contains no clip
(Ctrl/Shift-clicking on a clip will select the
clip). Alternatively, you can
Ctrl/Shift-middle click on either the
horizontal bar or anywhere in the Tracks pane (with or without a
clip).
![]()
Transport controls (left box) and clock (right box) showing current position of playhead
The blue vertical lines are Edit Markers. See below for information on these.
A track’s state is controlled via the R, M, S and A buttons in the left pane. Their meanings are as follows:
When muting/solo-ing a track, holding down Shift or
Ctrl while clicking the M or
S buttons produces the following effects:
Shift-click - Enable/disable state on all tracks. If
the button clicked is currently disabled, all tracks will be enabled; if
it is currently enabled, all tracks will be disabledCtrl-click - Enable/disable state on this track only.
For example, Ctrl-solo-ing a track with other tracks
already solo-ed will un-solo those other tracks, leaving just the target
track solo-ed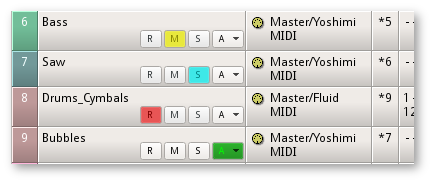
Mute, Solo, Record & Automation buttons for individual tracks
It is possible to select more than one track at a time in order to mute/solo/monitor them all simultaneously, by using the following commands:
Shift+left-click/mouse drag;
Shift+Home/End keys;
Shift/Ctrl+up/down arrow keysCtrl+left-click/mouse drag;
Ctrl+Home/End keysIn Qtractor parlance, though there is only ever one current
track at any one time for editing purposes, there may be one or more
selected tracks, invoked by the above commands, on which an
operation can be performed. The current track is always
displayed with a slightly darker background, whilst the colour of
selected tracks is determined by the current palette scheme or
theme (the default being that of the desktop environment). Once you have
your desired tracks selected, you can mute/solo/monitor them using the
relevant icons, menus or keyboard shortcuts. It is also possible to
Shift/Ctrl-click the M or
S buttons (as discussed above) with multiple tracks
selected in order to apply these operations to the entire “set” of
selected tracks.
Tracks can also be muted and solo-ed on mix-down, which will then apply when exporting, enabling you to export specific tracks only.
The mouse cursor has four select modes: Clip, Range, Rectangle and Automation. Choose your desired mode via Edit / Select Mode from the main toolbar, or by right-clicking in the track area and choosing Select Mode.
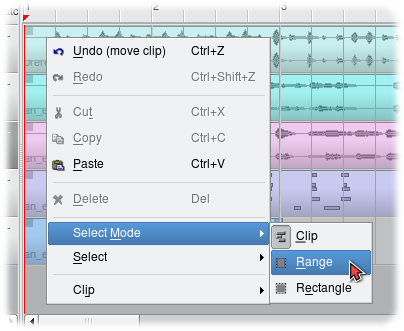
Select Mode context menu (right-click menu)
Once you’ve made your selection, you can then perform the usual cut, copy, paste etc. operations.
Making a selection using the Range* select mode*
For the final select mode, Automation, see its section.
In addition to using select modes, you can select a range in your workspace by using the Edit-head and Edit-tail markers. These are the two blue vertical lines which are present in the tracks area and which are independent of the playhead.
The Edit-head and Edit-tail markers
To set the in-point of your selection, left-click in the bar/tempo area of the workspace, where the top of the blue lines are situated. To set the out-point, right-click in the same area. You can also drag the lines. Middle-clicking will bring both lines together at that point.
Once you’ve set your markers, you can use them to make a selection. To do so, from the main toolbar, choose Edit / Select and one of Track or Track Range. You can also right-click in the track area to access the same menu.
Looping a section is a common operation, often used to enable a musician to practise a particular passage, or a mix engineer to focus on a specific area. To play a section of your composition in a loop:
Select a range, using one of the methods described above
From the Transport menu, select Loop Set. Alternatively, click the Loop button (pair of blue, circular arrows) on the main toolbar
Move the transport into the loop range, or somewhere before it, then press the Play button or the space bar. Once the transport reaches the end of the loop range, it will return to the in-point and seamlessly continue playing until stopped
It is also possible to record using a loop, but such an operation would more commonly be handled by Qtractor’s Takes feature. See its section for details.
In electronic music especially, there’s often a need to record one or two bars and then loop them to create standardised bass lines or drum beats. For drum tracks, you may prefer to handle them by using a specialist drum machine, such as Hydrogen, which would play the same data (either pure MIDI data or audio samples) for as many bars as you program it to. However, the same effect can be achieved in Qtractor by using a Paste Repeat. This allows you to copy an audio or MIDI clip and then paste it back-to-back for as many repetitions as you wish.
There are two ways to perform a Paste Repeat - one quick and one
slightly more detailed. The quick method is to Ctrl-click
and drag a clip’s left or right edge. This will replicate the clip as
many times as fits into the desired area. The more detailed method is as
follows:
Check your snapping settings in the View / Snap menu (when pasting clips for a loop, the user generally wants precision snapping to the clips’ edges)
Select the clip you want to copy using the Clip select mode (or use Range mode, Rectangle mode, or the Edit Markers to select a portion of a clip) and use Edit / Copy to copy it
Click Edit and choose Paste Repeat
In the Paste Repeat window, enter the desired number of iterations in Count and, if needed, the duration (in frames, time or BBT) between the start of each iteration in Period. Click the OK button to confirm
Position the box outline where you want to paste the clips and left-click to anchor them in their track
Note that any clips copied in this way will become linked to the original, as covered in the Clips section.
If one or two bars of a track don’t quite measure up to your standards, you might want to re-record just those bars without having to record the entire track over again. This process is called punching in/out.
To perform a punch in/out:
Use the Range or Rectangle selection mode, or the Edit Markers, to define the region of your timeline that you wish to re-record
Once your range is set, click the Punch in/out button in the main toolbar (pair of up/down arrows), or use the Transport menu and select Punch Set
Arm the recording destination track by clicking its “R” button in the track properties pane, on the left hand side of the main workspace
Press the Record button in the main toolbar, position the playhead somewhere before your selected region, then press the Play button or the space bar. Qtractor will play back your piece and you can play along, but nothing will actually be recorded unless it is within the punch range
To stop playback, click the Stop button in the main toolbar, or use the space bar
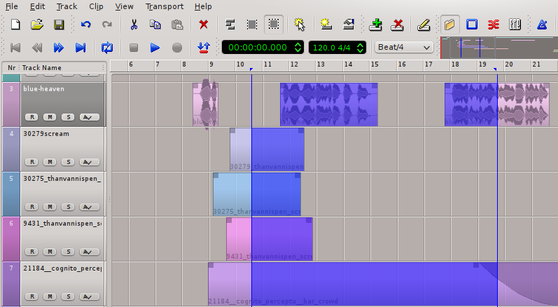
Punch in/out range (purple markers) inside a loop range (green markers)
Qtractor features automation of nearly any aspect of any plugin, as well as basic track functions like volume and panning. It is only possible to automate tracks; buses cannot be automated.
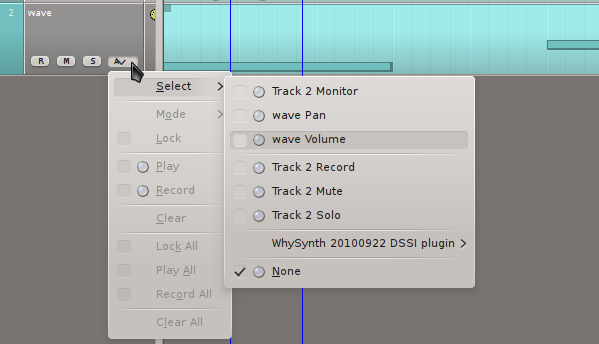
Automation pop-up menu
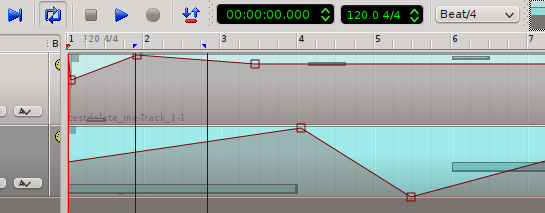
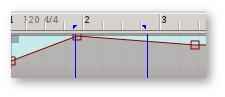
Adding automation nodes
If you need a less gradual change, move the nodes closer together, or use more nodes to shape different movements.
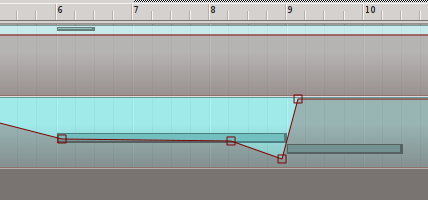
Adjusting automation nodes
The type of transition used between automation nodes can be customized via the track’s Automation button, within the Mode category. Hold places the automation nodes into absolute values until otherwise changed.
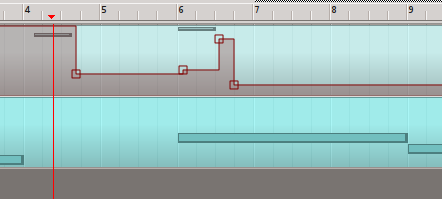
“Hold” automation mode
“Linear” automation mode
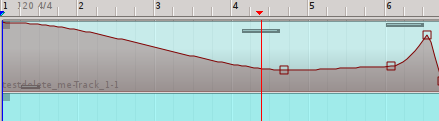
“Spline” automation mode
If you are a skilled live mixer and want to record your performance in real-time, you can override existing automation decisions, or record new ones, in two different ways, each available in the Automation menu:
Play - with this enabled, you may make real-time changes to existing automation, and upon release of the slider or knob that you are automating, the value returns to the pre-existing value. This may be combined with the Record option.
Record - with this enabled, you may make real-time decisions for automation and every move will be recorded, in real-time, as a node in your track. They can be manually changed later, if needed.
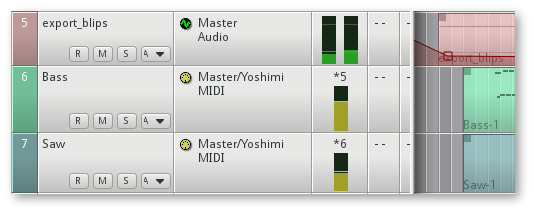
The Mixer window serves for session control, monitoring, recording and assistance in mix-down operations. It is divided into three panes: the left accommodates all input buses; the centre, individual track strips (either MIDI, with a yellow “plug” icon, or audio, with a green “waveform” icon); and the right, output buses. These are marked as Inputs, Tracks and Outputs respectively. Right-clicking in this area allows you to toggle the Inputs/Outputs’ displays on and off; you can also left-click and drag & drop them both within and outside of the Mixer.
The Mixer window can be accessed via the View / Windows / Mixer menu. It opens as a separate window, making it a prime candidate for occupying a second screen if you have a multiple-head set-up.
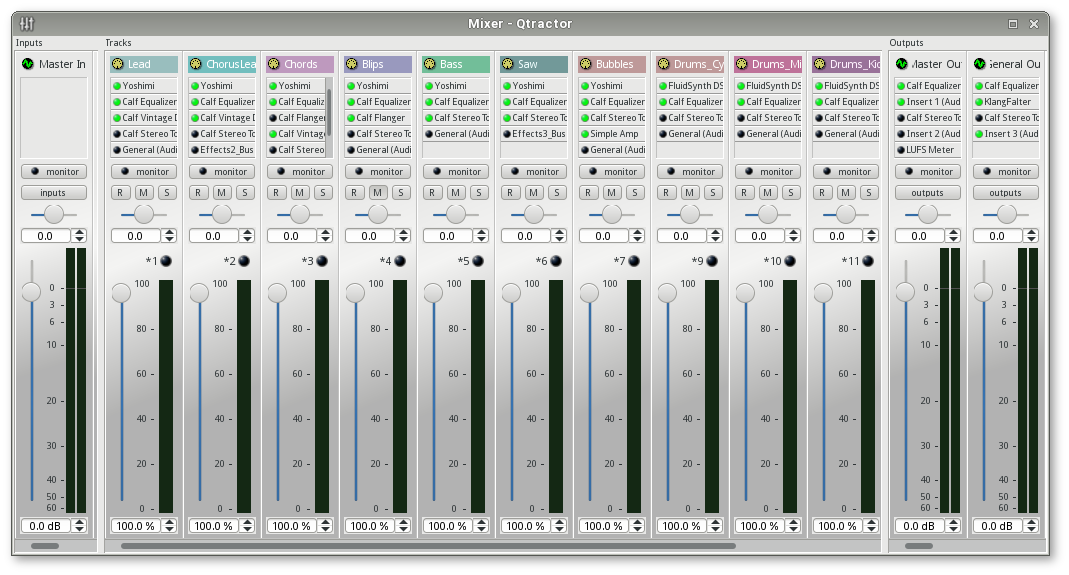
The Mixer window
Each vertical mixer strip offers a volume slider (MIDI tracks) or gain control (audio tracks and buses), panning slider, Mute/Solo/Record state buttons (tracks only), monitor button, connections button (buses only) and output event activity LED (MIDI tracks only).
Right-clicking in the panel directly underneath each strip’s name allows you to perform a variety of operations. For instance, you can add plugins, or set up dedicated outputs via Audio / Dedicated. A dedicated output is an audio output specifically for that track, which can be connected via JACK (in Qtractor’s Connections window, or QJackCtl, it will appear in the Audio tab, under Qtractor). You can also choose whether to Auto-connect the dedicated output via the same right-click menu - doing so means that it will automatically be connected to system:playback_1 and 2.
At the extremities of the Mixer window are the Master In and Master Out buses. These are independent of any one track and control everything coming into or going out of the Mixer. Here, you can adjust the master input/output levels and place any effects processors you want to apply globally (such as a compressor to prevent peaks on outgoing audio).
Monitoring is presented in the form of peak level meters for audio and note event velocity for MIDI, both with fall-off eye-candy. Audio volume is presented on a dBFS scale (IEC 268-10) and pan is applied in approximated equal-power effect (trigonometric weighting). For MIDI tracks, volume control is implemented through the respective channel’s Controller 7 and system-exclusive master volume for output buses. MIDI pan control is only available for track strips and is implemented through the channel’s Controller 10. MIDI input buses have volume and pan controls disabled.
When monitoring the levels of your tracks, make sure that the sound does not enter the red zone on the volumeter. In audio production, any sound that goes above 0dB hits its peak and can cause distortion. It’s not uncommon to flirt with 0dB to truly maximize the impact of important sounds, but leaving sounds above 0dB in your final mix can ruin your project.
Using the volume level slider, adjust your track volumes to safe settings while listening to your project. Then, listen to your project again to refine the levels in relation to one another. If the sound source is too low (or too loud), you can add (or subtract) gain at the input point with the Gain adjustment at the very bottom of the Mixer window. This adds or subtracts gain level at the point of the sound’s entry, meaning that you are changing the amount of sound reaching any effects processors. Generally, gain adjustment is avoided and other tools, like a Compressor or Equalizer, are favoured.
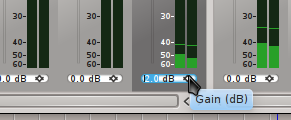
The Mixer’s gain adjuster
Remember that Track levels don’t exist in a vacuum; the levels are cumulative. So, if you have two tracks with near-maximum levels that produce very loud sounds at the same time, the Master Out level will peak even if each track was “safe” independently.
There is no authoritative way of achieving a balanced mix. Some professional mix engineers favour an additive mix, in which they start all levels at a reasonable and safe level and then accentuate important parts by adding volume to tracks. Others favour a subtractive method, starting everything at the highest safe (or unsafe) level and then bringing volumes down so that everything falls into place. Predictably, still others prefer a combination of these methods.
By default, tracks are set to play from the center point of the stereo space, meaning that the sound will feel as if it’s situated directly in front of the listener, or spaced evenly between his/her ears. To diversify the sound, perhaps in order to emulate a live set-up, to suggest that an instrument is just next to the listener, or simply to broaden the scope and impact of the piece, you can pan tracks between the left and right speakers using the panning slider.
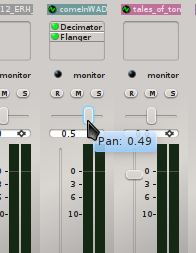
The Mixer’s panning slider
When panning a track, “less” is often “more” and an even spread is usually best. In other words, instead of arbitrarily assigning tracks in stereo space just to give a spread to your sound, try to consider their overall balance. Avoid moving sounds to the extreme stereo positions (also known as hard left/right), since, in real life, sounds are rarely only heard in one ear and not the other. The sound of extreme stereo separation was common in early stereo mixes from the 1960s, in which the drums might only be heard in the right ear and the guitar only in the left; the effect was revolutionary at the time but is largely considered utterly unnatural now.
Generally, important tracks (vocals, lead etc.) and low frequency/groove tracks (bass, kick drum etc.) are positioned in the middle, while other parts are panned to the sides in various degrees. The extreme edges are often used for atmosphere, emphasis, or effect.
For anything other than the simplest of projects, you will likely want to manipulate the flow of MIDI and audio data, routing it into, out of and through Qtractor in a variety of ways. You may want to drive an external sound module, accept input from a MIDI controller to record performance data, group together similar tracks to share the same plugin, or perform some other kind of processing before final export. In Qtractor, Connections, Buses, Aux Sends and Inserts are all used to control “what goes where”. There are many different ways to approach the process of routing and exactly what you’ll need will depend on your set-up. With this in mind, this section will give a general overview of the options available so that you can decide what best fits your requirements.
The Connections window serves to establish the audio and MIDI port connections between the internal core layer input and output buses (ports), and the external devices or client applications. It can also be used to connect external client application ports - either JACK clients for audio or ALSA sequencer clients for MIDI. All active connections on the existing input and output buses are saved and restored upon session recall. To open the Connections window, select View / Windows / Connections, or click on its icon.

Connections icon
A window similar to the below will then open. Its features and usage are almost identical to those of QjackCtl.
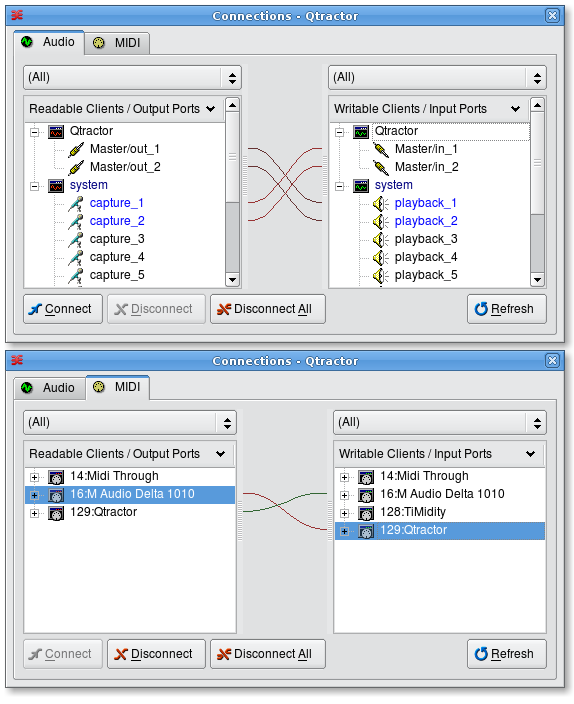
Qtractor’s Connections window, showing both the Audio and MIDI tabs. “Readable” ports are sources of data (where audio or MIDI data can come from) while “writable” ports are places that data can be routed to (sent to)
Once you’ve decided how to approach the routing for a particular
project, you can then make the necessary connections between Qtractor
and whatever other programs or external devices you’re using. You can
connect a Readable/Output port (left pane) to a Writable/Input port
(right pane) in several ways. One method is to click a port in the
Output pane and, with the mouse button held down, drag the cursor to a
port in the Input pane until the port is highlighted, then release the
mouse button. Another method is to left-click a port in the Output pane,
left-click a port in the Input pane, then either left-click the
Connect button or right-click elsewhere in the window
and select Connect from the pop-up menu. With this method you
can also Ctrl-click or Shift-click to select
multiple ports. Regardless of the method you use, a line representing a
“virtual cable” will appear between the connected ports in the middle
section of the window.
The System input ports playback_1/2 represent your default left/right stereo output (e.g. your first-configured sound card). If you wish to use alternative destinations for playback, monitoring etc., you can connect them up here.
As explained at the start of this chapter, a bus is like a pipeline through which streams of data can travel. Qtractor has Input, Output and Duplex buses for both audio and MIDI. Input buses receive data streams from particular sources (inside Qtractor, or from other software or hardware), Output buses send streams to other destinations and Duplex buses both receive and send streams.
How many and what kind of buses you need will depend on what you want to achieve, but the basic steps to follow are:
To open the Buses window, click on the View / Buses menu.
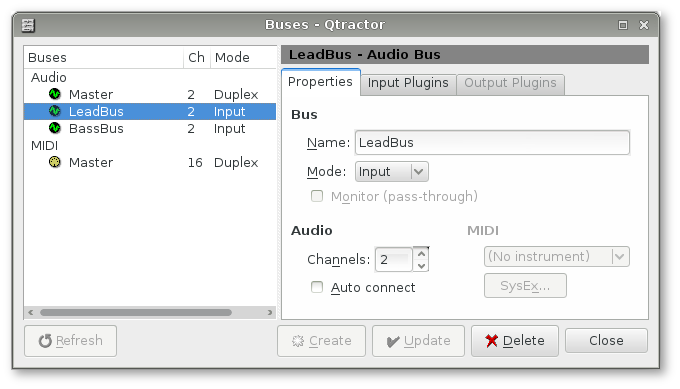
The Buses window, showing one MIDI and three audio buses
The left pane contains a list of the session’s buses; clicking on one of these will display its information in the right pane. The right pane has three tabs:
The method of creating a bus may not be immediately apparent. To create a new MIDI or audio bus, select any bus of the desired type in the left pane (if you’re working on a clean session, the only choices will be MIDI and Audio Master) in order to display its properties in the right pane. Next, change the text in the Name field; this will enable the Create and Update buttons. To create a new bus, click Create.
Before clicking Close, you may wish to change other options in the right pane. For audio buses, a commonly used option is the Channels setting. Its default is 2, which, for an Input bus, will give you a stereo recording. However, you may want to set this to 1 to create a mono input bus in order to record, for example, an external source via a single microphone. With a bus’ Channels set to 1 and the bus assigned as the Input to a track, any recording on that track will then be in mono.
If you’ve made any changes, click Update, then Close. (If you don’t click Update a reminder dialogue box will appear in any case.)
Once you’ve created your bus, you’ll need to assign it to the relevant track(s). To do so, select a track and choose the Track / Track Properties… menu, or double-click the track in the left pane of the main view. This will open the Track window. In the Input / Output area, assign your bus via the drop-down box (whether it appears in Input, Output or both will depend on what type of bus it is).
Track window for a MIDI track
The final step is to connect the bus up to its destination - a task which is achieved via the Connections window. Again, exactly what you need to do will depend on your set-up, but if you wanted, for example, to send a particular MIDI track to an external software or hardware synth, you would connect its output bus’ Output connection in the left pane to your synth’s Input in the right pane. One thing you should not do is route the output of one Qtractor bus to the input of another, as this will give unpredictable results.
Buses are an extremely valuable tool and their use is almost essential for any reasonably sized project and when using Qtractor with external inputs and outputs. They enable you to use the full 16 MIDI channels through each bus, giving you much more flexibility than if you were using the Master MIDI bus only. You can, for example, have a dedicated MIDI bus routed to a multi-instrument synthesizer, sound module or soft synth, giving you 16 separate channels to control different instruments within the synth. Buses can also be used to route the audio output of external synths into Qtractor audio tracks for recording. For more information on this topic, see this How To.
Aux Sends are used to route audio or MIDI from a track or input bus to another destination within Qtractor - specifically, to a bus. To create one, open the Mixer, right-click under the name of your track or bus, then choose Inserts / Audio or MIDI / Add Aux Send. In the window which appears, set the Aux Send to “Active” (top right button), choose your destination bus in the Aux Send Bus combo box (bottom left) and choose the amount you want to send via the Send Gain slider.
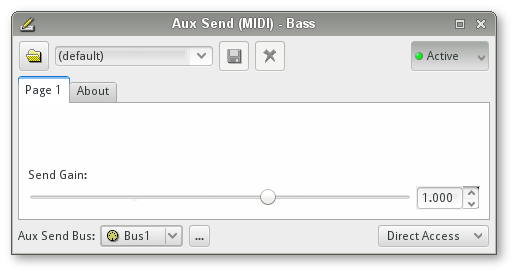
The Aux Send window for a MIDI track
What value to set Send Gain to will depend on the purpose of your destination bus. For example, you may want to send several tracks to the same bus in order to share that bus’ plugin(s). This is a reasonably common requirement, particularly for reverb, where you would have an “overall” setting in the destination bus’ plugin, then adjust the amount you send to this via each track’s Send Gain slider. In this way, you can control the amount of reverb applied, in order, for example, to mimic an instrument’s placement on the stage.
Inserts are similar to Aux Sends, but are used to route audio or MIDI externally of Qtractor. They can be added to tracks, or to input or output buses. You can even route your entire mix to an external destination, such as JAMin, before routing it back into Qtractor for export.
To create an Insert, first, launch your external application. Then, open Qtractor’s Mixer, right-click under the name of your track or bus and choose Inserts / Audio or MIDI / Add Insert. In the window which appears, set the Insert to “Active” (top right button) and adjust Send Gain, Dry Gain and Wet Gain as necessary.
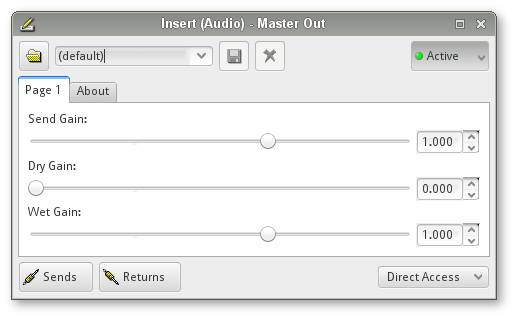
The Insert window for an audio track
Next, use the Sends button to connect the Insert to your external application and the Returns button to connect the application back to the Insert (these buttons open up the same Connections window discussed above). The signal will now flow from your track/bus out to the external application, then return to the same track/bus and continue on from the point below the Insert.
When working with purely internal sources and destinations (plugin soft synths, Aux Sends etc.) Qtractor will automatically restore any connections you have made upon re-loading the session. With external applications, however, things are slightly different: Qtractor will only restore such connections if they are present when the session is saved. For example, if you save and close your session with everything correctly connected, upon restarting both Qtractor and your external application, the connections will be correctly restored. However, if you close the external application, then make a change in Qtractor and save (i.e. with Qtractor and the application in a “non-connected” state), upon restarting, the connection will be lost and you’ll need to make it again.
This behaviour can be avoided by always ensuring that you have your external connections in order before closing Qtractor (easier said than done when using many external applications). It can also be mitigated somewhat by using QjackCtl’s Patchbay feature to make the connections persistent; however, this too is rather unwieldy as it means adding each item manually to the Patchbay. A third approach would be to use a session manager, such as QJackCtl’s Session feature (which employs “JACK session”), or NSM.
There are four types of plugins supported within Qtractor: LADSPA, DSSI, VST and LV2. They can be added to both buses and tracks and are aggregated seamlessly as one single instance on a multi-channel context. To add a plugin, open the Mixer, right-click in the panel below the name of the desired track and select Add Plugin.
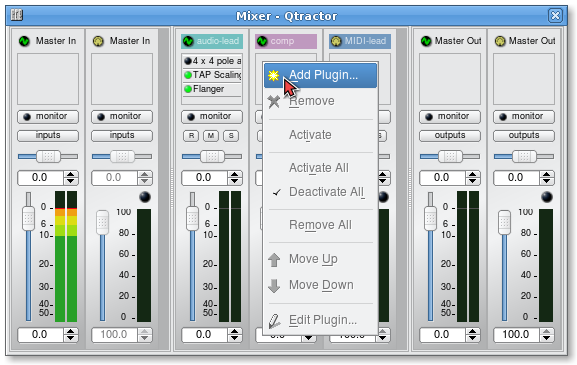
Mixer window showing plugin area at top. Plugins are added, removed, activated/deactivated, moved in the processing chain and their settings edited using a right-click context menu
In the Plugins window which then appears, select the plugin type - (Any), LADSPA, DSSI, VST, or LV2 (see the following sections for information on the different types) - in the top-right box. Next, select your plugin from among those installed and, if desired, tick Activate in the bottom-left corner to enable the plugin as soon as it’s added to the mixer strip. If you have a long list of plugins to choose from, you can use the top-middle box to search for what you want.
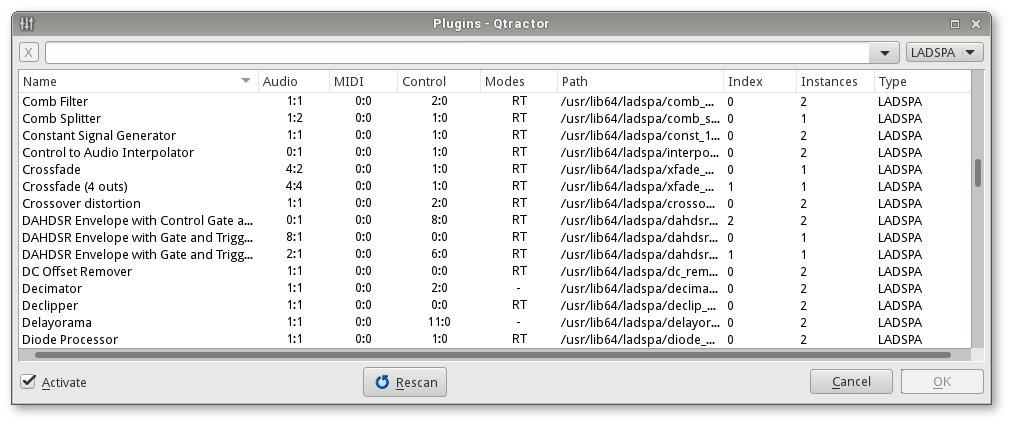
Plugins window, showing LADSPA plugins currently installed
Qtractor will look in the most likely installation directories for plugins and display any found in the above window. If, however, you have plugins installed in non-standard directories, you should specify their paths in the Plugins tab of the View / Options… window. Once you’ve made your selection, click the OK button to add the plugin.
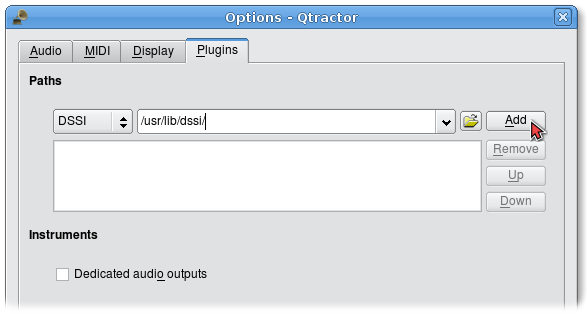
Specifying the locations (paths) of plugins in the View / Options… window
Plugins are processed in order from top to bottom and can be
individually selected, activated and moved (by dragging/dropping) within
the plugin chain order. They can also be copied or moved to other mixer
strips by dragging/dropping and choosing your desired option from the
pop-up menu which appears; a faster way to accomplish this is
Ctrl+drag to copy and Shift+drag to move.
There are a couple of things to note about plugins, which may affect
your workflow.
Individual plugin control parameters can be modified in real-time through provided dialog windows and maintained as named presets for re-usability. To create a preset, once you have your desired settings ready, enter a name in the box at the top left of the generic plugin GUI (it will say “(default)” to begin with), then click the save icon next to it. You can select from among your saved presets by clicking the arrow next to the preset name or, when in the Mixer, by right-clicking the plugin and choosing Preset.
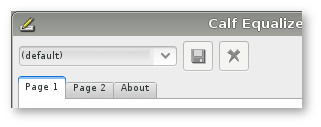
Generic plugin GUI, showing preset box and save and delete icons
Note that certain plugin-specific GUIs, such as Calf LV2, may not display the presets information even though the functionality itself is there. In such cases, you can access the generic GUI by right-clicking the plugin in the Mixer and choosing Properties…, then create presets from there. When more than one GUI exists for a plugin, you can also opt to choose which you want by enabling Select plugin’s editor (GUI) if more than one are available in the View / Options… / Plugins menu.
LADSPA has been a Linux audio plugin standard for many years. There are literally hundreds of LADSPA plugins available for Linux, providing a huge variety of processing effects, such as equalization, filtering, reverb, chorus, amp and speaker simulation and so on. Well-known LADSPA plugins include the swh package by Steve Harris and the tap package by Tom Szilagyi. These may already be present in your distro’s repositories.
DSSI plugin support is
available for instrument and effects plugins. You must have the core
DSSI subsystem installed in order for this type of plugin to function.
Well-known DSSI plugins include the fluidsynth soft synth for working
with soundfonts (.sf2/.sf3) and Sean Bolton’s
WhySynth. Again, these
may already be present in your distro’s repositories.
Native Linux VST plugins are supported, but there are only a few native Linux VSTs available. Please see section 2.4.2 for complete information on building Qtractor with native VST support.
Note: Native Linux VST support does NOT include running of Windows® VST plugins. Please use the DSSI-VST wrapper when attempting to use this type of plugin, and make sure your Windows® VST plugins are located within your DSSI path environment variable (the variable name is VST_PATH).
LV2 is the extensible successor to LADSPA and offers many improvements over it. A wide variety of plugins are available, such as the synthv1 synth, by Rui Nuno Capela (author of Qtractor), and the Calf set of effects. If you have the choice of using an LV2 plugin over a LADSPA or DSSI one, it’s generally better to use the LV2 one. Doing so will ensure that when saving a Qtractor archive file (.qtz), all the relevant information is correctly included in the archive.
MIDI is a versatile format for triggering sounds. It can be used to trigger hardware synths external to your computer, software synth applications on your computer, samples, loops, automation functions and more. Some music programs bundle your MIDI data into your project file, which can make it difficult to share one MIDI loop between projects. However, Qtractor saves all MIDI tracks as independent files, meaning that you can easily re-use them.
There are basically three ways to get MIDI data into your Qtractor session and they are each covered in the sections below:
Import MIDI data from an existing file
Play in MIDI data via a USB MIDI keyboard controller
Enter MIDI data into the MIDI Editor (sometimes called a “piano roll” or “matrix editor”)
Before beginning with MIDI, unless you’re using Qtractor to drive an external hardware synth you should make sure that you have some software synthesizers installed on your system. If you’ve just installed soft synths now you should relaunch Qtractor so that it will detect the newly available plugins.
Note that with each successive MIDI track you add, you must increment the MIDI Channel used (Qtractor will do this by default), otherwise key presses on your MIDI controller, or playback from Qtractor, will use the same MIDI channel to trigger different sounds. In other words, if Track 1 and Track 2 are both using MIDI Channel 1, then a note played on Track 2 will also trigger the instrument assigned to Track 1. To change a track’s Channel, double-click on the track in the left hand pane of the main view then, in the Track window which appears, select the Channel number underneath MIDI / Instrument. If you run out of channels, you can use multiple buses.
Track window for a MIDI track, where the MIDI Channel can be selected
Since MIDI data consists of nothing more than digital signals to activate and deactivate sounds at certain times, MIDI files are small and easily distributed online. A simple internet search for MIDI files will result in thousands of files for nearly any song you can name. Taken alone, MIDI files are useless; imported into Qtractor and assigned instruments, however, the files come to life like a player piano. The MIDI file you import into Qtractor could be from the internet, one you created yourself in another application, or even a data dump from a MIDI-capable hardware synth. In this example, we will use one from the internet:
Download a MIDI file, such as JS Bach “Invention in C minor, BWV 773 (Canon)” and save it to your hard drive - preferably in your Qtractor’s session directory, to keep your project self-contained
In Qtractor, go to the Track menu and select Import Tracks / MIDI. Alternatively, you may open the Files pane, click on the MIDI tab and use the right-click menu to import the MIDI file without automatically adding it to a track (if you do this, you’ll need to drag the file into the workspace manually). Please also see the note in the Files section regarding importing MIDI files
The MIDI tracks will appear in your Qtractor session. Imported tracks will often have embedded General MIDI instrument assignments, as is the case with this example. General MIDI was an effort to standardize a set of 128 instruments to provide similar playback results across all systems
If you have a soft synth installed and assigned to the relevant track(s) you can press the Play button in the top toolbar of Qtractor to hear the MIDI file. If you’re using a General MIDI-compliant soft synth bank you should get a good approximation of how the original author of the file wanted the tracks heard.
A MIDI controller is a piece of hardware to help you play the software-based synthesizers in your computer. Typically, it is a piano keyboard with a few octaves and no built-in sounds of its own. It usually plugs into the USB port of your computer and, once configured, will pass on any key press to Qtractor, allowing you to play a software synth in real-time as well as record the key presses themselves.
MIDI and USB are two technologies that, fortunately, have been kept universal enough that you almost don’t need to question whether any given USB MIDI controller will work with your system. There are perfectly capable USB MIDI controllers being offered from vendors like Akai, Roland/Edirol, Digidesign/M-Audio and many others. If you require realistic, weighted keys with high resolution touch-sensitivity then look at the upper price-range of controllers and go to a music store to audition them. However, if all you require are a few octaves of piano keys so that you can get a tune into the computer quickly and easily, the basic controllers will be enough.
To use your USB controller to input MIDI data:
Plug the USB MIDI controller into your computer
Launch QJackCtl and start it
Launch Qtractor and click on the View menu, then select Connections from the Windows category
In the Connections window, click on the MIDI tab. Find your USB controller device from those listed on the Readable Clients/Output Ports column on the left hand side. Open its category to see the available outputs
Connect the output of your MIDI device to Qtractor in the Writable Clients/Input Ports column
Create a new track, then double-click the track in the left pane of the main view. In the Track window which appears, make sure that the Channel value (underneath MIDI / Instrument) corresponds to the channel your MIDI device is transmitting on. Alternatively enable Omni alongside this to tell Qtractor to receive input on all channels
In the Mixer, enable the track’s Monitor button (so that it turns green)
In Step 4, if you do not see your USB controller listed in the
left column, check to ensure that your controller is powered on (some
require external power; others are powered by the USB port) and check
the cable connection. If you still cannot see the device in the left
column make sure your computer sees the controller by checking
dmesg | tail. If your computer registers the device but you
are not seeing it in Connections click Refresh* in
the bottom right of the window. If it still doesn’t appear try
restarting both QJackCtl and Qtractor.*
Presuming you have a soft synth installed and assigned to the track, pressing the keys on your USB controller should now trigger the soft synth in Qtractor, generating sound. To record MIDI data, arm your track by clicking its “R” button in the left pane of the main view, click the Record button in the top menu, then click the Play button to start the transport recording - every key press you make on your USB controller should now be recorded in real-time. Depending on the feature set of your controller, velocity, pitch and other data may also be recorded
If you re-record over a clip, Qtractor will create a new, overlapping clip (which can, if desired, be merged with the original clip using Clip / Merge). If you’d rather overdub the original clip, adding extra notes directly to it instead of creating a separate clip, select the desired clip and choose Clip / Record from the main menu, or File / Record from the MIDI Editor. Once selected, the clip will change colour and any data recorded in its region of the timeline will be added to it.
You may wish to control particular settings of a plugin by sending MIDI controller messages to it from your USB controller. Although assigning MIDI controllers to LV2 plugins is not permitted by the LV2 specification, Qtractor offers another way of handling this which works for all plugin types. To assign a controller, first open the plugin’s generic GUI, by right-clicking on its name in the Mixer and selecting Properties…. A window such as the below should appear, the content of which will be defined by the plugin’s exposed settings.

A plugin’s generic GUI
Next, right-click on the name of the setting you want to control and, in the dialogue box which appears, choose MIDI Controller. The below window should then appear.
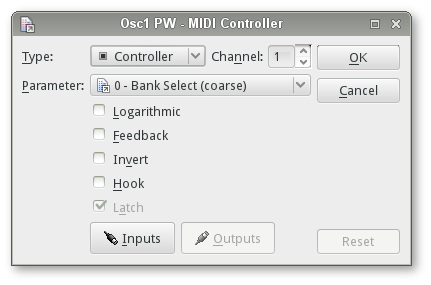
MIDI Controller window, where controller messages can be assigned to plugin settings
If you have not already done so, connect your hardware MIDI controller up, using the Inputs button. Then, choose which controller message to use via the Type and Parameter options, together with your desired MIDI channel in the Channel box. There are also several other options below these:
Note that MIDI controller assignments are applicable only to the session you create them in. If you want to use the same assignment in a different session you’ll need to create it again.
You can also create and manage generic MIDI controller mappings, plus import/export these mappings as a .qtc file, via the View / Controllers menu.
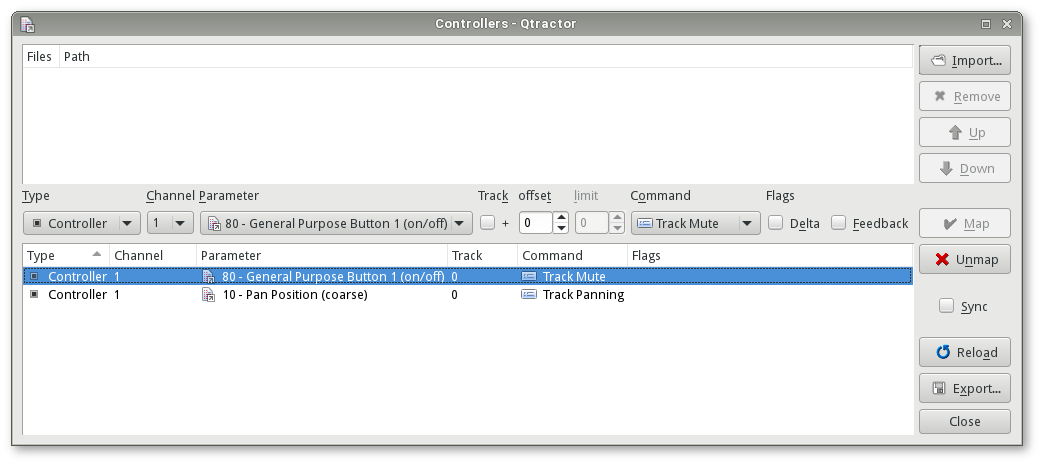
The Controllers window, where generic MIDI controller mappings can be managed
If you have no USB MIDI controller, you can still create MIDI data using Qtractor’s MIDI Editor (sometimes called a “matrix editor” or “piano roll” in other music programs). Data is edited on a grid through the usual GUI operations, such as selection, drag-and-drop, move, cut, copy, paste and deletion. The MIDI Editor can be invoked either for raw entry or to modify existing MIDI data that you’ve imported or played into Qtractor.
The MIDI Editor is very intuitive. The main, upper pane is the Editor Grid, which represents the notes being played. Vertically, the grid corresponds with notes on the chromatic keyboard (pitched as per the keyboard on the left of the window); horizontally, it corresponds with beats per bar. The lower pane is the Value Grid, which controls extra MIDI data, such as velocity, program changes, pitch bends and so on. The data represented here changes according to the Value menu setting in the upper menu bar.
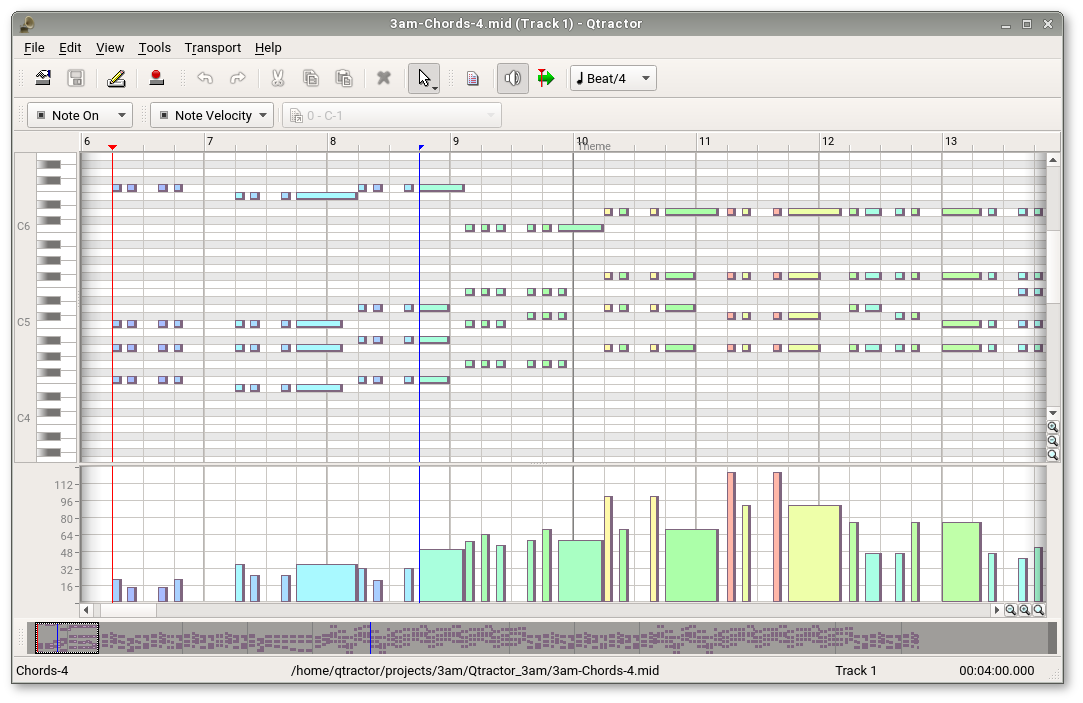
MIDI Editor window, showing notes in a familiar “piano roll” display (above) with their velocities (below)
You move around the MIDI Editor in the same way as the main work area
- using the horizontal/vertical scroll bars at the bottom/right of the
window, the mouse wheel/Shift+mouse wheel, or the
navigation window (at the bottom of the MIDI Editor window itself).
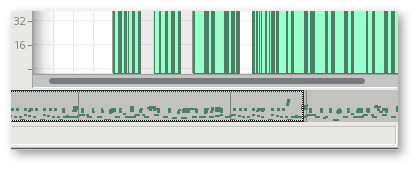
The MIDI Editor’s navigation window, situated at the bottom of the MIDI Editor window itself
To zoom in/out, again, as per the main work area use the magnifying
glass buttons at the bottom-right of both the Editor Grid and Value Grid
(Shift-clicking or Ctrl-clicking if needed),
or Ctrl+mouse wheel.
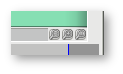
“Magnifying glass” zoom buttons, situated towards the bottom-right of the MIDI Editor window
All MIDI editing operations are available and processed in real-time. Several MIDI Editor instances may be active and open at any one time, provided each one refers to its own clip. All MIDI content may be saved as standard MIDI files (SMF) Format 0 (all tracks reduced to one track, preserving channel assignment data) or Format 1 (multi-track). The format for the SMF files may be set in View / Options… / MIDI.
To create new MIDI data:
Below is a summary of the MIDI Editor’s main tools:
To use the value ramp: 1. Choose your desired Snap/beat setting 2. Enable Edit on and Edit Draw, then draw a series of events in the Value Grid (lower pane) 3. Hold down Shift or Ctrl (or switch to Edit off) and highlight these events 4. Disable Edit Draw (leaving Edit on enabled), then hold down the left mouse button and drag the dotted line over the events to set the angle of the slope. You can not only shave the tops off the bars but extend their heights too. You should see something like the below as you drag
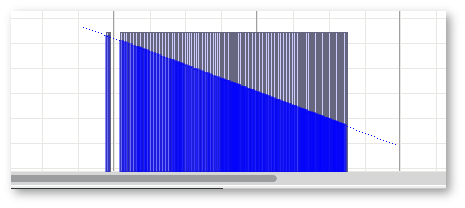
Adding a diminuendo using the value ramp
You can also use the tools detailed in Additional MIDI Editor Features with MIDI events such as these. For example, if you wish to make your diminuendo longer/shorter you can do so easily using the Rescale tool. With the MIDI events highlighted, right-click and choose Tools / Rescale, then adjust the Time percentage value accordingly.
In addition to input and editing tools, the MIDI Editor features functions such as Quantization, Transposition, Timeshifting and more to make it easy to modify your composition. To access these features, open the Tools menu via the MIDI Editor toolbar, or by right-clicking within the window. If no notes are selected, the Tools will be unavailable; select a note or block of notes with the Arrow tool to make them available. Many of these tools are also very useful for adjusting MIDI event data in the Value Grid.
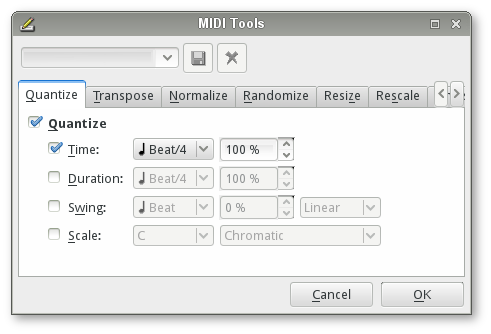
The MIDI Editor’s Tools menu
In order for Qtractor to know how to accelerate the timing of the notes, you must define a range of time for the acceleration to occur. Do this with the Edit-head and Edit-tail markers (the blue markers in the timeline above the MIDI Editor grid). Mark the out point (tail) of your range by right-clicking on the timeline, and then set the in point (head) of the time range by left-clicking somewhere to the left of the original marker. Once the range is defined, select the notes you wish to timeshift with the Arrow tool. Open the Tools menu and select Timeshift. Use the slider to cause either an acceleration, or a deceleration, in your selected notes over the course of the defined time range and then click OK to commit the change.
The View menu provides customization for how the MIDI Editor is laid out and how the notes are presented to you. The default layout is clean and pleasingly minimalist, but take a look at some of the other options to see what works best for you:
Menubar - turns off the top menu bar; use
Control+m to toggle it on or off
Statusbar - turns off the status bar at the bottom of the window
Toolbars - defines what information is visible in the window. Choose from File (file opening and saving icons), Edit (cut, paste, undo), View (preview modes, snapping, quantization), Transport (fast forward, rewind etc.), Scale (key signature and scale information) and Thumb (thumb view at the bottom of the window)
Windows - toggles on or off event information, a panel which provides detailed information on each MIDI event in the MIDI Editor grid
Tool Tips - toggles whether tool tips are visible
Note Duration - defines whether the note’s duration is reflected in the length of the velocity bars at the bottom of the grid
Note Color - assigns differing colours to each note; if this is not active, all notes appear as one colour
Value Color - assigns the colours of the corresponding notes to the velocity bars; helpful when you have many overlapping notes but want to adjust their velocities
Drum Mode - displays MIDI Note On events as diamonds instead of rectangles
Zoom - zoom in or out on the grid
Snap - define what division of the beat your notes snap to, or turn snapping off entirely
Scale - change the key signature or type of scale being used
Refresh - causes the MIDI Editor to redraw in the event of latent images
Preview Notes - toggle whether or not you hear the notes of the scale as you input or move notes on the grid
Follow Playhead - define whether the MIDI Editor grid scrolls with the playhead when you are playing the track
There are many MIDI hardware tone generators available from a variety
of manufacturers such as Yamaha, Roland and Korg. In Qtractor,
information about the sound patches and sound banks of these tone
generators is obtained from “instrument definition” (.ins)
files. Qtractor supports instrument definition files used by the Cakewalk/Sonar MIDI sequencer
software, offering a convenient MIDI bank-select/program-change mapping
for existing MIDI instrument patch names and easier, intelligible
selection of MIDI track channels. Files for many popular MIDI tone
generators and synthesizers can be downloaded from the Cakewalk
site.
.ins files are imported via the View /
Instruments… window. You can also import MIDI Name XML
files (.midnam) in the same way. Once you’ve imported a
file, select your desired patch via the Bank and
Program options in the MIDI /
Instrument area of the Track window. After
clicking OK, the information will appear in the main
view. Instrument patches can also be assigned via several other
menus:
When working with soundfonts (for example, via the FluidSynth DSSI, or
Calf Fluidsynth LV2, plugins),
you can also use the View /
Instruments… window to import their patch names. Simply
select the desired .sf2/.sf3 file and its
patch names will be imported. For DSSI plugins, changing the patch
information in the Track window should update the
relevant information in the plugin’s GUI automatically and vice-versa.
However, this may not be the case for LV2 plugins (due to the LV2 spec,
rather than any issue with Qtractor) - if there is a mismatch between
the patch set in the plugin and the information in the
Track window, upon re-loading the session the patch in
the track may override that of the plugin. To avoid this behaviour, in
the Track window set MIDI / Instrument
to (No instrument) and Bank and
Program both to (None), then perform all patch
selections directly in the plugin.
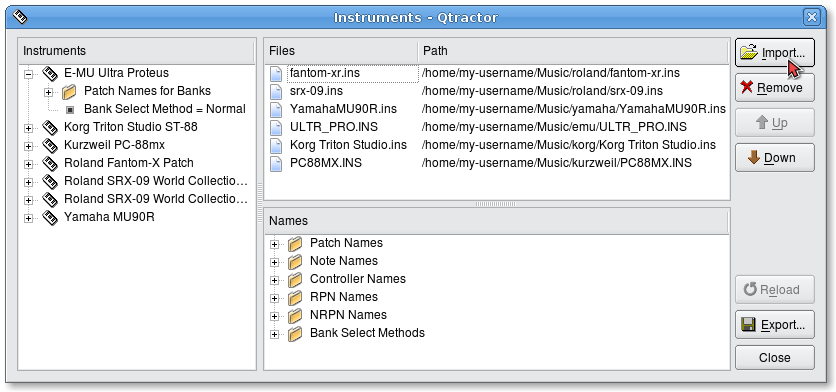
Instruments window, where MIDI instrument definition files, MIDI Name XML files and soundfont patch names can be imported, exported and moved
Strictly speaking, software synths, or “soft synths”, are not part of Qtractor. However, it is common to use them within Qtractor. Acquiring free soft synths online is a simple matter of locating them via the project’s homepage, your distribution’s repositories, or sites such as sourceforge.net.
Soft synths for GNU/Linux come in a few varieties:
Standalone synth applications that launch separately from Qtractor, but which plug into JACK so that they can be used as sound sources within Qtractor. One such example is Qsynth, written by the same programmer as QJackCtl and Qtractor
DSSI Plugins, which are launched and controlled entirely from within Qtractor. For example, Fluidsynth DSSI
LV2 Plugins, which are launched and controlled entirely from within Qtractor. For example, synthv1
VST Plugins. The format from Steinberg does in fact support Linux technically, but there are few Linux-native VST synths
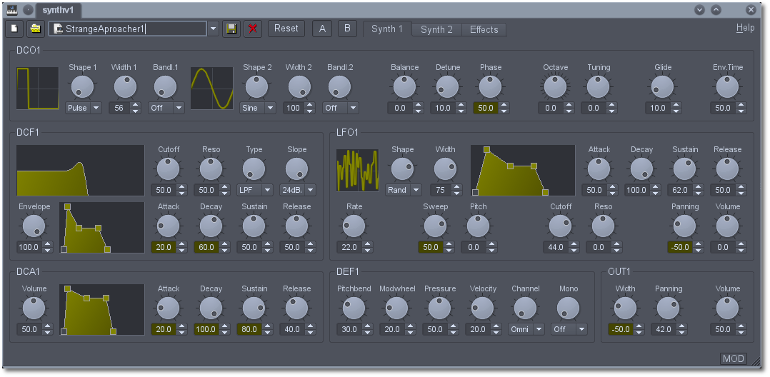
synthv1 - a soft synth available in both standalone and LV2 plugin forms
Once your synth of choice is installed, the method of launching it will depend on what form it is. If it’s a standalone application, it can be launched like any other application on your system. If it’s a plugin for Qtractor, launch Qtractor and create a new MIDI track, then choose your soft synth for the MIDI Instrument, as described here.
Using soft synths as LV2 or DSSI plugins is probably the easiest model, as it does not require any additional routing through JACK. The synth is integrated into Qtractor’s interface, the sound is directed to the appropriate track, and the fact that you are using a separate application is almost entirely abstracted away from you. For more information on using plugins, see the Plugins section.
Most soft synths have some level of control over the sounds they produce. To edit a synth’s properties:
Choose View / Windows and open the Mixer
In the panel towards the top, locate your synth and make sure it’s on (designated by a green lamp on the left of its name). If the lamp is black (synth turned off), click it so that it turns green
Double-click on the soft synth to open its settings window and change the desired parameters. The actual information presented will differ depending on the synth
Whether you use LV2, DSSI or VST plugins, the process for using a soft synth (or plugin effect) is the same. In addition, all parameters provided by the interface can be automated, enabling attributes like LFO or resonance to change over time during playback. For more information on this see the Automation section.
The other kind of software synth you might use is a stand-alone synthesizer, such as Qsynth. To use such a synth, launch QJackCtl and Qtractor, then launch the synth the same as you would any other application on your system.
Once you’ve launched your synth it will become a source for audio and a destination for MIDI signals in Qtractor. However, you must first verify that your settings are correct:
Open the View / Windows / Connections menu
The Audio tab contains all possible sources of audio. If you’ve launched QSynth, for example, it will be listed in the left column. Also listed will be Qtractor itself, since it too produces sound. In the right column are the audio destinations available. At the very least, you should see Qtractor’s Master In and your computer speakers (labelled as System > playback). By default, the sound from Qtractor’s Master Out is patched to System > playback so that you can hear everything that Qtractor’s Mixer manages
This is where the workings of your own studio set-up should be considered. The audio from your synth can logically be patched into either Qtractor’s Master In, so that its sound can be recorded into an audio track, or System > playback, if you have an external mixer or recording device that will be recording it. To patch the sound from the synth to its destination, click the left channel of the synth output (in the left column), then the left destination channel (in the right column), then the Connect button. Repeat this for the right channel if stereo is required
This takes care of routing the audio; now you must route the MIDI signals controlling the synth. Here again, there is no “right” way to route the flow of data - you must be somewhat familiar with the equipment and workflow you are implementing and decide for yourself how you want it all to work together. However, a general method of working is described below:
Open the View / Windows / Connections menu
The MIDI tab contains all possible sources of MIDI signals. At the very least, your stand-alone soft synth will be listed in the left column. If you have a USB MIDI controller, it too will be listed. Qtractor itself and a MIDI Through channel will also be listed. In the right column are the sound destinations available. At the very least, you should see Qtractor’s Master and MIDI Through, together with any soft synths you are running
Connect the MIDI signal from Qtractor (in the left column) into your soft synth (in the right column) so that the data in your MIDI tracks will trigger the synth’s sounds
If you are using an external USB MIDI keyboard controller, you will also likely want to route its signal into Qtractor’s MIDI input so that you can input notes directly into your Qtractor MIDI tracks
There are two typical scenarios for dealing with audio in Qtractor and, indeed, for most digital audio workstations:
Import existing audio files from your hard drive, a recording device, or a loop collection
Record audio into Qtractor via your computer’s built-in microphone or an external microphone
These methods of acquiring sound for your work can be, and very often are, combined to create a richer audio production.
The easiest way to get sound into Qtractor is to import an audio file from your hard drive. Whether you are using sampled loops to construct a new musical piece, or importing a performance transferred from a recording device, importing audio in this way does not involve recording sound directly into Qtractor.
To bring audio into your project file, right-click in the
Files pane and select Add Files or use
Ctrl+F. Choose which file or files you wish to import from
the file chooser window that appears. To place an audio file in a track,
drag and drop it from the Files panel into the workspace. You can add it
to an existing track, or drop it directly into an empty workspace area
and a new track will be created automatically.
Note that when importing an mp3 file and adding it to the timeline, you may find that the waveform shows extraneous silence at the end. This is a known problem with mp3 files and it is especially prevalent with those encoded in VBR (variable bit rate) mode. To fix this, just delete the file from the timeline, then re-drag it back onto the timeline and the waveform should display correctly.
Recording audio into Qtractor requires a microphone and at least one audio input channel. Many laptops and webcams have built-in microphones, so, in theory, you could use this as an input source, but for best quality, purchase an external microphone and use it as your audio capture device.
For simultaneous multi-track recording, rarely will the sound card that was bundled with your computer be sufficient. Almost all sound cards embedded on motherboards are set to mix the input signals down to a stereo mix. If you wish to record three separate musicians at the same time, each to a separate track in Qtractor, you will require a sound card with separate, dedicated inputs.
The way that Linux displays available sound inputs and outputs can be
daunting at first, until you understand the logic behind it. A Linux
system displays sound devices the same way it displays hard drives and
available network interfaces: the first device (regardless of actual
inputs or outputs available via that device) is labeled
hw0, the next hw1, the next hw2,
and so on. It is safe to assume that hw0 would be the
built-in sound card on the system; being embedded in the motherboard
would certainly qualify it as being the first available sound
device.
So, hw0 represents, in almost every case, your built-in
sound card. hw1 might represent, for instance, a webcam
that you keep plugged into your desktop, and hw2 could
represent, perhaps, a USB microphone or a USB interface that you’ve
plugged in. You can usually determine which device is which by looking
at the vendor name associated with the hw labels; for
example, if you have two devices plugged into your system and one is
labeled Blue and the other H4, then you would
know from these terms that one is your Blue USB microphone and the other
your Zoom Studio H4n.
With regard to outputs, these can sometimes be confusing due to the many possible ways you may wish to output your sound. Typically the stereo mix of your system sound is available as the first two output devices. If you have more than just two speakers and you wish to split your sound to each, then utilize the outputs labeled appropriately (Front, Center and so on). If the sound input and output labels confuse you, take a few minutes to learn them by playing sound on your computer and plugging speakers into each output on your computer. For the inputs, plug a microphone into your different inputs and see where they are received and how they are labeled. It won’t take long before you understand the logic behind the labels, and you’ll be able to use Qtractor all the more fluidly.
There are many kinds of microphones, each intended for certain kinds of sounds and situations, but on a purely technical level, without the question of aesthetics and microphone design, there are only about three scenarios you will encounter:
Microphones with an 8th-inch (also called a mini) jack
Microphones with a quarter-inch or XLR jack
Microphones with USB connectors
The recording process is different, depending on your input type.
If your microphone has an 8th-inch jack, then you can plug it directly into the line-in of your computer. No external sound interface is required. Your built-in sound card is JACK’s default input, so no changes are necessary. If your microphone can easily and cleanly adapt to the standard 8th-inch input with a cable or a simple plug adapter, then you can use this method of recording, as well.
To record from the line-in of your computer into Qtractor:

Connections window, set up to capture audio
Go to the Track menu and choose Add
Track or use Ctrl+Shift+N. In the
Track dialogue box, give the track a name, set the
Type to Audio, and set the Input/Output to
Master. Click the OK button to
proceed
Arm the new track for recording by clicking the “R” button in the track listing on the left of the main Qtractor window. This sets the destination for the recorded sound
Click the Record button in the top toolbar
Click the Play button in the top toolbar
A USB microphone plugs directly into the USB port of your computer. If you input sound through USB, then (obviously) you are utilizing a different interface than your computer’s built-in sound card. This must be set via QJackCtl for appropriate sound routing to occur:
In QJackCtl, stop the sound server by clicking the Stop button
If you have not already plugged in your USB audio interface or USB microphone, then do so. Make sure it’s on
Click the Setup button. In the Settings tab, locate the Input Device setting and click the “>” button to see your choices
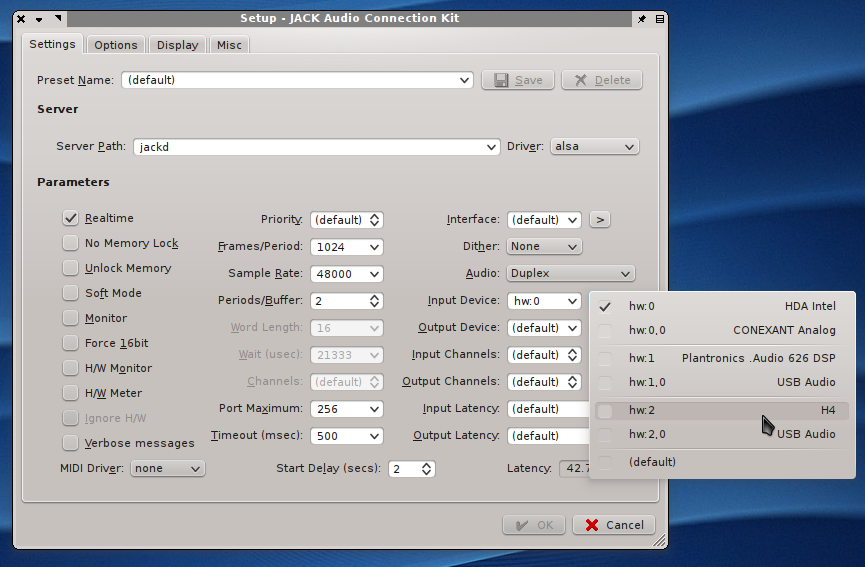
QJackCtl settings window showing Input Devices
Now your USB interface, whether it is a single USB microphone or a 4-channel Audio-to-USB conversion box, is managing your input sources. Plug your XLR microphone into your USB interface, set the interface’s input source as your XLR jack, and then create a new track in Qtractor and begin recording:
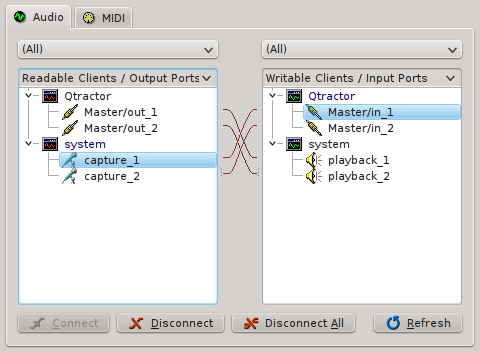
Connections window, set up to capture audio
Go to the Track menu and choose Add
Track or use Ctrl+Shift+N. In the
Track dialogue box, give the track a name, set the
Type to Audio, and set the Input/Output to
Master. Click the OK button to
proceed
Arm the new track for recording by clicking the “R” button in the track listing on the left of the main Qtractor window. This sets the destination for the recorded sound
Click the Record button in the top toolbar
Click the Play button in the top toolbar
Aside from one-take recordings, you can create multiple, continuous takes by using the Loop recording mode. To enable the Loop recording mode, go to View / Options… and, on the General tab, set Loop Recording mode (takes) to either ‘First’ or ‘Last’. This will control whether Qtractor chooses the first or the last take by default.
After you have enabled the Loop recording mode, select a loop range.
To do so, position the Edit markers by left-clicking on the timeline
where you want your loop range to start and right-clicking where you
want it to end. Now select Transport /
Loop (or press Ctrl+Shift+L). This will
create a loop range out of your edit range and enable the loop mode as
well. Just arm the track you want to record to, press Record,
then press Play. Qtractor will start recording, but when it
reaches the end of your loop range it will wrap around and start
recording a new take of your loop range. You can record as many takes as
you wish and decide later which one you like the most.
After having recorded some takes, select your new clip and go to
Clip / Takes / Select
to choose between the different takes. You can also press
Shift+T to iterate through the recorded takes.
It is also possible to combine Punch in/out recording with looped takes recording. Just create a new Loop range as before, then create a Punch in/out range inside your loop range. Recording now starts as soon as the playhead enters your Punch in/out range. Recording stops once the playhead leaves the range, but it will start again, recording another take, as soon as your loop starts over and reaches the punch in point again.
Punch in/out range (purple markers) inside a loop range (green markers)
Takes are implemented in such a way that they are appended to each other. In other words, multiple recorded takes will result in a single clip that contains all takes appended to each other. By having activated the takes mode, Qtractor will show you only a section of this clip with the size of the selected loop range. If you go to Clip / Take / Select and choose ‘None’, Qtractor will ‘unfold’ your takes and show the recorded clip at its full length.
Once you know how takes are implemented, you can create them from any clip you like. For example, select a clip and place the edit markers within a fraction of your clip. If you have a clip that is four measures long, place the first edit marker at the beginning of the clip and the last at the beginning of the second measure. Now go to Clip / Take / Range. In the dialog box which appears, choose ‘Edit’. The box on the right of this will show the resulting number of takes - in this case it will create four takes (one for each measure). Just click on the take you want to select. As you can see, takes can be created with a variety of ranges - just use the one that fits your needs best.
Finally, be aware that take state information is kept only for the original recording track location. If you change or cut any of the folded clip-takes all take state information will be lost (though such operations can be undone, as normal). If you move a clip to another area of the same track, then select a different take, the clip will “snap” back to its original position. If you move a clip to another track, take state information will be lost. Note that even if information has been lost in whatever way, you can still drag the clip’s edges to access any hidden takes manually.
All or part of the session may be exported to one audio or MIDI file. To export a file, select Track / Export Tracks / Audio… or MIDI…, or right-click in the tracks area of the main view to access the same menu. This will open either the Export Audio or Export MIDI window.
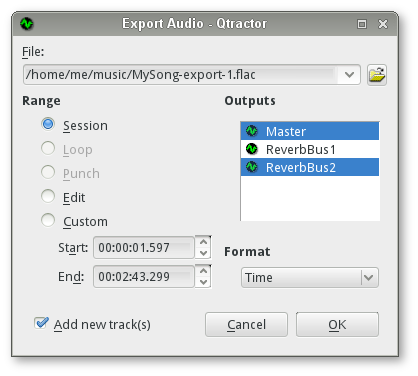
Export Audio window, where the tracks in a session can be exported as a single audio file in the format previously specified by the user in View / Options…
The Range options enable you to specify how much of your session to export. You may export the whole Session; any Loop, Punch or Edit range you have previously denoted with its markers; or an arbitrary Custom period (the format of which can be expressed in Frames, Time or BBT).
The Outputs box allows you to choose which buses to
export. Ctrl-click to select more than one. Note that when
exporting multiple buses, because the buses’ outputs are added together,
the exported file can become clipped. To address this, you may choose
to:
Enabling the Add new track(s) option will automatically import a copy of your exported file into a new track below the currently selected one. This can be useful to “freeze” all or part of your session, mixing down several tracks to one new track in order to lighten CPU load or simply to tidy your workspace up.
MIDI export pertains to MIDI material only and results in the merging and concatenation of the selected MIDI tracks and clips into a single file of either SMF Format 0 (all tracks reduced to a single track) or SMF Format 1 (multi-track).
Audio export is implemented through the special JACK freewheel mode and is thus faster than real-time, resulting in a complete and exact mix-down of the selected audio material into a designated audio file of the selected format (wav, aiff, flac, au, ogg etc.). It is also possible to export the output of MIDI tracks directly as audio (with standard audio tracks also included in the exported file, if desired) using the same Export Audio window, provided that the MIDI tracks’ audio is generated by plugin instruments. For MIDI tracks which are used to send data to external instruments driven by JACK-MIDI or ALSA-MIDI (the output of these instruments then being routed back into Qtractor), it is necessary to “bounce” their output to audio tracks within Qtractor before export. The process of bouncing is covered in this How To.
The user-preferred format for exported audio and MIDI files can be set in the Options window (View / Options…).
After the initial save of your project, you may find later that you want to save multiple “snapshots” of a session to compare it at different stages. To do this, click File / Save as… and Qtractor will add an incremental number to the end of your file name. Once saved, you can then switch freely between these snapshots by opening the relevant file.
Be aware that snapshots saved in the standard session file formats (.qtr or .qts, which are essentially the same) save only references to clips, rather than the clips themselves. Because of this, “destructive” edits (such as changing the notes of a MIDI clip) will be reflected in all snapshots. For example, if you have a MIDI clip in snapshot 1, then create snapshot 2 and make changes to the notes in that same clip, when you re-load snapshot 1, the changes you made in snapshot 2 will now be present in snapshot 1 as well. If you wish to avoid this and preserve all of your clips in a separate snapshot, use the .qtz archive format, which will safely bundle its own versions of all the clips (see also 4.13.3. Archives below).
Templates are an extremely useful time-saving feature, which enable you to restore many settings automatically for use in a new project, thereby eliminating the need to re-configure tracks, buses, connections etc. each time. To create a template, once you have your session set up the way you want it, choose File / Save As and save the file in the .qtt format. This file can then be loaded in the same way as a standard session. Template files reproduce all the original session’s settings, without any MIDI or audio data, leaving you ready (or at least part of the way ready) to begin a new project. Exactly what you include in your template will depend on your needs, but you’ll begin to discover what these are as you use Qtractor. You can save any number of templates to cover whatever kind of projects you need.
If you find that you’re using the same template often, you may choose to have it auto-loaded for every new session. To enable this, choose View / Options… and, in the General tab, specify your template in New session template.
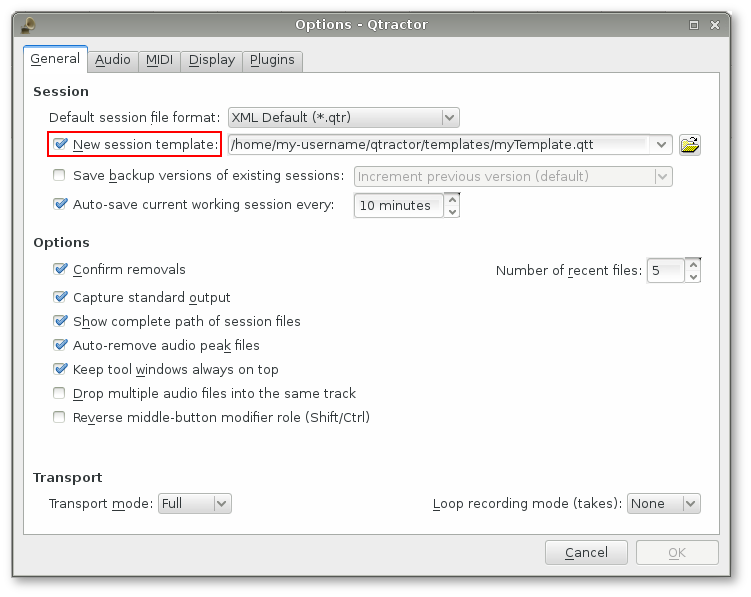
The Options window
Qtractor has a zipped archive format, .qtz, which collects together all the information needed to reproduce the session elsewhere, such as settings, connections, plugins (LV2 only) and all MIDI and audio files (minus any which have been disassociated with the session via the Cleanup option in the Files pane). This format can be used to share your Qtractor project with other people, or simply to tidy up a session which contains extraneous files.
Note that even if you save an archive with a different file name the
original session’s Properties will remain as they were, meaning that any
clips subsequently recorded will still bear this old name in their file
name. For example, if your original session has “Song_A” as the Name in
its Properties and you save an archive of, then work on, the new session
as “Song_B”, all new clips will continue to be called
Song_A-trackName-1.mid etc. If you want the new session
name to be reflected in the file names of both new and existing clips,
open the File / Properties… /
Session menu and update the name in the
Name: box. Qtractor will then update the session’s midi
and audio clip file names to match this name.
When recording audio or MIDI data in real-time, a metronome can be very useful for keeping your performance in time. Qtractor has both audio and MIDI metronomes. The audio metronome generates its sound within Qtractor; the MIDI variant requires an external sound source, such as a standalone soft synth. You can even use both metronomes at the same time if desired.
To set up a metronome, open the View / Options… menu.
If you’re working with noticeable latency in your system, the Offset (latency) option, available for both audio and MIDI metronomes, allows you to compensate for this.
Percussion sounds are often employed for a metronome, though what you
use is entirely your choice. For the audio metronome, if you have no
suitable files to hand you can search the internet or use the ones from
this thread on
rncbc.org. For the MIDI metronome, if you want percussion sounds and
you’re using a General MIDI-compliant bank, set Channel to
10, which is the channel for percussion.
In order to hear either metronome while the transport is rolling you must turn it on. To do so, click the blue triangle icon in the top menu bar, or select Transport / Metronome.

The Metronome icon
Keyboard shortcuts are useful for the power user, in that they provide a quick mechanism for performing often used commands quickly, without the use of your mouse. Shortcuts can also be assigned for MIDI Controllers.
Keyboard shortcuts may be customized to your preference by using the shortcuts editor. This editor may be found in the Help menu (Help / Shortcuts…). Note that there are two separate shortcuts windows - a general one, accessed from the main window and a MIDI Editor-specific one, accessed from the MIDI Editor window.
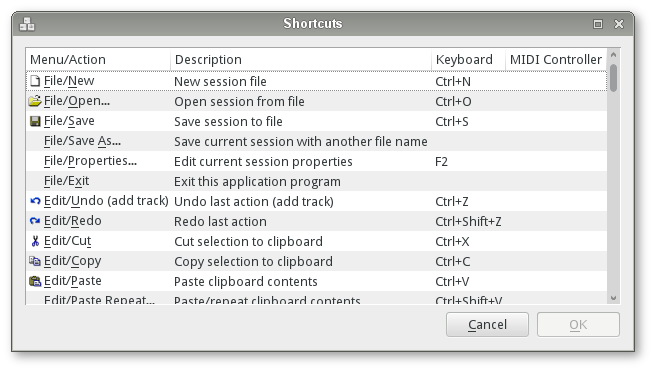
Keyboard Shortcuts Editor window, available from the Help / Shortcuts… menu item
It is very straightforward in its use. Simply find the item you want to create a shortcut for, left-click in the shortcut cell, and choose the key you wish to be assigned to that function. You will then see whatever key or key combination you chose appear in the context. The “X” icon on the right of the window can be used to undo any changes or remove a default shortcut.
Take care when using shifted combinations, as if that combination
produces a non-alphanumeric character it may not function as a shortcut.
For example, Shift+1 will likely end up as a symbol such as
“!” in the menu and, upon attempting to use this combination as a
shortcut, it will not work. Alt and
Ctrl-modified shortcuts should, however, be fine.
Qtractor will display a warning message if you try to duplicate a shortcut in the same menu, but not if you use the same shortcut in both the main and MIDI Editor menus. Instead, a warning message will appear in the Messages window. This warning is driven by the Qt framework and is, unfortunately, outside of Qtractor’s control.