 Qtractor An Audio/MIDI multi-track sequencer
Version 0.3.0
December, 2008
by
Rui Nuno Capela
James Laco Hines
Stephen Doonan
1.1 Abstract
1.2 Introduction
2.1 About Compiling Qtractor from its Source Code
2.2 Preparation–Required and Optional Prerequisites
2.2.1 Mandatory Software
2.2.2 Optional Support Libraries (at build time)
2.3 Downloading Qtractor
2.3.1 Qtractor for Everyone
2.3.2 Qtractor for the Experienced and Adventurous
2.4 Compiling and Installing Qtractor
2.4.1 Standard Compiling and Installation
2.4.2 Compiling for Native Linux VST Support (optional)
2.4.3 Compiling Qtractor with Debugging Code Included
2.5 Qtractor’s Configuration Settings File
2.6 Audio and MIDI Input
3.1 Preparation
3.2 Importing an Audio File
3.3 Connecting the MIDI data source to Qtractor
3.4 Creating a MIDI track
4.1 Routing–Connections, Ports, Tracks and Buses
4.1.1 Routing–General Concepts and Information
4.1.2 Routing in Qtractor
4.1.3 Routing–Technical Notes
4.2 Qtractor’s Main Window and Work Area
4.3 Understanding a Qtractor Session (recording or editing)
4.3.1 Session Audio Sample Rate
4.3.2 Session Properties including Time Signature and Tempo
4.3.3 Session Options
4.4 Files
4.5 Clips
4.5.1 Clip Summary
4.5.2 Audio Clip Properties
4.5.3 Clips and Tracks
4.6 Qtractor Main Workspace–Tracks Area
4.7 Mixer
4.8 Connections Window
4.9 Audio Effects Plug-ins
4.9.1 Summary
4.9.2 LADSPA
4.9.3 DSSI
4.9.4 VST (Linux Native)
4.10 MIDI Instruments
4.11 MIDI Editor
4.12 Audio / MIDI Export
4.13 Keyboard Shortcuts Editor
5.1 File Menu
5.2 Edit Menu
5.3 Track Menu
5.4 View Menu
5.5 Transport Menu
5.6 Help Menu
6.1 References
6.2 Colophon
6.3 Contact Us
Qtractor is a multi-track Audio and MIDI recorder and editor. The program is written in C++, and for the GUI (graphical user interface) elements, the Qt4 Toolkit and Qt Designer are used. Qtractor is free open-source software, licensed under the GPL, and the project welcomes all collaboration and review from the Linux audio developer and user community in particular, and the public in general.
Currently the Qtractor project has one developer, the originator of
the project, Rui Nuno Capela. Development was started April of 2005,
initially as a Qt3 application. Since October 2006, it is officially a
Qt4 [2](2.html) application.
The initial target OS platform is Linux, in which ALSA (Advanced
Linux Sound Architecture [4](4.html)) and JACK (the Jack
Audio Connection Kit [3](3.html)) form the supporting
infrastructure for recognizing sources of digital audio and MIDI
(musical instrument digital interface) data, communicating with those
sources and routing the data to and from various locations and programs
(applications, including Qtractor) both inside and outside the computer
and involving both software and hardware interfaces.
The goal is to develop Qtractor into a more and more full-featured and robust digital audio/MIDI workstation, especially appropriate for personal home recording studio use.
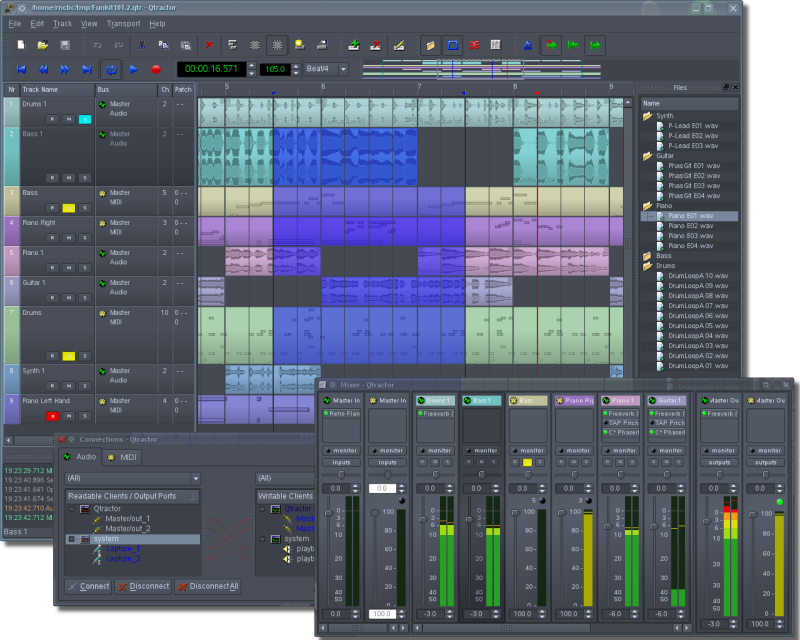
Illustration 1.1: Main GUI window showing audio & MIDI tracks, Mixer & Connections windows
Although Qtractor will become more and more full-featured as it is developed, it can already be comfortably used by hobbyists as a personal home recording studio or “bedroom studio.” It can record, import, arrange and edit both digital audio and MIDI data. The functionality of Qtractor is contained within a graphical desktop environment that will be familiar to users of other popular multi-track recording/editing applications on any computer operating system, and follows the same design principles with many of the same or similar elements. In addition to recording digital audio and MIDI, Qtractor provides an environment for multi-track clip-oriented composing techniques common in modern music-making and aims to be intuitive and easy to use, yet powerful enough for the serious recording enthusiast.
Note: Qtractor is not what is known as a “tracker” type of audio/MIDI application, although it has the potential to function in that way if needed.
When used merely as an audio and/or MIDI recorder (a MIDI recorder was historically called a “sequencer”) or arranger, Qtractor is non-destructive, which means that the underlying files that contain the audio or MIDI data are not altered when those files are apparently cut into pieces, duplicated, pulled or pasted into a different order in time, or manipulated in any number of ways within the main Window (GUI interface) of Qtractor. However, when used as an audio or MIDI recorder, for example, or when editing previously recorded MIDI data in the dedicated MIDI editor, Qtractor’s actions can be destructive in the sense that newly recorded data (or altered MIDI data) replaces previously recorded data on the same track.
If Qtractor is not available as a package for your particular type of Linux (a .deb package for Debian, Ubuntu or other Debian-based system or an .rpm package for Red Hat, Fedora, SUSE, etc.), then it must be compiled into an executable application from its source code (from the C++ programming code in which Qtractor is written) before it can be installed. In that case, one’s computer must have an appropriate compiler program installed (such as G++, the GNU C++ compiler) in order to compile the C++ source code of Qtractor.
For those who have experience compiling programs, the following preparation and instructions based on autoconf will be familiar. The process is fairly easy and straightforward, but both the process and the “build environment” (a collection of programs necessary for compiling) can be confusing for those who are not experienced, so those persons may wish to learn a little about the process first. There are many books and online resources such as Linux forums, email lists, wikis that can be consulted and used to learn how to compile and install programs’ source code.
In order to compile the source code of Qtractor to create an executable program, as well as to run Qtractor, some software must be installed (the mandatory software listed below) and some may be installed if the user wishes to enhance the abilities of Qtractor (the optional support libraries).
Qt 4 (core, gui, xml) - C++ class library and tools for cross-platform development and internationalization http://www.trolltech.org/products/qt/
JACK Audio Connection Kit http://jackaudio.org/
ALSA - Advanced Linux Sound Architecture http://www.alsa-project.org/
libsndfile - C library for reading and writing files containing sampled sound http://www.mega-nerd.com/libsndfile/
LADSPA- Linux Audio Developer’s Simple Plugin API http://www.ladspa.org/
If the functionality that these additional software libraries provides is desired for Qtractor, they must be installed before Qtractor itself is compiled from its source code.
libvorbis (enc, file) - Ogg Vorbis audio compression http://xiph.org/vorbis/
libmad - High-quality MPEG audio decoder http://www.underbit.com/products/mad/
libsamplerate - The secret rabbit code, C library for audio sample rate conversion http://breakfastquay.com/rubberband/
librubberband - Rubber Band Audio Time Stretcher, an audio time-stretching and pitch-shifting library http://breakfastquay.com/rubberband/
liblo - Lightweight OSC implementation (needed for DSSI GUI support) http://liblo.sourceforge.net/
DSSI - An API for soft synth plugins with custom user interfaces http://dssi.sourceforge.net/
VST-SDK - Steinberg’s Virtual Studio Technology http://www.steinberg.net/
Qtractor is still in its alpha stages of development, but is already
fully functional. The latest versions are publicly available from the
qtractor.sourceforge.net project web site [1](1.html):
http://qtractor.sourceforge.net/
The “bleeding-edge” source code may be found in the CVS repository, through anonymous (pserver) access with the following instructions:
At the command line (in a text terminal or terminal window) login to the CVS repository:
cvs -d:pserver:anonymous@qtractor.cvs.sourceforge.net:/cvsroot/qtractor loginWhen prompted for a password, hit enter and proceed for check-out (all in the same line):
cvs -z3 -d:pserver:anonymous@qtractor.cvs.sourceforge.net:/cvsroot/qtractor co qtractorPrepare the configure script on the just created
qtractor source tree directory:
cd qtractor

make -f Makefile.cvs
Hopefully, the source tree will be now ready for build and installation.
After downloading Qtractor and decompressing and extracting the archive if necessary (with the applications gzip and tar, for example), change directory in a command-line terminal to the resultant qtractor directory. Once inside the qtractor directory, type and enter the following command:
./configure && makeNOTE: To see all configuration options before entering the command sequence above, type
./configure -helpAfter typing the configure and make commands and waiting until the program has finished being compiled, become an administrator of your system (using either the sudo or su command to become, temporarily, the user “root”) and finish the installation by entering the following command:
make installwhich will copy the qtractor binary executable (the Qtractor application or program) and associated desktop and icon files to common standard system locations.
VST is a “Virtual Studio Technology” developed by Steinberg Media Technologies GmbH for their own proprietary audio and MIDI applications. VST support is not very easy to accomplish and is suggested only for experienced users. Because of licensing issues for this proprietary software, one must download the VST SDK (software developer’s kit) from the Steinberg Media Technologies GmbH website, specifically searching in the third-party developers section. It doesn’t matter whether you choose version 2.3 or 2.4 of VST, but choose one and only one. Do not use VST 3.0. It will not work.
In order to download the VST SDK zip-archive you will have to accept the license and supply some personal data, then download and unpack (de-compress and/or de-archive) the pertinent program header files, which are found in one of the directories listed below.
VST SDK 2.3:
Directory:
vstsdk2.3/source/common/
Files:
aeffectx.h
AEffect.h
VST SDK 2.4:
Directory:
vstsdk2.4/pluginterfaces/vst2.x/
Files:
aeffectx.h
aeffect.h
Just copy the two files to somewhere else in your computer’s directory structure. It is recommended that you copy those files into a standard “include” directory (eg. /usr/local/include or /usr/include), in which case all will be handled “automagically” by the ./configure build step. Otherwise you’ll need do supply the path yourself, as in:
./configure -with-vst=/path/to/vstsdk2.x/includeOnce Qtractor is properly compiled, you will probably want to download some native VST plugins. But Qtractor must be told where it can find these VST plugins. To accomplish this, currently you’ll need to set (create and assign a value to) a variable known as an “environment variable.” The variable must be named VST_PATH and the value assigned to this environment variable must be the path (location on the computer) where the VST plugins have been placed. You can do this by entering the command (in a command-line terminal or terminal window):
export VST_PATH=/path/to/vst_pluginsSome ready made Linux VST plug-ins can be found on the following web sites:
Although Qtractor is a mostly stable program, there could be problems that eventually show up. This short guide will explain to you how to build Qtractor with debugging code built in, making it easier to locate where the code exhibits problems.
Rebuild it all from scratch, with:
./configure --enable-debug && makeEnable core dumps in a shell session:
ulimit -c unlimitedFrom the same shell command line, run the program until it crashes. You’ll see something like this in the output when it happens:
Segmentation fault (core dumped)
Locate the dumped core file. Depending on your environmental settings it might be just named core or something like core.1234 (1234 is the process-id number of the crashing program) located on the last directory the program was current.
Load the core dump file into gdb:
gdb ./qtractor /path/to/coreAt the gdb prompt just enter:
gdb> btor:
gdb> thread apply all btQtractor keeps a separate set of its run-time settings and configuration state (a “memory” of certain settings) for each person who uses Qtractor, in a file located in the user’s home directory as in the following example (on your computer the word “user” in the example would be replaced with your own user name):
/home/user/.config/rncbc.org/Qtractor.conf
Normally, there is no need to edit this file because it is recreated and rewritten every time Qtractor is run.
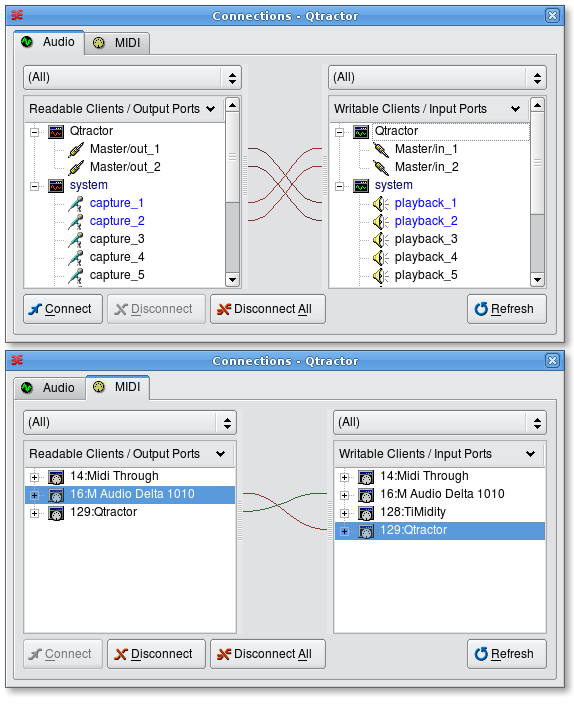
Illustration 2.1: Qtractor’s Connections window, showing both the Audio and MIDI tabs; “readable” ports are sources of data (where audio or MIDI data can come from) while “writable” ports are places that data can be routed to (sent to).
Qtractor can record both digital audio and MIDI data, but it does not know what audio or MIDI data you wish to record nor does Qtractor automatically make any connections to sources for that data. Instead, you must route audio and MIDI data to Qtractor manually, like building a pipeline from the source of the audio or MIDI to Qtractor. Qtractor includes a utility for doing this: the Connections window, pictured below. But Qtractor and its Connections utility depend upon the supporting software infrastructure mentioned previously, composed of ALSA and Jack, in order to both recognize sources of data and to receive data from those sources. ALSA is responsible for knowing about and communicating with audio and MIDI hardware and some software, and Jack is used for routing audio and MIDI data to and from various hardware and software “ports” within the computer or attached to it. Both ALSA and Jack, working together, make it possible to route audio and MIDI data to Qtractor. You simply must remember to connect at least one source of that data to Qtractor first, before you can record some of that data in Qtractor.
This chapter is written for those who may not be very familiar with digital audio recording or MIDI “sequencing” applications, or who wish to gain a quick overview of how Qtractor works and can be used before exploring the program in greater depth and learning its features in detail. It describes an example Qtractor session and serves as a walk-through of the program. The reader can follow the writer as he creates a Qtractor session and uses Qtractor to record, import and edit MIDI and audio data.
You’ll use Qtractor to record or import several tracks of MIDI and audio data. A MIDI-triggered tone generator (in this case, a rack-mounted tone generator outside the computer, although it could just as easily be a “soft synth” inside the computer) will produce the sound for the MIDI parts as Qtractor plays them back. The audio tracks will be either recorded from some external source, or pre-recorded audio files will be imported into, played back and edited in Qtractor. A final “mix down” audio track in Qtractor will contain the combined audio result of playing back and simultaneously recording the other audio and MIDI tracks.
The first thing you would like to do is to import a pre-recorded audio file of drums and other percussion, to form the basis of the rest of the recording session.
 Your MIDI piano-like keyboard normally routes its MIDI data (created
when you strike the keys, for example) to its own internal tone
generator, which then sounds like you’re playing a real piano, or
electric piano, harpsichord, bass guitar, etc. However, for this project
in Qtractor you want to route the external keyboard’s MIDI data to
Qtractor. So, using a standard MIDI cable you connect the keyboard’s
MIDI output to the MIDI input of your sound card, and inside the
computer you will route the MIDI data from the sound card to a Qtractor
MIDI input bus.
Your MIDI piano-like keyboard normally routes its MIDI data (created
when you strike the keys, for example) to its own internal tone
generator, which then sounds like you’re playing a real piano, or
electric piano, harpsichord, bass guitar, etc. However, for this project
in Qtractor you want to route the external keyboard’s MIDI data to
Qtractor. So, using a standard MIDI cable you connect the keyboard’s
MIDI output to the MIDI input of your sound card, and inside the
computer you will route the MIDI data from the sound card to a Qtractor
MIDI input bus.
After connecting the MIDI cables, launch Qtractor, which also launches the JACK daemon (jackd, part of the Jack Audio Connection Kit mentioned previously) if jackd was not already running. Then open Qtractor’s Connections window, pictured in Illustration 2.1, page 9. In the Connections window MIDI tab, connect the MIDI output of the sound card (in the left pane, marked “Readable Clients / Output Ports”) to Qtractor’s listing in the right pane of the window (marked “Writable Clients / Input Ports”). One can connect an output port (the source of the data, MIDI or audio) to an input port (the port that will receive the data), in several ways: one is to highlight a port in the list in the left pane, highlight a port in the right pane, then right- click (third-button-click if a person is left handed and uses a mouse in a reverse configuration) and from the pop-up menu select “Connect;” another way is to click a port on the left side and with the mouse button held down, “drag” the mouse to a port in the list at the right until the port is highlighted, then release the mouse button. Using either method, a line representing a “virtual cable” will appear between the two ports in the middle section of the window.
Then close Qtractor’s Connections window by clicking its button near the top of Qtractor’s main window and workspace.
Now that Qtractor can receive MIDI data, it’s time to create the first track in order to record that data. Right-click in the blank pane at the left in Qtractor’s main window and from the popup menu choose “Add track…,” (or you could choose the menu item Track -> Add Track…).

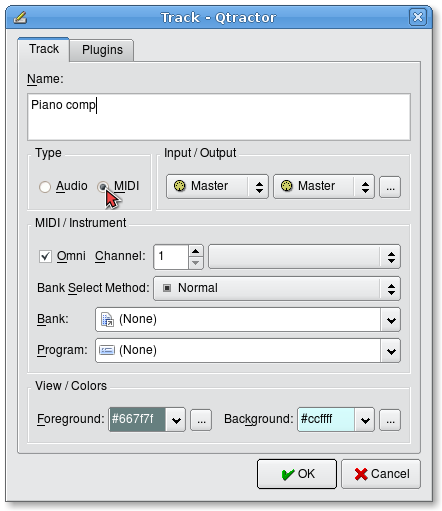
Illustration 3.1: Track Properties window
Qtractor’s Track Properties window opens.
In the Track Properties window, click the MIDI radio button: you want this track to be used for MIDI rather than audio data. As soon as you click the MIDI button, Qtractor automatically connects the track to Qtractor’s master MIDI input and output busses. These can be changed by using the drop-down lists and the ellipsis button in the Input/Output area of the Track Properties window, but there is no reason right now to do so. You can replace the default name “Track 1” with, for instance, “Piano comp.”
Leave the MIDI Channel at the default “1,” although this really makes no difference at the moment because this channel designation is mainly for output. That is to say, when the track is played back and its MIDI data is sent to somewhere outside Qtractor (like to a tone generator or synthesizer) that data will be sent on the MIDI channel specified here (there are 16 possible channels). But you’re going to record now, so the eventual output MIDI channel doesn’t matter and can easily be changed later, after you have recorded all the MIDI tracks you wish to record, and before you play them back.
What does matter however is the Omni checkbox. This setting determines whether Qtractor will record MIDI information received on any MIDI channel (omni means all), or whether (if _un_checked) will record only the MIDI data it receives on the same MIDI channel number as the output channel number displayed just to the right of the Omni checkbox. Your MIDI keyboard might be set to transmit MIDI data on only one channel (e.g., MIDI channel 1), so you have to make sure that each of the MIDI tracks you plan to record will receive data from any MIDI channel (which will of course include the MIDI channel your MIDI keyboard is transmitting on) by selecting the Omni checkbox, despite the fact that all MIDI tracks will later be set to send their MIDI data each on a different channel (channels 1, 2, 3, etc.). Click the “OK” button and a new empty track appears in Qtractor’s main window.
Now is a good time to save this new session, so choose the menu item File -> Save…. This opens the Session Properties window, Illustration 4.4, page 17. In the Session tab of the Session Properties window, give the project (session) a name (Qtractor will append the filename extension .qtr (or .qts) to this name to indicate a Qtractor session file), and you may choose to create a directory for Qtractor to store the MIDI and audio files that will become a part of this project or session. Give the directory you create a name similar to the session name.
Now that the session has been saved, open the Session Properties window again using the menu item File -> Properties. This time click the Properties tab of the window and set both the time signature (roughly, how many beats per measure) and the tempo so that you can use the metronome to help you keep the MIDI parts synchronized as you record them.
You need to arm or set the track ready for recording, by clicking on the “record” button for that track. That button is the “R” button that is present on every track strip, besides the other “M” and “S”, respectively for “Mute” and “Solo” track state settings. You can also set the record ready state for the current selected track by checking the menu item Track -> State -> Record. Either way the “R” button will turn red and the track is then set armed and ready for recording.
Now it’s time to turn on session recording mode. This is accomplished by clicking on the Record button in the main transport tool-bar (big red circle). You can do the same action through the menu item Transport -> Record.
Now you’re ready to record your first MIDI track. Take a little breath and… press “Play”, the space-bar or Transport -> Play menu item: you’re rolling. Hit the MIDI keyboard and see a brand new MIDI clip taking shape while you’re performing.
When done, press “Play” again to stop. Save your session and enjoy.
(continues on qtractor 0.3.0 manual pt2)