 Qtractor An Audio/MIDI multi-track sequencer
(continued from qtractor 0.3.0 manual pt1)
Qtractor can record and play digital data, specifically digital audio and MIDI data. To record, Qtractor must get the audio or MIDI data from somewhere, and to play that audio or MIDI data Qtractor must send it to somewhere that is capable of understanding an audio or MIDI data stream and producing (for example) some sound. The process of directing such digital data to and from– and through–certain software and hardware is called routing, which is simply choosing the route that the data will take. Not much routing is done automatically; most routing is left to the user, because it is the user’s preferences, desires and goals in any specific project that in large part determine how the audio and MIDI data should be routed.
In order to route data, one must have a knowledge and understanding of the various connections and pathways that are available and through which data can flow or be deposited. A bus is like a pipeline through which data can travel. Often, more than one stream of data can flow through a single bus, side by side so to speak. A port is like a valve at one or both ends of a bus. The valve is normally closed, not allowing any data to flow through unless a connection, such as another bus, is made to the other side of the valve. In that case the valve (port) opens to allow data to pass through it from one bus or pipeline into another. However, simply because a connection is made and the port is open doesn’t mean that data is flowing through the available port and buses. The data flow in either direction is initiated by the software or hardware at one or both of the ends of the buses. Often, the data in buses can travel in only one direction. Sometimes it can travel in both directions (duplex mode).
Qtractor has input buses (both audio and MIDI) to which “data streams” from other software or hardware can be connected, and output buses which can be connected to the ports and buses of other software or hardware both inside and outside the computer, using routing procedures explained in this manual.
A track can be thought of as a place where digital audio or MIDI data is deposited rather than a pathway through which such data moves. The data is placed into a track by a recording or paste or import procedure, for example. Despite this, tracks are a part of the signal or data flow, the pathway that audio or MIDI data can take through Qtractor and out of Qtractor, via a bus, to other software or to a hardware port on the sound card installed into one’s computer, for example. The reason that a track is considered part of the signal or data flow is that a track can be examined (by Qtractor) in a sequential fashion to “pluck” a copy of the data from the track and send that data to one or more buses and through those buses to other destinations. During recording, a track becomes the destination for audio or MIDI data coming into Qtractor’s input bus(es). During playback, a track becomes the source of audio or MIDI data that is then sent through a Qtractor output bus to a destination such as to the sound card and its attached speakers.
Routing is very flexible and therefore signal/data flow can become very complex. Data streams can merge and flow through the same bus for a while, or split and go through separate buses to different destinations, or even through different buses to the same destination, meanwhile passing through separate and different intermediate software or hardware environments in which the data is possibly manipulated or altered in some way. Because of this complexity it is beneficial to develop a solid understanding of the issues related to routing and the many possible routes or pathways that data can take, and the many possible connections that can be made, all at the user’s discretion.
Below is a representation of the connections (ports) buses and routes available in Qtractor through which audio or MIDI data can flow.
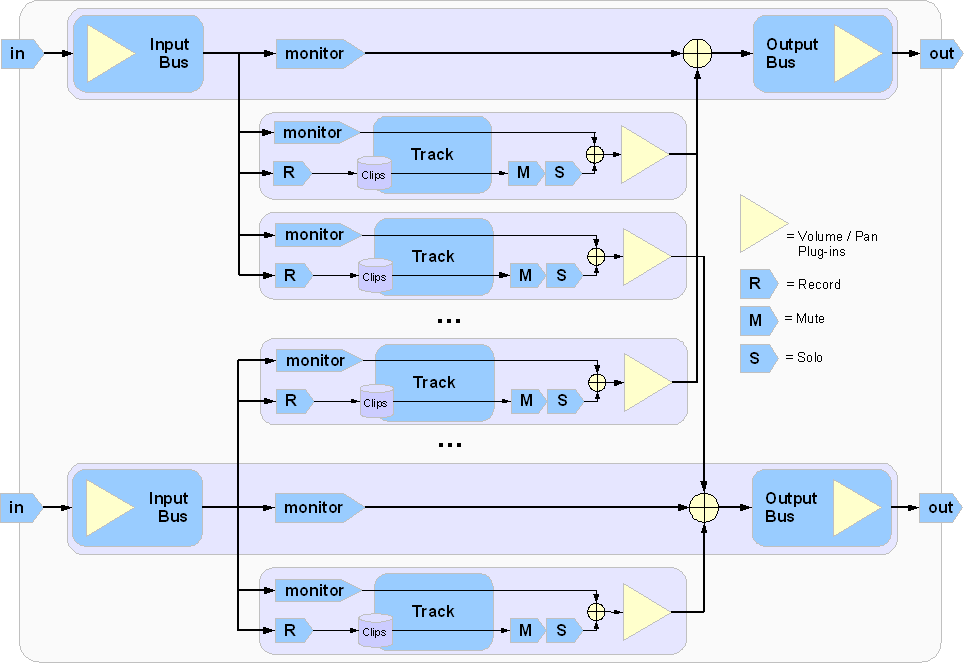
Illustration 4.1: Audio & MIDI data flow, in, through and out of Qtractor
Routing in Qtractor is accomplished in several ways including:
using the Connections window (Illustration 2.1) to connect Qtractor’s input and output buses to outside sources (for “reading” data in order to record it, for example) and destinations (for “writing” data to an outside destination in order to play back and listen to it, for example);
in the Track Properties window (reference to illustration goes here…) where input and output buses are assigned to each track;
changing the “state” of each track (their are four states, explained in detail later: record, mute, solo and monitor, some of which are mutually exclusive and others which are not);
using the buttons “R” (record), “M” (mute) and “S” (solo) which are visible within each track’s entry in Qtractor’s main window;
adding plugins to tracks or buses in the Mixer window or View -> Buses window.
Qtractor is a fairly massive multi-threaded application. For instance, each audio clip has a dedicated disk I/O executive thread, which synchronizes with the master engine and, for all purposes, to central JACK real-time audio processing cycle, through a lock-free ring-buffer. These audio file ring- buffers are recycled (filled/emptied) at one second threshold, and has a maximum streaming capacity of 4-5 seconds of audio sample data. Smaller clips are permanently cached in a RAM buffer.
Audio thread scheduling is mastered and mandated through the JACK callback API model. MIDI clip events are queued in anticipation through one MIDI output thread, which feeds a ALSA sequencer queue, synchronized on one second periods to the JACK process cycle. A single thread is responsible for listening (polling) for MIDI input, and multiplexes all incoming events through record- armed MIDI tracks. Time stamping is done through the ALSA sequencer facility.
Looping is made possible through the audio file buffering layer, right at the disk I/O thread context. The same consideration is adopted for MIDI output queuing. JACK transport support is not an option, as playback positioning is constantly kept in soft-chase fashion. Audio frame relocation is accounted from successive JACK client process cycles (i.e. buffer-period resolution).
On this particular design, JACK and ALSA sequencer ports are logically aggregated as buses with respect to the audio and MIDI signal routing paths, functioning as fundamental device interfaces. Input buses, through exposing their respective input ports, are responsible inlets on capture and recording. Output buses are the main signal outlets and are responsible as playback and, more importantly, as mix-down devices.
Buses are independently assigned to tracks. Each track is assigned to one input bus for recording, and to one output bus for playback and mix-down. The assigned output bus determines the number of channels the track supports. Clips bounded to disparate multichannel audio files, for which their number of channels do not match with proper bus/track’s one, are automatically resolved on mix-down. Illustration 4.1, page 14 shows one typical signal flow block diagram.
Qtractor’s graphical user interface follows a standard design of most modern digital audio and MIDI workstations. The interface is easy and intuitive enough to easily interact with in order to discover the potential of the underlying inner core of the application where its functionality is implemented.
The following illustration shows an overall view of the GUI with an example session loaded into the workspace.
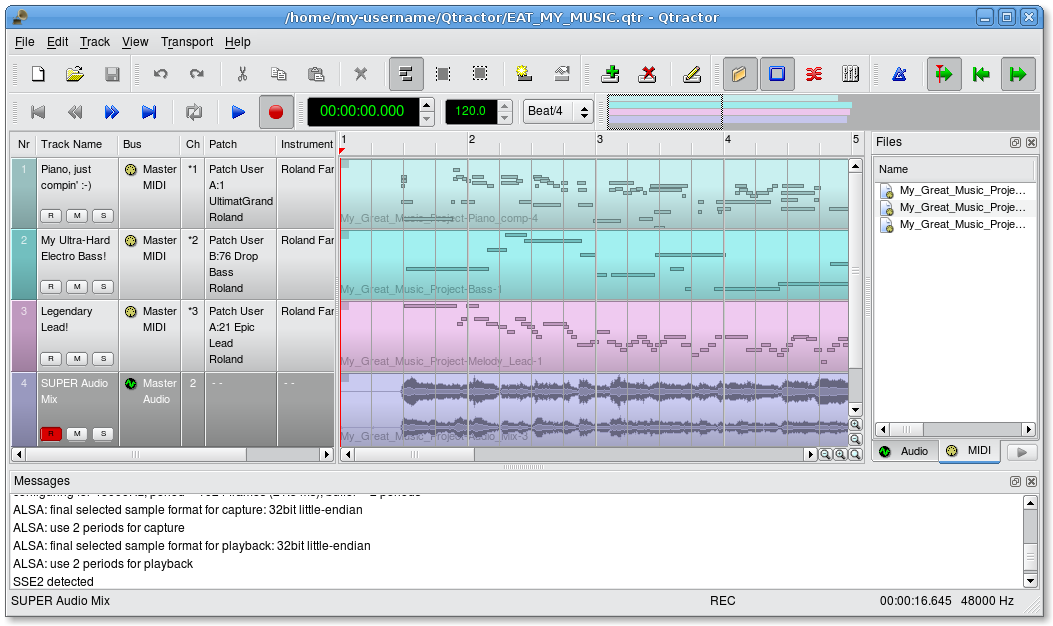
Illustration 4.2: Qtractor’s main window and work area
The main Qtactor window is initially laid out in this fashion:
Menu and Tool-bars at the top
Track list and information at the left
Track (audio and MIDI) data view representation and file list on the right, with time scale above.
The track data view section in the middle is where most of the action takes place. It contains visual displays and representations of audio waveforms or MIDI data. This section is used for editing Clip objects (portions or all of any particular audio or MIDI file, recorded or imported) and for navigation within the project or “session.”
Qtractor also has other useful windows, such as the Mixer window, and the Connections window. Both these windows can be opened using the F8 key for Connections window (the patch-bay), and the F9 key for the Mixer window. These items are also selectable from the View menu.
Two utility windows are additionally featured: the Messages window, specially suited for debugging, and the Files window, where audio and MIDI files are organized and selected on demand.
Dialog windows for editing session, track and clip properties are also accessible in their proper context, which will be discussed in their respective sections.
Finally, session and application configuration options are assisted through respective customizing dialogs: Buses, Instruments and Options, available from the View menu in the main menu bar.
A Qtractor session project contains all the information about all your Clip Objects, placement of Clip Objects, Mixer setup, plug-ins, tempo, time signature and Connections patch-bay. When creating or saving a project, all this, and any related settings are saved on your hard disk within this session project file.
It is important to note that Qtractor sessions are locked to a
session project sample rate. This is dependent on the sample rate of the
JACK [3](3.html) server running at the time the session is
created.
Any attempt to convert non-matching sample-rate sessions will result in a recommendation warning message.
However, individual audio clip files are automatically converted on
playback in real-time to the host sample-rate (via libsamplerate
[8](8.html)). This method, while it works very well, is not
the recommended method due to possible errors in the real-time sample
rate conversion. Real-time sample rate conversion is also going to use
quite a bit more valuable CPU resources.
Rui Nuno Capela is working toward eliminating this shortcoming by taking control of JACK from within Qtractor, and restarting it using the session’s project parameters. This will ultimately reconnect any plug-ins, set the proper sample rate, etc. Until this feature is available, please follow the recommendations listed above.
To access the session properties, choose the File / Properties menu item. Here, you can name your Qtractor session, set the tempo, time signature (how many beats per bar) and decide how many “ticks” (the smallest time unit in a session) will be within the time span of each beat.
Although you may select any time signature and tempo for your session, by present design Sessions can only contain a single constant tempo. Tempo must be regarded as a global setting of a session. Qtractor does not presently support tempo mapping, but may eventually do so.
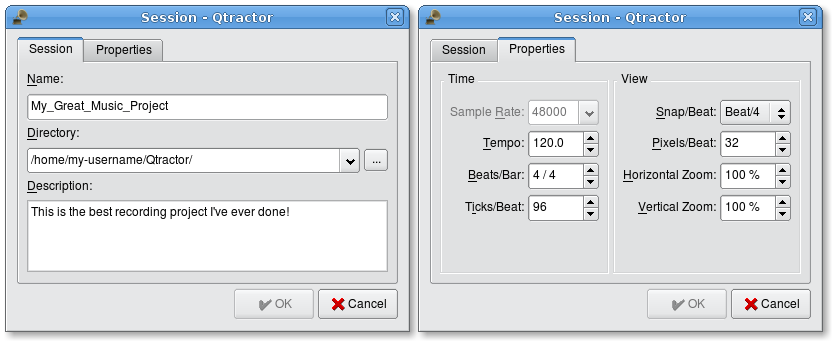
Illustration 4.3: Session properties window showing both Session and Properties tabs
A new feature, which applies to existing audio clips, will reflect
all tempo changes with a corresponding time-stretching effect.
Time-stretching is thus applied in real-time at the buffering level, as
a custom WSOLA algorithm based and derived from the SoundTouch
[12](12.html) library.
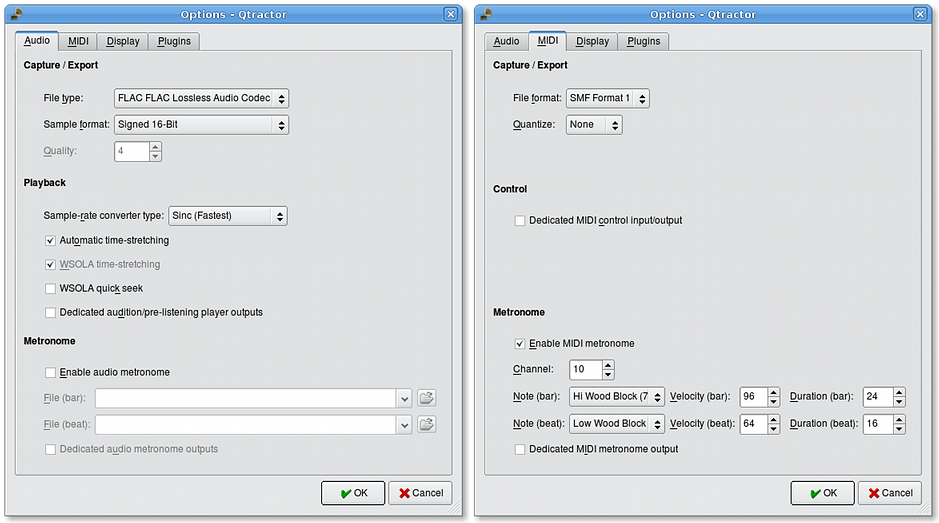
Illustration 4.4: Session Options window, showing both Audio and MIDI tabs (sections)
Access the Options windows via the View / Options menu item. This window, and its tabs allows you to control the global parameters of Qtractor, and these are the default settings which are not saved within your session file.
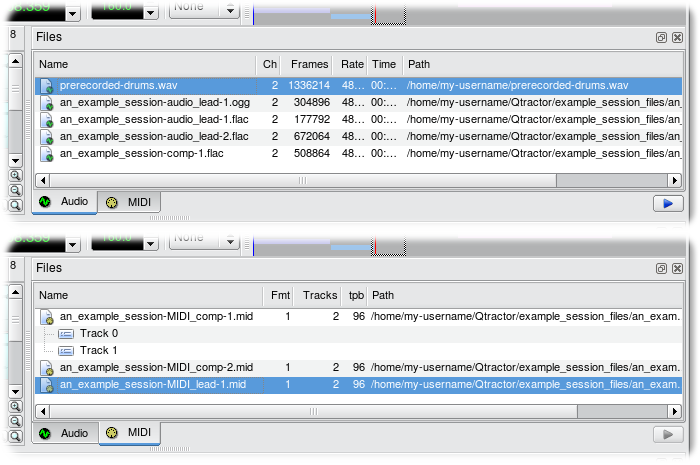
Illustration 4.5: The Files pane of Qtractor’s main workspace; both Audio and MIDI tabs are shown
Sound file selection is made available through a tabbed mini-organizer. Audio and MIDI file lists are kept separate on their respective tabs.
Files can be imported using the menu command Track / Import Tracks / Audio… or MIDI…, or by using the context menu (“right-click” menu) in either the Audio or MIDI tabs of the Files pane and choosing Add Files…. Individual and multiple files can be drag-and-dropped from the desktop environment and within the provided tree list. This lists all the files which are referred in the working arrangement session. File items can be drag-and-dropped directly into the track window, thus creating new clips in the working arrangement. This is mainly used as a your audio/MIDI file data pool.
The Files pool can also allow you to preview the files shown in the windows either by double-clicking the file name, or by click the play button on the lower right hand side of the Files Pool window.
Audio file format support is provided by libsndfile
[5](5.html), and supports wav, aiff, flac, au, etc.
Optional libraries provide support for both ogg and mp3 formats.
libvorbis [6] (ogg) and libmad [7](7.html)
(mp3). MIDI file support covers the usual SMF formats 0 and 1, through a
native, home-brew implementation.
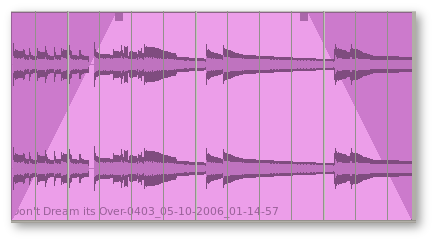
Illustration 4.6: An audio clip, with left and right upper corner handles drawn inward to create a fade-in and fade-out
Clip objects are the elemental items of a session arrangement, and can contain either Audio or MIDI data. A Clip Object is merely a region of an actual sample or MIDI file. A clip object is also non destructive, and can be copied, truncated and time stretched as if it were actual audio/MIDI data.
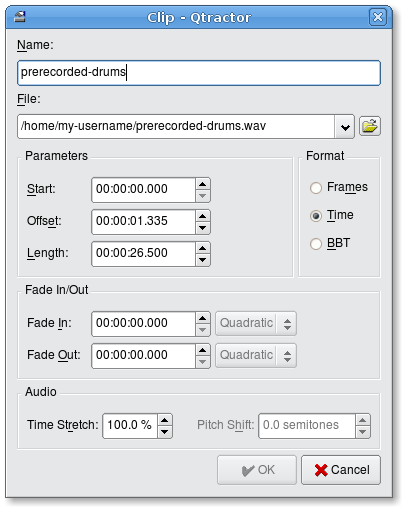
Illustration 4.7: Audio clip properties window, which appears with a double- click or right-click -> Clip -> Edit… on an audio clip’s visual representation in Qtractor’s main workspace
Clip properties include its label (Name), File path, start time (location), offset and length (in frames), fade-in and fade-out length (in frames) and time stretch percentage, respectively, from the start and end of the clip. Although fade-in and fade-outs are always displayed as straight lines, the actual audio volume (gain) and MIDI velocity effect can be opted to be of either linear, square or cubic characteristic, in as for an approximation to the logarithmic model of human ear perception.
Clips are placed on tracks, either by importing audio and MIDI files as new tracks, or by dragging and dropping files into the track-view arranger window. Empty clips may also be created by right clicking on a track, and choosing Edit / Clip / New…. After being placed on their respective tracks, you may perform clip-region operations such as drag, copy, cut, paste, delete, truncate, fade in/out etc. Altering clip fade-in and fade-out is accomplished by dragging the handles (square boxes) on the top ends of any clip. A Clip may be split by positioning the playback head where you want to split it, right click the Clip, and choose Edit / Clip / Split. If you use this often, it is far more convenient to assign a keyboard shortcut to accomplish this task.
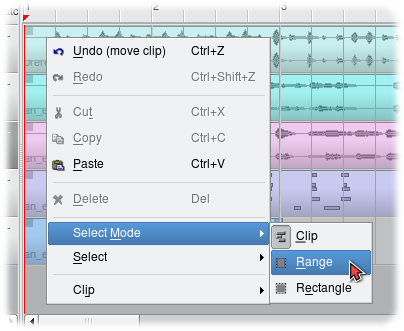
Illustration 4.8: Select Mode context menu (right-click menu)
Most clip editing operations are accomplished through the usual mouse interaction, by first selecting one or multiple clips and/or regions, and applying the edit action upon the resulting selection.
There are three selection modes available: clip, range and rectangular modes (Edit / Select Mode).
In Clip mode, clip objects are selected as a whole with no sub-clip regions possible.
In Range mode, clip object regions are selected on all tracks between a given time interval or range.
In Rectangular mode, only the regions that fall under a rectangular area are selected, this means for adjacent tracks and clips only
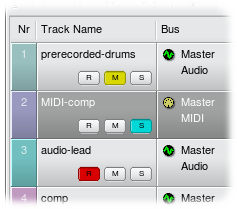
Illustration 4.9: Mute, Solo & Record buttons for individual tracks
Tracks may be armed for recording, making way for creating new audio and MIDI clip files with captured material. Tracks can also be muted and soloed on mix- down, which also applies when exporting. Most editing operations should be possible while playback is rolling (but not completely safe though; there are many procedural helpers, but not completely assisted with lock-free primitives, yet)
MIDI clip objects are representations of a sequence of events of one single MIDI channel, as extracted from a SMF format 0 file or of one single track, as from a SMF format 1, either in whole or in part.
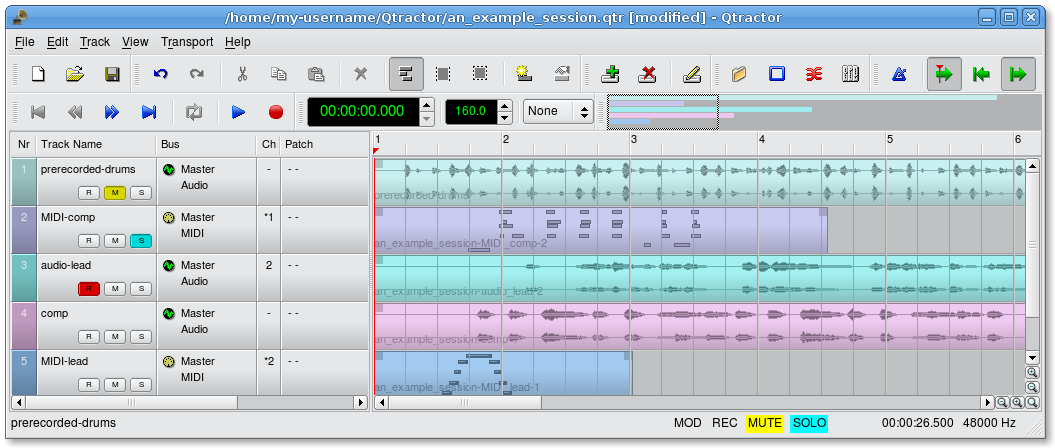
Illustration 4.10: Audio and MIDI tracks in the main workspace of Qtractor
Tracks are arranged as a sequence of one or more overlapping clips of the same file type, either audio or MIDI. The tracks window is the main application workspace, serving as a virtual canvas of a multi-track composition arranger. Most of the editing operations are made on this tracks area of the main workspace window.
The tracks area has two panes, the left one displays the list of tracks with their respective properties and the center-right pane is the main tracks view canvas window where multi-track composition and arranging activity is pictured and performed. As usual, tracks are stacked on horizontal strips and clips are layered on a bi-dimensional grid, in time sequence for each track strip. Time is modeled on the horizontal axis and pictured by a bar-beat scale ruler at the top of the track-view.
Clips may be conveniently aligned to discrete time positions, depending on the current snap mode setting. When not set to “None”, the snapping is always carried out to MIDI resolution, quantized to ticks per quarter note granularity.
Each track has its own user assignable colors for better visual identification. Audio clips are displayed with approximate waveform graphic, with peak and RMS signal envelopes as read from the respective audio file segment. MIDI clips are shown as a piano-roll like graphic, with note events shown as small rectangles, depicting pitch, time and duration.
All session, track and clip editing operations are undo/redo-able. Discrete view zooming and track vertical resizing operations are also available.
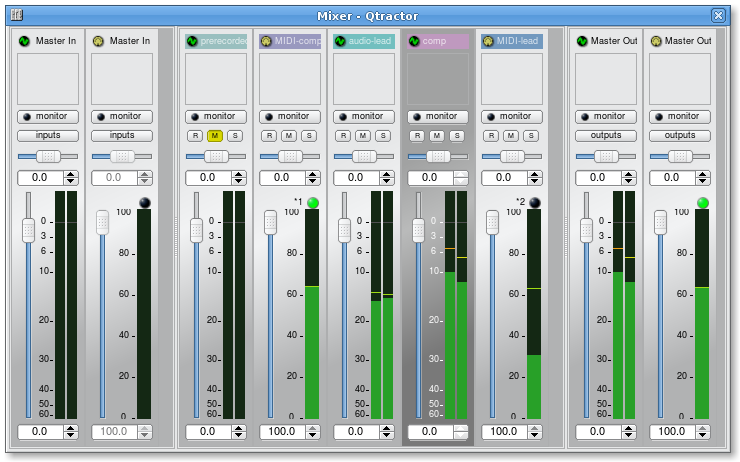
Illustration 4.11: Mixer window
The mixer window serves for session control, monitoring, recording
and assistance in mix-down operations. The mixer is divided in three
panes: the left accommodates all input buses, the center with individual
track strips and the right for the output buses. Each mixer strip offers
a volume and pan control and monitors each one of the respective buses
and tracks. Audio strips also offers the possibility to chain plug-in
effects (LADSPA [9](9.html)).
Monitoring is presented in the form of peak level meters for audio and note event velocity for MIDI, both with fall-off eye-candy. MIDI mixer strips also feature an output event activity LED.
Audio volume is presented on a dBfs scale (IEC 268-10) and pan is applied in approximated equal-power effect (trigonometric weighting). For MIDI tracks, volume control is implemented through respective channel controller-7 and system-exclusive master volume for output buses. MIDI pan control is only available for track strips and is implemented through channel controller-10. MIDI input buses have volume and pan controls disabled.
The Connections window (Illustration 2.1, page 9)serves to establish
the audio and MIDI port connections between the internal core layer
input and output buses (ports), and the external devices or client
applications. Incidentally the Connections window can also be used to
make connections between external client application ports, either JACK
clients for audio, or ALSA sequencer clients for MIDI. In fact, it
almost completely replicates the very same functionality of QjackCtl
[10](10.html). All connections on the existing input and
output buses are properly saved and restored upon session recall.
There are three types of plug-ins supported within Qtractor. LADSPA, DSSI and VST. Plug-in support is available for all audio input and output buses and for all audio tracks. All plug-in types are aggregated seamlessly as one single instance on a multi-channel context and can be individually selected, activated and moved within the plug-in chain order.
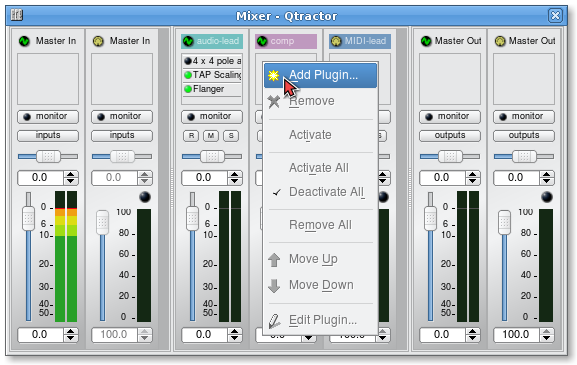
Illustration 4.12: Mixer window showing audio plug-in area at top; plug-ins are added, removed, activated/deactivated, moved in the processing chain and their settings edited using a right-click context menu.
Also, you may drag-and-drop all plug-in instances over the mixer strip channels. You can move, drag and drop inside the same strip or over to, and from any other. You may also copy plug-ins from one channel strip to another as well. A mini menu will ask if you want to copy or move the plug-in. Individual plug-in control parameters can be modified in real-time through provided dialog windows and maintained as named presets for re-usability.
LADSPA [9](9.html) has been the Linux audio plug-in
standard for many years. There are literally hundreds of LADSPA plug-ins
available for Linux. LADSPA plug-ins give the user many standard options
such as Equalization, Filtering, Reverb, Chorus, Amp and speaker
simulation, etc. Qtractor must be told the location (path in the
file-system hierarchy) of the LADSPA plug-ins that have been installed
by the user. This path can be specified in the View /
Options… window, under the Plugins tab (see
Illustration 4.13 below).
DSSI plug-in support is available for DSSI effects plug-ins. DSSI Instrument plug-ins are not yet supported. You must have the core DSSI subsystem installed in order for this type of plug-in to function. When DSSI is present, the DSSI-VST wrapper may also be used. This wrapper uses WINE (http://www.winehq.org) to allow a user to run native Windows® VST applications. The DSSI paths may be set within the View / Options… window under the Plugins tab, or with an environment variable.
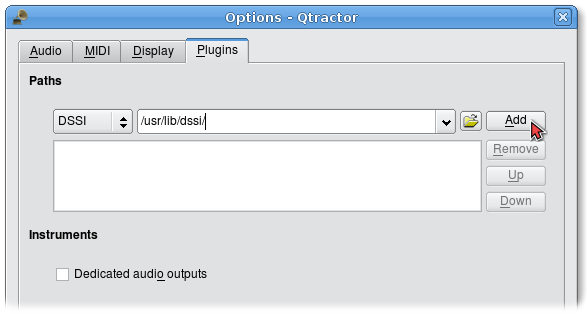
Illustration 4.13: The locations (paths) of LADSPA and DSSI audio plugins can be specified in the View -> Options window, under the Plugins tab.
Native Linux VST plug-in support is also available. Presently, there are only a few native Linux VSTs available, but more should be on the way soon, thanks to some aggressive ongoing projects.
Please see section 2.4.2 for complete information on building Qtractor with native VST support.
Note: Native Linux VST support does NOT include running of Windows® VST plug-ins. Please use the DSSI-VST wrapper when attempting to use this type of plug-in, and make sure your Windows® VST plug-ins are located within your DSSI path environment variable (the variable name is VST_PATH).
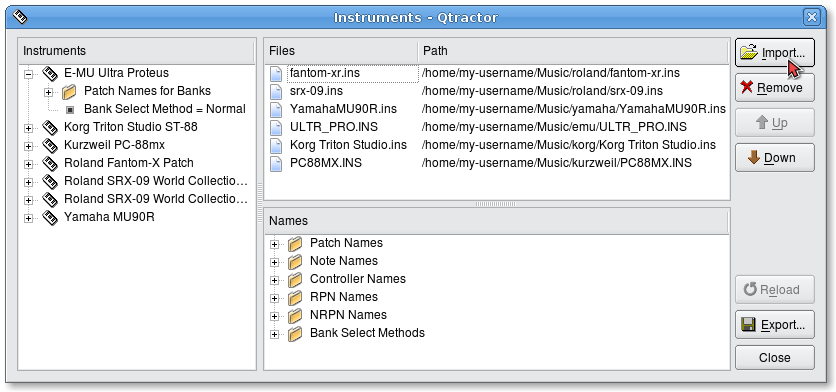
Illustration 4.14: Instruments window, where MIDI instrument definition files, for various popular MIDI tone generators, can be imported, exported and moved.
There are many MIDI hardware tone generators available from a variety
of manufacturers such as Yamaha, Roland and Korg.. In Qtractor,
information about the sound patches and sound banks of these tone
generators is obtained from “instrument definition” files. Qtractor
supports the instrument definition files used by the Cakewalk / Sonar
[11](11.html) MIDI sequencer software, offering a
convenient MIDI bank-select/program-change mapping for existing MIDI
instrument patch names, and easier, intelligible selection of MIDI track
channels. These Cakewalk / Sonar instrument definition files (.ins
files) can be imported using the View /
Instruments… window.
Cakewalk / Sonar instrument definition files for many popular MIDI tone generators and synthesizers can be downloaded from http://www.cakewalknet.com/ in the “Downloads” section of the website.
Each MIDI clip content may be readily edited under a dedicated and fairly complete “piano-roll” type editor,, with individual pitch, velocity and controller, editable trough the usual GUI operations such as: multi-extended selection, drag-and-drop, move, cut, copy, paste, deletion of every event in the MIDI sequence is rightly accessible on the fly.
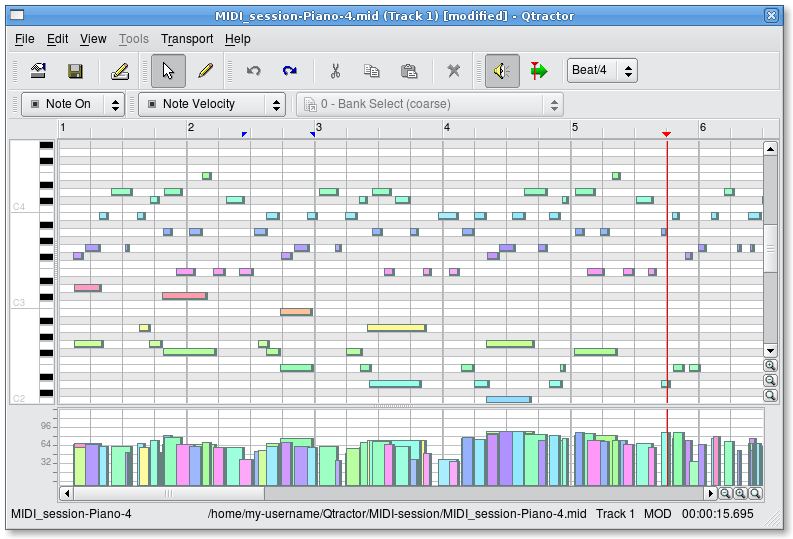
Illustration 4.15: MIDI Editor window, showing notes in a familiar “piano roll” type of graphical display, above, and a graph of their velocities below. The notes and their velocities can be selected and edited in many ways, using the mouse, menu commands and context menus.
Special tools for batch processing are also implemented and applicable to the any event selection: quantize, transpose, normalize, randomize and resize. All MIDI editing operations are available and processed in real-time, effective while playback. Several MIDI Editor instances may be active and open in any time, provided each one refers to its own clip.
All MIDI content may be saved as standard MIDI files (SMF) Format 0 (all tracks reduced to one track, preserving channel assignment data) or format 1 (multi-track). The format for the SMF files (format 0 or 1) may be set in View / Options… under the MIDI tab.
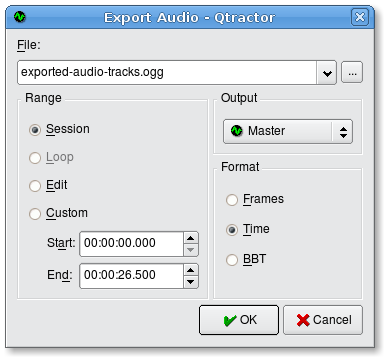
Illustration 4.16: Audio export window, where the audio tracks in a session can be named and exported as a single audio track in the particular format previously specified by the user in the View -> Options window.
All or part of the session may be exported to one audio or MIDI file. Audio export is implemented through the special JACK freewheel mode, thus faster than real-time, resulting in the complete and exact mix-down of selected audio material into a designated audio file of the opted format (wav, flac, au, aiff or ogg). MIDI export is just the same but for MIDI material only, resulting in the merging and concatenation of selected MIDI tracks and clips into a single MIDI file (SMF Format 0 or 1). The user-preferred format for exported audio files (OGG, FLAC, WAV, etc.) and MIDI files (SMF 0, all tracks reduced to single track or SMF 1, multi-track) can be set in the Options window (View / Options…).
Keyboard shortcuts are useful for the power user, in such that it provides for a quick mechanism for performing often used commands quickly, without the use of your mouse.
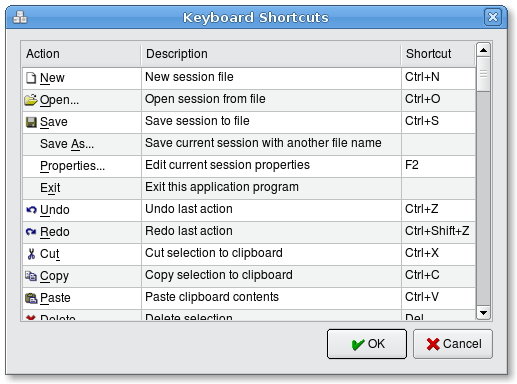
Illustration 4.17: Keyboard Shortcuts Editor window, available from the Help / Shortcuts… menu item
Keyboard shortcuts may be customized to your preference by using the shortcuts editor. This editor may be found in the Help menu (Help / Shortcuts…).
It is very straight forward in its use. Simply find the item you want to create a shortcut for, left click in the shortcut cell, and type on the key you wish to be assigned to that function. You will then see whatever key or key combination you chose appear in the context.
(continues on qtractor 0.3.0 manual pt3)