I've settled on a work flow I'm pretty content with so figured I'd share the details here. The test case is the Odin2 synth which appears to suffer from a bug where MIDI Learn data is not persisted. Under the hood, I suspect the plugin most likely doesn't export the data in a suitable fashion which is preventing DAWs from making use of it in the session. Either way, it doesn't matter what the exact reason is; just to say the situation inspired a need to find a work flow that isn't based on functionality provided by MIDI Learn.
So what's the problem? Well, this particular plugin defaults it's Master Volume to -7.0 dB. I really wanted to find a way to automate setting that Master Volume to 0 dB in order to get the most signal out of the plugin. Initially, I struggled through all the usual methods of using Automation to control that exact parameter but couldn't come up with a predictable method given the lack of any predictable coordination between the value on the Qtractor side vs. the value on the plugin side. It's as if 2 measurement units are being used in an epic battle of failure. What's important here is realizing this wouldn't be about finding "just the right" value on the Qtractor side that resulted in setting this particular plugin's Master Volume to 0 dB since other plugins set their defaults to other values. If I were to settle on the approach of "trial and error" for Odin2, I'd be committing myself to that same grunt work method for other plugins like TAL NoiseMaker and ZynFusion which all default their global/master volume to different values.
A predictable method was needed so here's what I ended up with:
- In Qtractor,, ensure the track volume is set to 100% and the audio bus used to route the plugin's audio is set to 0 dB.
- From the track, open the Odin2 synth. Hold Ctrl and click on Master to set the default (-7.0 dB).
- Setup track automation as follows:
- Select / Odin2 / Master
- Mode should set to Hold
- Enable automation Record
- Enable track record
- Enable transport record and start playback
- While recording, go back to the plugin and double-click on Master. Set to 0 manually and hit Enter.
- Stop playback
- Verify the single piece of automation data has been recorded.
- Enter Select Mode / Automation, select the data point with your mouse by starting the select "loop" anywhere outside of the automation lane and "loop" over the data point. This is a safer method since if you try to click on it, you may accidentally change the value. We don't want that so we drag select loop around it simply to accomplish the goal of selecting the data point. Now, copy and paste. The new data point can be dragged (horizontal movement only) to the beginning of the song. This horizontal movement of a copied automation data point is a terrific feature since it protects the value of the data point from being changed.
- Now delete the original (now redundant) automation data point.
Enable Play in Automation now and the plugin's Master volume will now be set in a reliable and predictable fashion along with the session every time.
Before I continue, I'd like to take the opportunity to point out step 9, despite the safeguards mentioned, still feels like a bit of grunt work. I almost wish Qtractor would allow me to check a box somewhere that accomplished the following (on a per track basis) "First automation data point entered will be moved to start"....... or something. You get the idea. Yes, that wouldn't always be desired which is why it'd be a nice tool to have on a per track basis. In those situations where you are intending to set automation data from the start of a song, the current flow always leaves the end user to figure out a way to manually remediate everything to the left of that first data point.
OK, moving on. Now the plugin's Master volume is calibrated to value of our choosing but how can we go about working with the plugin's volume so we're not stuck at this level?
Enter the Simple Amplifier plugin from swh/lv2

Now we can use this plugin to back away from 0 dB as needed quite easily and drive it with automation as needed.
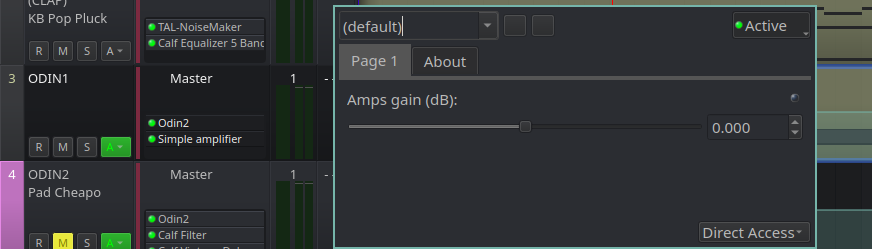
By using the plugin to subtract from the default (0 db), we don't ever have to worry about the exact meanings of how Qtractor represents the data. All we need to do is stay under the default line and automate volume to taste.
This feels usable for a number of reasons (mostly described above) despite it leaving the role of any and all faders pretty much out of things entirely. That's something I'll need to get used to but I suppose it's a worthwhile price to pay.
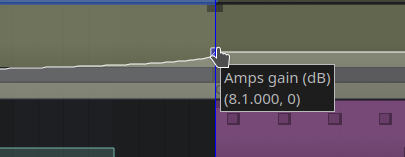
Rui, in the dialog box shown in the second screenshot, I do notice the step values of the slider move in rather large values when driven via the rodent wheel. Is that step value derived in any way from the plugin itself or is that Qtractor? I'm talking about the step of 0 dB -> 14 dB, - 28 dB
With 32 bit internal data
With 32 bit internal data format there is plenty of headroom so you don't have to care about proper levels.
But if you want to amplify an intrument plugin's output you can abuse an Insert.
The dry signal can by amplified up to 4x, thats +12 dB.
re. {rodent wheel} step values of the slider...
hi
step size refinement's been missing since your last call, which was only applied to the mixer strip sliders...
now in plugin's generic editor as well: qtractor >= 0.9.39.34git.47d51b
enjoy
ah so cool. Thank you Rui.
ah so cool. Thank you Rui.
To the compiler!
Just tested it out on the
Just tested it out on the same plugin/slider... It appears to be stepping in increments of 3.5. Is that the intention?
re. stepping increments...
yes, it is now the same to the mixer strip sliders; increments are now shorter; but related to the graphical width or height of the slider, not the specific parameter value range/scale of the subject;
btw. remember, you may press Ctrl to have even shorter steps.
ah ha
ah ha
Add new comment