 Qtractor An Audio/MIDI multi-track sequencer
This How To introduces one possible approach to composing with MIDI tracks. It gives a brief outline of each stage of the process - namely track set-up, composition, recording, external routing and audio export. It’s aimed mainly at beginners who aren’t overly familiar with sequencers/DAWs, but some of the Qtractor-specific information may also be of interest to more experienced users. Note that a number of the tasks mentioned here are already detailed in the wiki, so this How To contains several links to it in order to avoid repeating information.
Different people have different needs in terms of workflow, so this How To is by no means a definitive guide. However, it should hopefully provide some kind of direction for people who are uncertain where to start. Finally, it assumes that you already have Qtractor up and running with JACK etc, so if this is not the case, please check the set-up information in the wiki before continuing.
** NOTE ** This guide was originally written for Qtractor V:0.5.x, when it was necessary to bounce any MIDI data to audio tracks in order to export it. However, it is now (since V:0.6.7) possible to export “internal” MIDI tracks (i.e. those which use plugin instruments, such as the xsynth example detailed below) directly as audio, thus avoiding the bounce step. Nevertheless, for “external” MIDI tracks (those which send data to external instruments driven by JACK-MIDI or ALSA-MIDI, the output of these instruments then being routed back into Qtractor), the below workflow still holds true. It follows that a MIDI session which has both internal and external tracks will necessitate a “hybrid” workflow, wherein you first bounce the external tracks to Qtractor audio tracks, then export these together with the internal tracks.
For internal tracks, the workflow described by this How To will have the following differences:
To keep things simple, we’ll create just two MIDI tracks - Lead and Bass. Create a MIDI track, as detailed here, naming it “Lead”. Then, open up the Mixer, by clicking on its icon.

The Mixer icon
Right-click in the area directly under the “Lead” text, navigate to Audio and choose Dedicated. This will create an output specifically for this track, which we’ll later connect up. Note that you can choose to Auto-connect the output – doing so means that it will automatically be connected to system:playback_1 and 2. Whether you should do this or not will depend on your set-up, but for the purposes of this How To, we can leave it enabled.
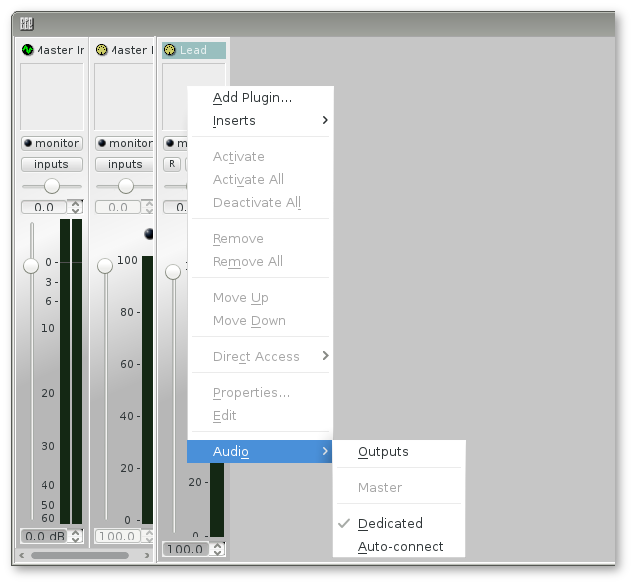
Creating a dedicated output
Then, create another MIDI track, naming it “Bass” and repeat the above.
Next, we’ll create two Audio tracks, to which we’ll later record, or “bounce”, the output of the MIDI tracks. Using the same Track window as you used for the MIDI tracks, this time, select Audio, instead of MIDI, under Type and create a track named “LeadBounce” (there’s no “dedicated output” step here). Once done, create another Audio track, called “BassBounce”. Qtractor should then look like this.
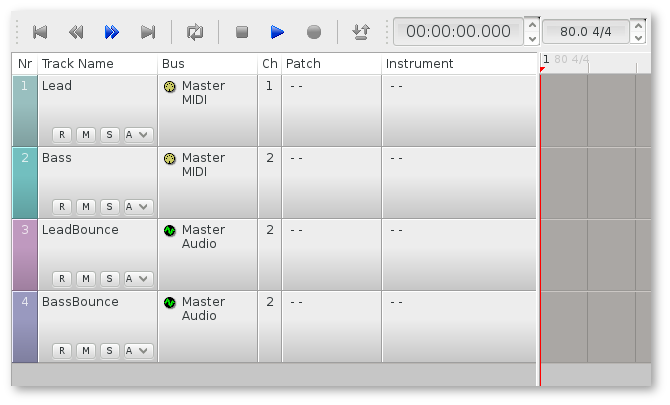
MIDI and corresponding Audio tracks
In order to send the output of the MIDI tracks to their Audio tracks, we use Buses. Buses channel the output from a particular source to a particular destination. For more detailed information on them and on the concepts of routing, please see the wiki.
The method of creating a Bus is covered in this How To. Using these instructions, create an Audio bus, with the Mode set to Input, calling it “LeadBus”. Then, create another in the same way, calling it “BassBus”. As with the MIDI tracks’ dedicated outputs, you can choose to Auto-connect or not (for the purposes of this How To, it doesn’t really matter). Your Bus window should then look like this.
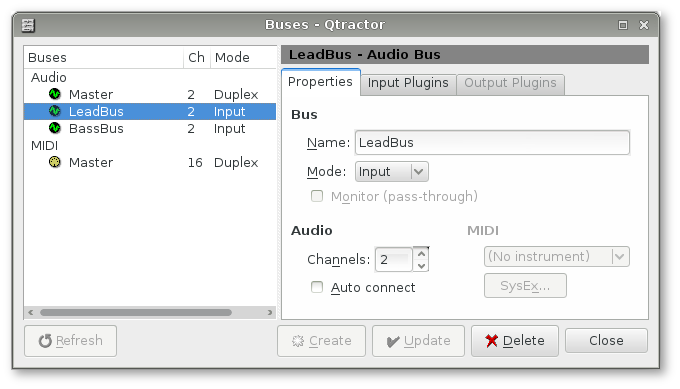
Creating Buses
Note that you can also create mono Buses to record into a mono audio track. To do this, you would set Channels to 1, as covered in this How To.
Although we now have MIDI tracks to compose in, Audio tracks to record in and Buses to route the audio, we won’t be able to use them until we connect everything up correctly. Double-click on your LeadBounce track in the main view and, in the Track window which appears, set its Input to LeadBus.
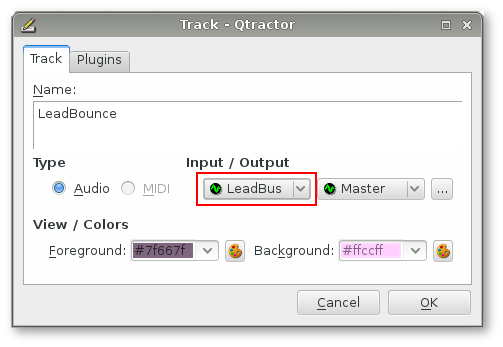
Creating Audio track Inputs
Next, do likewise for BassBounce, connecting its Input to BassBus. Qtractor should then look like this.
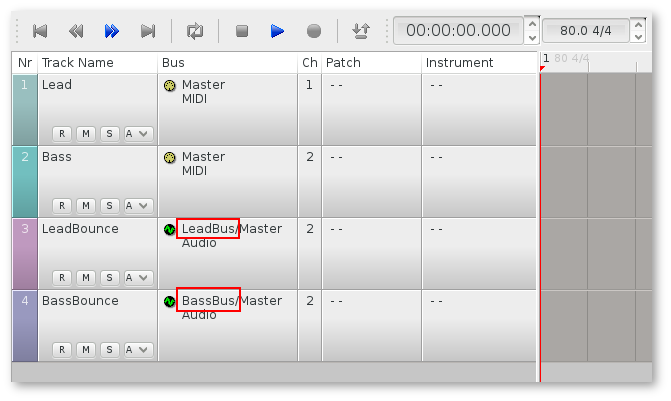
Audio tracks with their Inputs routed from Buses
The Audio tracks are now ready to receive input from their respective Buses, but we still need physically to connect the flow of audio. We do this via the Connections window. Click on its icon to open it.

The Connections icon
If you’ve used QjackCtl (also by the author of Qtractor) you’ll be familiar with the layout. On The Audio tab, connect the Lead and Bass outputs on the left (which are our MIDI tracks’ dedicated outputs) to their corresponding inputs on the right (which are our Buses). You can either drag the connections across, or highlight the source and destination and click Connect. The Connections window should then look something like this.
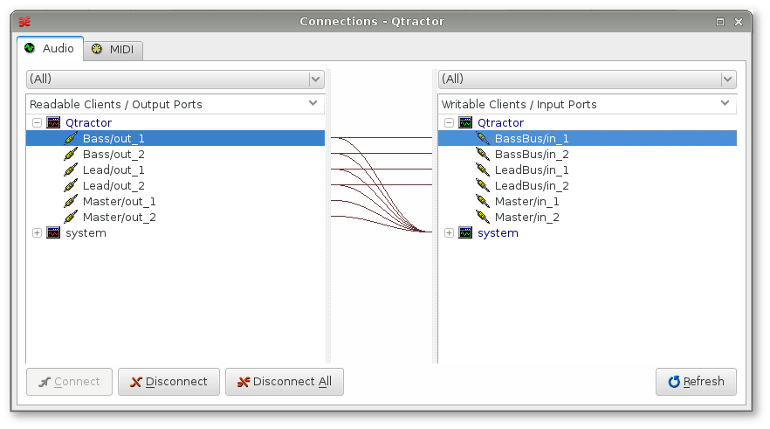
Connections window with Dedicated Outputs connected to Buses
Now, the output of the MIDI tracks will be routed to their respective Buses, which will, in turn, be routed to their respective Audio tracks to be recorded.
Exactly how you go about composing will depend on your needs, but for the sake of this How To, we’ll do things simply and use the soft synth, xsynth (though any other will do). Back in the Mixer window, right-click under the “Lead” text, as you did previously, but this time, choose Add Plugin. This will bring up the Plugins window. Here, you can select from among anything you have installed, of the various plugin types supported (LADSPA, DSSI, VST (Linux native) and LV2). For more details on these, see the wiki. xsynth is a DSSI plugin, so resides in the DSSI tab.
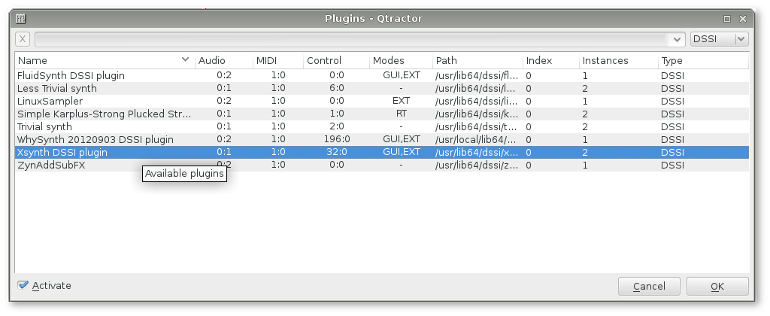
The Plugins window
Choose the synth patch you want via xsynth’s GUI and make sure that the plugin is enabled in Qtractor (green light next to its name in the Mixer). Then, double-click your MIDI track in the left pane of the main view and, in the Track window which appears, select “xsynth DSSI plugin” in the MIDI / Instrument area. The Bank and Program fields should then reflect whatever you chose in the synth’s GUI and, once you click OK, this information should also appear in the main view. For DSSI plugins, you should be able to select patches via either the Track window or the plugin’s GUI, with the other automatically updating, but this may not be the case with LV2 plugins. Please see the note in the wiki about this.
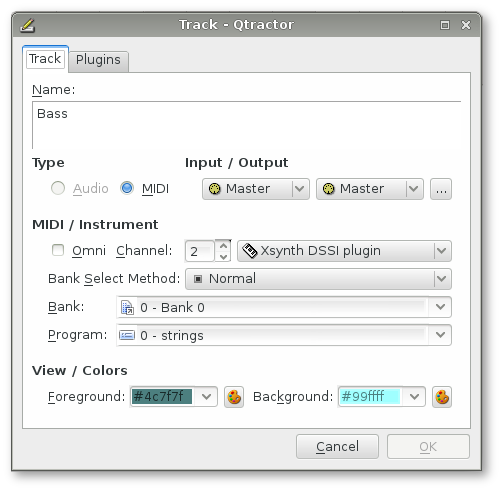
Track window with patch loaded
Once you’ve set up your synth for the “Lead” track as above, repeat the process for the “Bass” track.
*Note that when working with soundfonts (for example, via the FluidSynth DSSI, or
Calf Fluidsynth LV2, plugins),
you can use the View ->
Instruments… menu to import their patch names. To do
so, click the Import button and select the desired
.sf2/.sf3 file; the patch names will then be
imported by Qtractor.
You can also use an external synth, rather than a plugin instrument. If you choose to go down this route, you would use the Connections window to route the MIDI track’s output bus (the default is Master) to your synth and, if necessary, set a specific channel in the Track window described above. Then, again in Connections, you would route the synth’s audio output to your Qtractor audio track’s input bus (in the context of this How To, either LeadBus or BassBus). For more details on using external synths, see the wiki.
Once your synths are set up for both tracks, you can use whatever means you like to compose. You may choose to use an external MIDI controller to play in your performance in real-time, or input notes manually via the MIDI Editor.
Once you’re happy with your MIDI composition, it’s time to record it as audio. Arm the Audio tracks for recording (“R” button on the track, via either the main view or the Mixer), move the playhead (red vertical line) to somewhere before your MIDI composition starts, enable the red “Record” icon, then click the “Play” icon to start the transport rolling (and the “Stop” icon to stop). You can also use the Punch in/out facility to specify where recording starts and ends, setting these points with the Edit-head and Edit-tail markers (blue vertical lines).
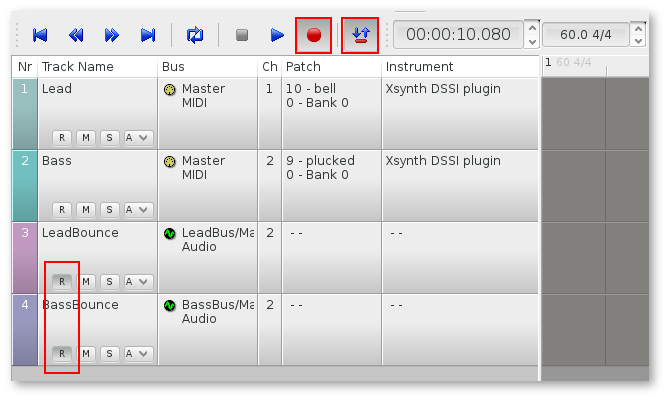
Qtractor set up to record, with Record and Punch in/out icons highlighted
If you’ve done everything correctly, once you start the transport, the signal from the MIDI tracks should be routed via the Buses and be recorded in the corresponding Audio tracks. During the bouncing process there’s always a chance that x-runs can occur, adversely affecting your audio file, so it’s best to check for this. The precise positions of x-runs are unfortunately not marked visually in the track area, but when one occurs a red warning indicator will appear in the session state information at the bottom-right of the screen. X-runs are also logged, together with their time of occurrence, in the Messages pane at the bottom of the screen, so use this as a reference. Once you have your audio safely recorded, you can adjust gain levels, panning etc via the Mixer.

Session state information showing x-run indicator
When playing back your audio tracks, note that you may, depending on your set-up, have to mute the MIDI tracks (using the “M” button), to avoid the audio output doubling up.
In most cases, you’ll want to add some effects to your tracks. This can be done very easily via the Add Plugin menu of the Mixer, as covered in 4. Compose! above. You can also add several plugins to the same mixer strip if desired; they are processed in order from top to bottom. If you need to change the order of an already-inserted plugin, you can simply drag and drop it.
You may also want to send several tracks to the same instance of a plugin in order to share it. This is a reasonably common requirement, particularly for reverb, and is catered for in Qtractor with Aux Sends. Although we have only two tracks here, to illustrate the theory, we’ll use Aux Sends to send the two tracks to another Bus, so that they can share a reverb plugin. First, create a Duplex Audio Bus via the Bus window we used earlier, calling it “ReverbBus”. In the Output Plugins tab, right-click in the blank area, choose Add Plugin, then select the reverb plugin you want to use, making sure it’s active (green light). You can also do this via the Mixer. If you’re not sure which plugin to use, the Calf LV2 set is a decent place to start.
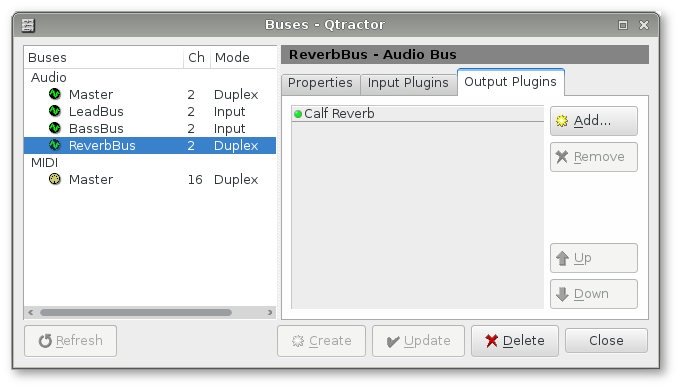
Creating a reverb Bus
You’ll probably also need to connect ReverbBus’ outputs to system:playback_1 and 2, via the Connections window we used earlier, so that you can hear the reverb effect.
Next, in the Mixer, right-click under the Audio track name “LeadBounce” and choose Inserts -> Audio -> Add Aux Send. In the window which appears, set the Aux Send to “Active” (top right button), choose ReverbBus in the Aux Send Bus combo box and choose the amount you want to send via the Send Gain slider. Then, do the same for “BassBounce”.
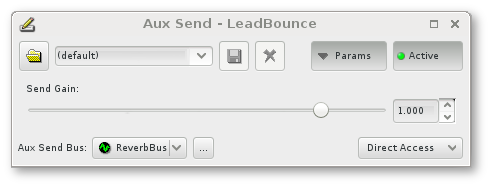
The Aux Send window
What value to set Send Gain to depends on exactly what you want to do and how you have your reverb plugin set up, but the basic theory is to have an “overall” setting in the reverb plugin itself, then adjust the amount you send to this plugin via each track’s Send Gain slider. In this way, you can control the amount of reverb applied, in order, for example, to mimic an instrument’s placement on the stage. Use a combination of Mixer levels, plugin settings and Aux Send gain amounts to achieve the effect you want.
There are a couple of things to be aware of with regard to the way Qtractor routes audio when using Aux Sends:
In Qtractor, Aux Sends are used for routing audio internally, as described above. Inserts are similar, but are used to route audio externally. Once you have your mix set up, you may want to route it to an external source, such as JAMin. The details of how to use JAMin are outside the scope of this How To, but we will cover one way of connecting it up to Qtractor. The manual features some information on how to use the program if you’re unfamiliar with it.
With JAMin running, in Qtractor’s Mixer, right-click below the name of the Master Out Bus (right hand side) and choose Inserts -> Audio -> Add Insert. In the window which appears, set the Insert to “Active” (top right button). Leave Send Gain at 1.000, Dry Gain at 0.000 and Wet Gain at 1.000, unless you have some other set-up in mind.
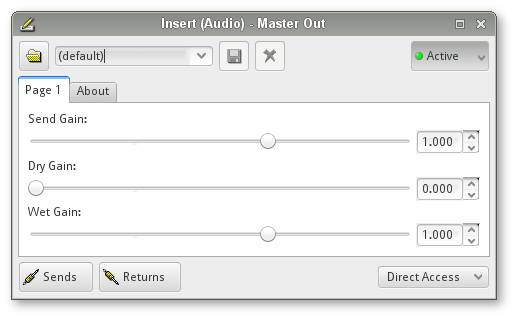
The Insert window
Next, use the Sends button to connect the Insert to JAMin and the Returns button to connect JAMin back to the Insert. These buttons open up the same Connections window we used earlier, so this process should be straightforward. Once you’ve connected everything up, repeat the above process for ReverbBus, but connect only the Sends (leave Returns unconnected). ReverbBus will now have two entries in its Mixer strip – the reverb plugin above and the Insert below. This means that the reverb plugin will be processed first, followed by the Insert, which is the order we want.
The audio from both your Buses should now be routed into JAMin - where you can use its many features to fine tune your mix - then back into Qtractor’s Master Out. In this way, the Master Out strip of the Mixer, at the point below the JAMin Insert, will have a “complete” stereo signal, containing the output of both buses. Beyond (that is, below) this point, you can perform any processing/analysis relevant to the mix as a whole, such as goniometer and mono checks.
Note that upon connecting JAMin up, you may find that it is also
sending its output directly to system:playback_1* and
2, which will cause some unpleasant doubling up of
audio. To fix this, disable the outputs in JAMin, via*
Ports -> Out ->
out_L & out_R.
There’s an important point to be aware of when working with Inserts and other external connections: Qtractor will only restore such connections if they are present when the session is saved. For example, if you proceed as above, save, then close and restart both Qtractor and JAMin, the connection will be correctly restored. However, if you close JAMin first, make a change in Qtractor and save (i.e. with Qtractor/JAMin in a “non-connected” state), upon restarting Qtractor/JAMin, the connection will be lost and you’ll need to make it again.
This behaviour can be avoided by always ensuring that you have your external connections in order before closing Qtractor (easier said than done when using many external applications). It can also be mitigated somewhat by using QjackCtl’s Patchbay feature to make the connections persistent; however, this too is rather unwieldy as it means adding each item manually to the Patchbay. A third approach would be to use a session manager, such as QJackCtl’s Session feature (which employs “JACK session”), or NSM.
We’ve now covered how to set up MIDI tracks, bounce their audio to Audio tracks, add plugins and route the mix to JAMin. The only thing that remains is to export the result into a single audio file. This can be done by right-clicking within the left pane of the main view and choosing Export Tracks -> Audio…. For details on the options available, please see the wiki. In the context of this How To, we’d highlight both Master and ReverbBus in order to export them together.